“I can feel my cilia vibrating!” my wife attempted to shout but was stifled by the rumbling bass blasting from my fresh NVX 10 inch sub-woofer. Last week we put the sub through some serious torture testing while cruising the Las Vegas strip. When we weren’t busy appeasing the solicitations of an occasional taunting speed demon the NVX Powered B.O.O.S.T kit managed to properly drown out the screeches of surrounding chaos. I am not quite positive what the B.O.O.S.T. acronym stands for, maybe Bass, Oh, Oh wait, Shut it down!, TROOPER!? What ever it means, this little beast adds a tremendous boost to the Tesla’s already ‘premium’ but bass deficient stereo system.
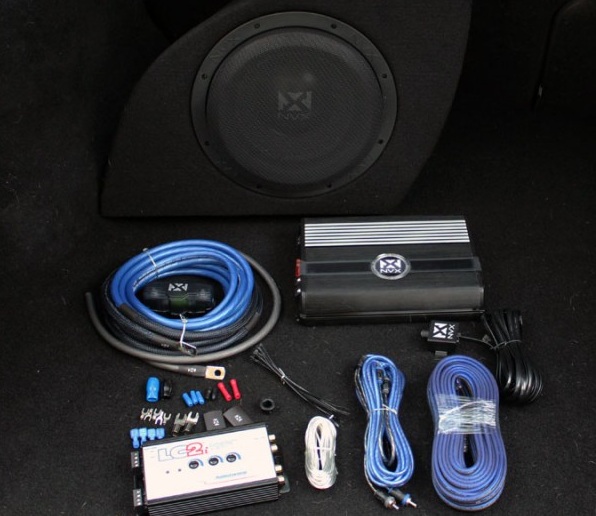
NVX is a relatively young company that produces an assortment of quality car audio equipment down in Southern California. I have been reading great reviews about the NVX products and until recently the only company I was aware of to offer aftermarket Tesla audio upgrades was Reus Audio. The NVX BOOST kit was specifically designed with the Model S in mind. It packs a 10″ woofer in a custom molded fiberglass speaker enclosure paired with a matching compact class D amplifier. A line audio converter and almost all of the necessary wiring to install the booming kit is included.
First Impressions
The package arrived just as I began to change Joules’ into to her set of road trip shoes which increases range by almost 10% over the fancy pair she plays on…but that needed to wait a minute, now I had something better to do….another project, yay!
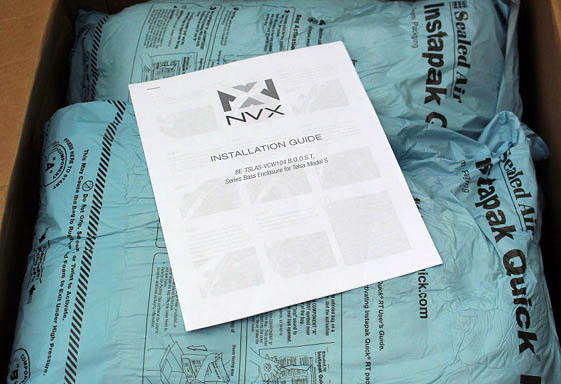
Practically giddy like a kid on Christmas morning, who am I kidding, I might have well ran a few laps around my car! I quickly sliced the packing tape securing the box top revealing a set of NVX instructions for installing the speaker enclosure. These were the only instructions included (besides those of the LC2i). I believe the rest of the kit is meant to be installed by a professional, even the enclosure installation guide recommends using professional help for safety reasons.
[Edit: Installation videos of the NVX system on a RWD and dual-motor D Model S can be found on YouTube.]
Well, lucky day! I just happen to be a Professional Engineer, pretty sure that counts right? Time to get to work!
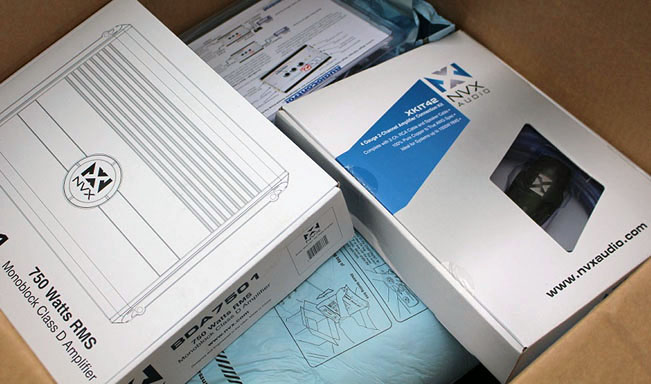
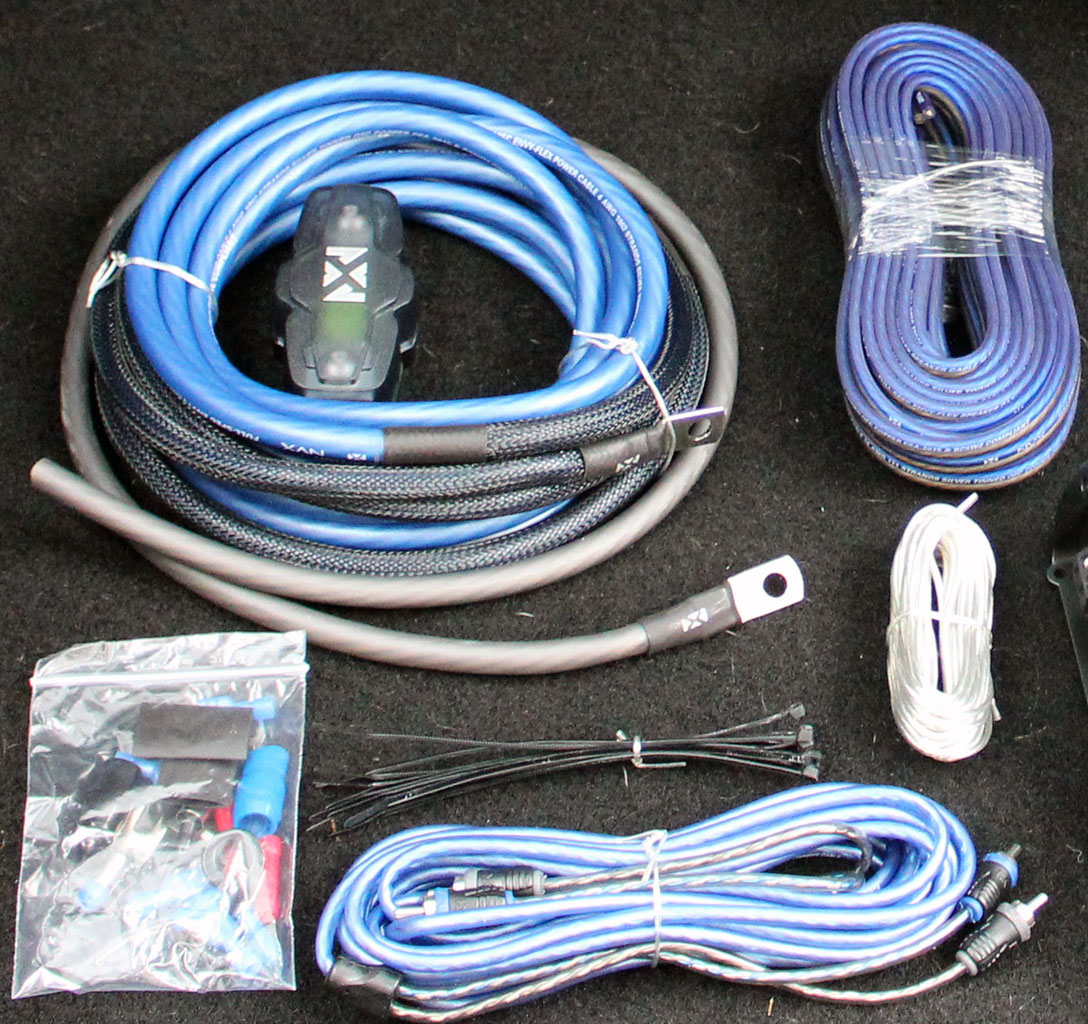
Digging in revealed four separate parcels packed firmly in between ‘instapak quick’ foam blocks. The boxes near the top contained an amplifier, LC2i audio converter and a well prepared wiring kit.
The sub woofer enclosure was wrapped in poly sheeting and wedged tightly in more of the packing foam. Its position low within the package gave the whole box a very stable stance.
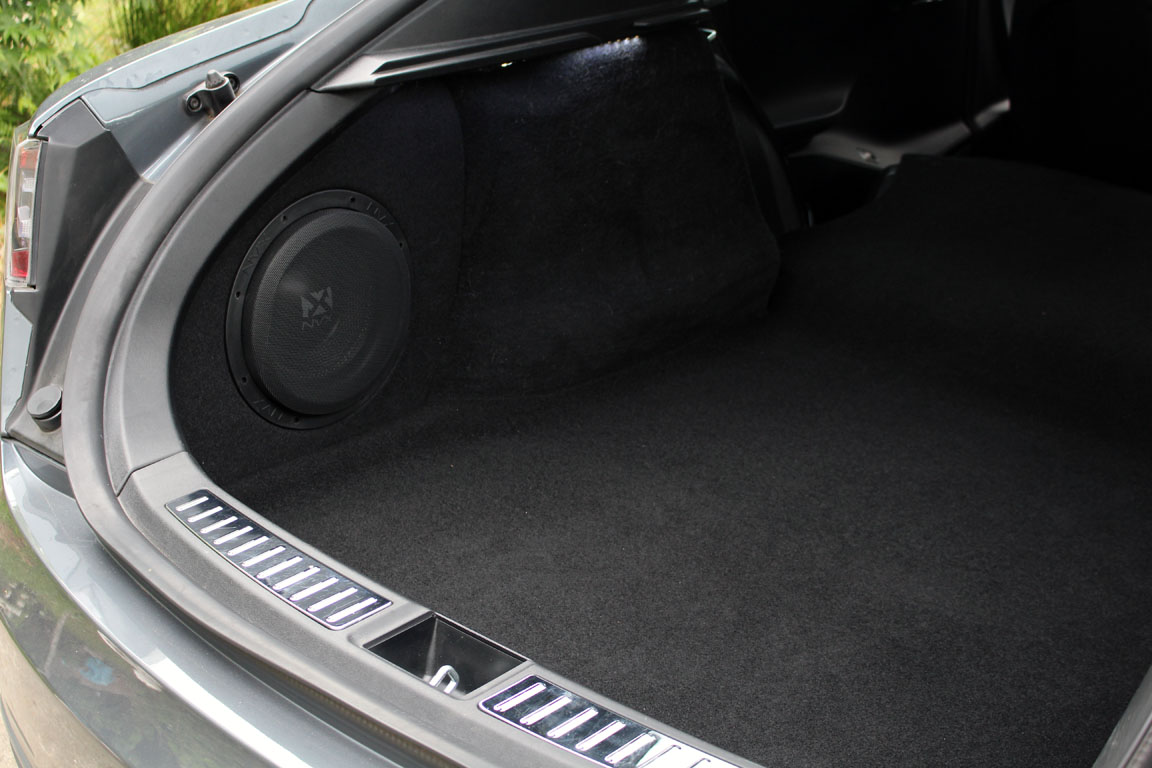
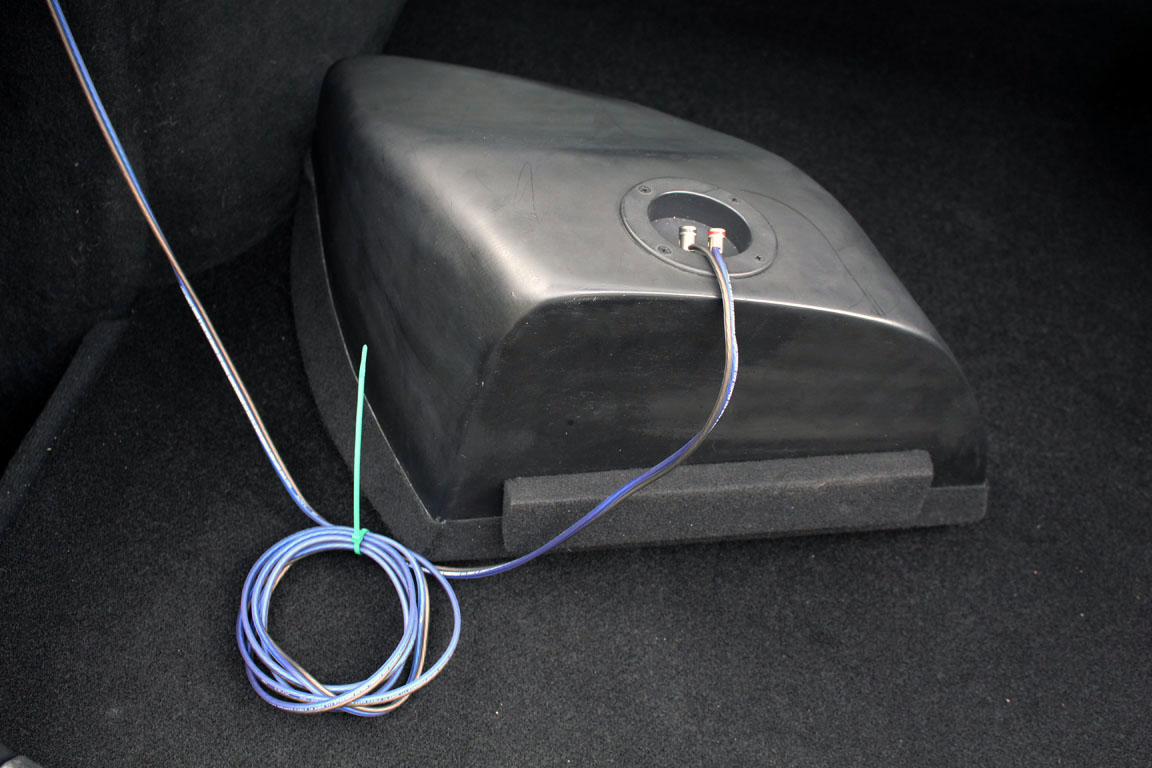
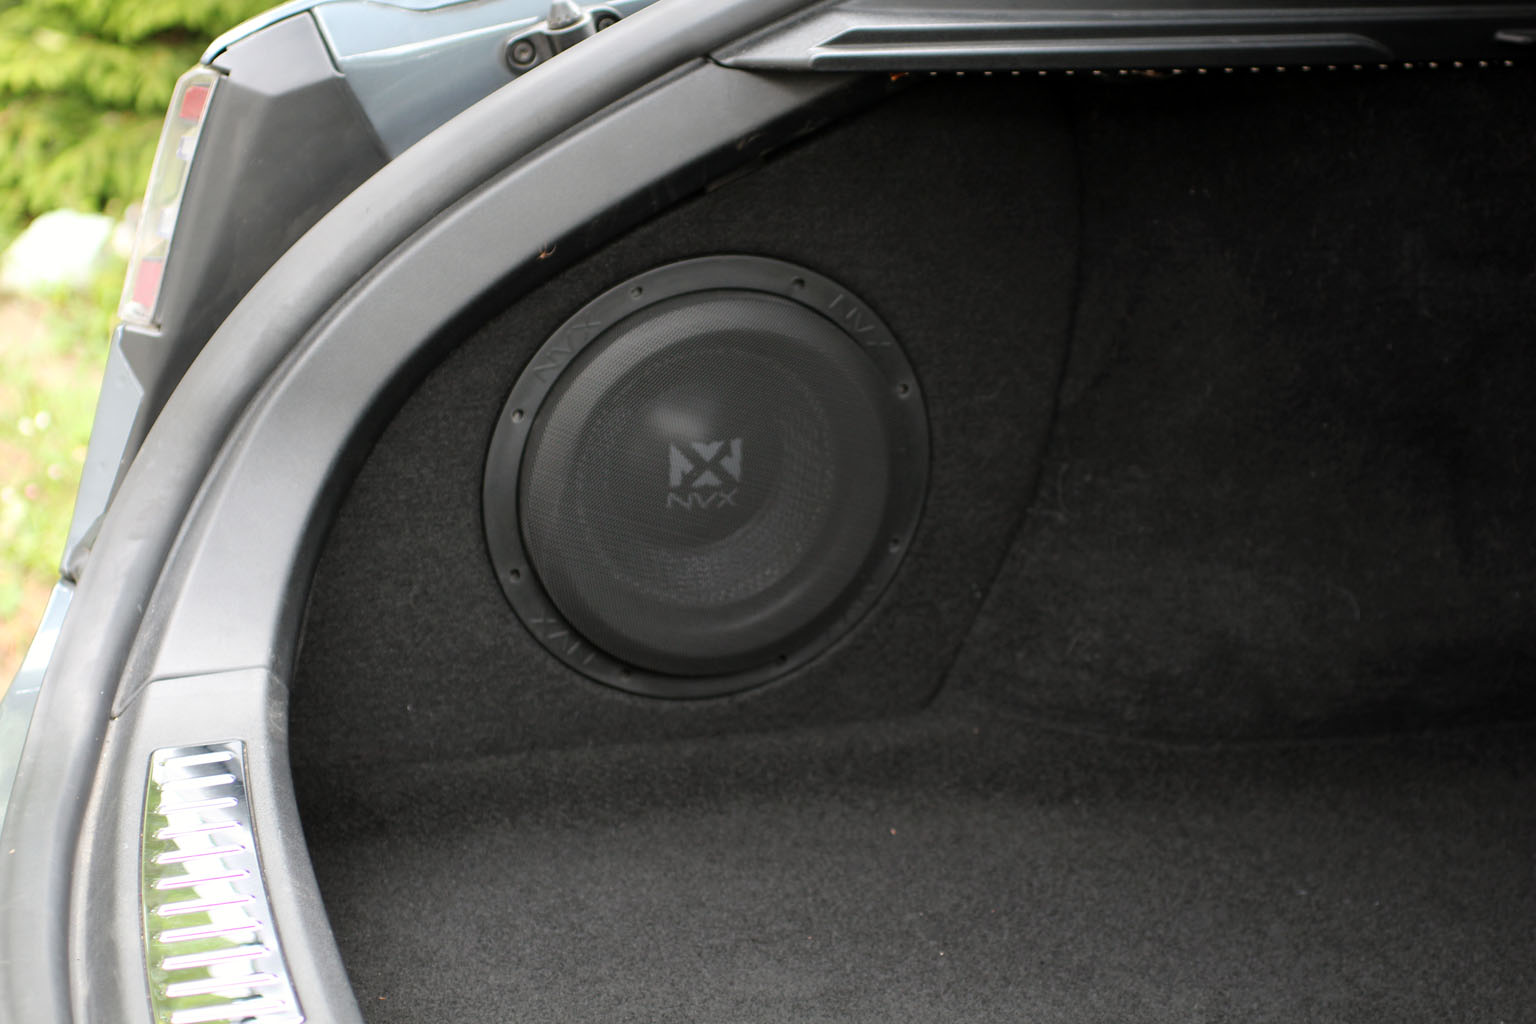
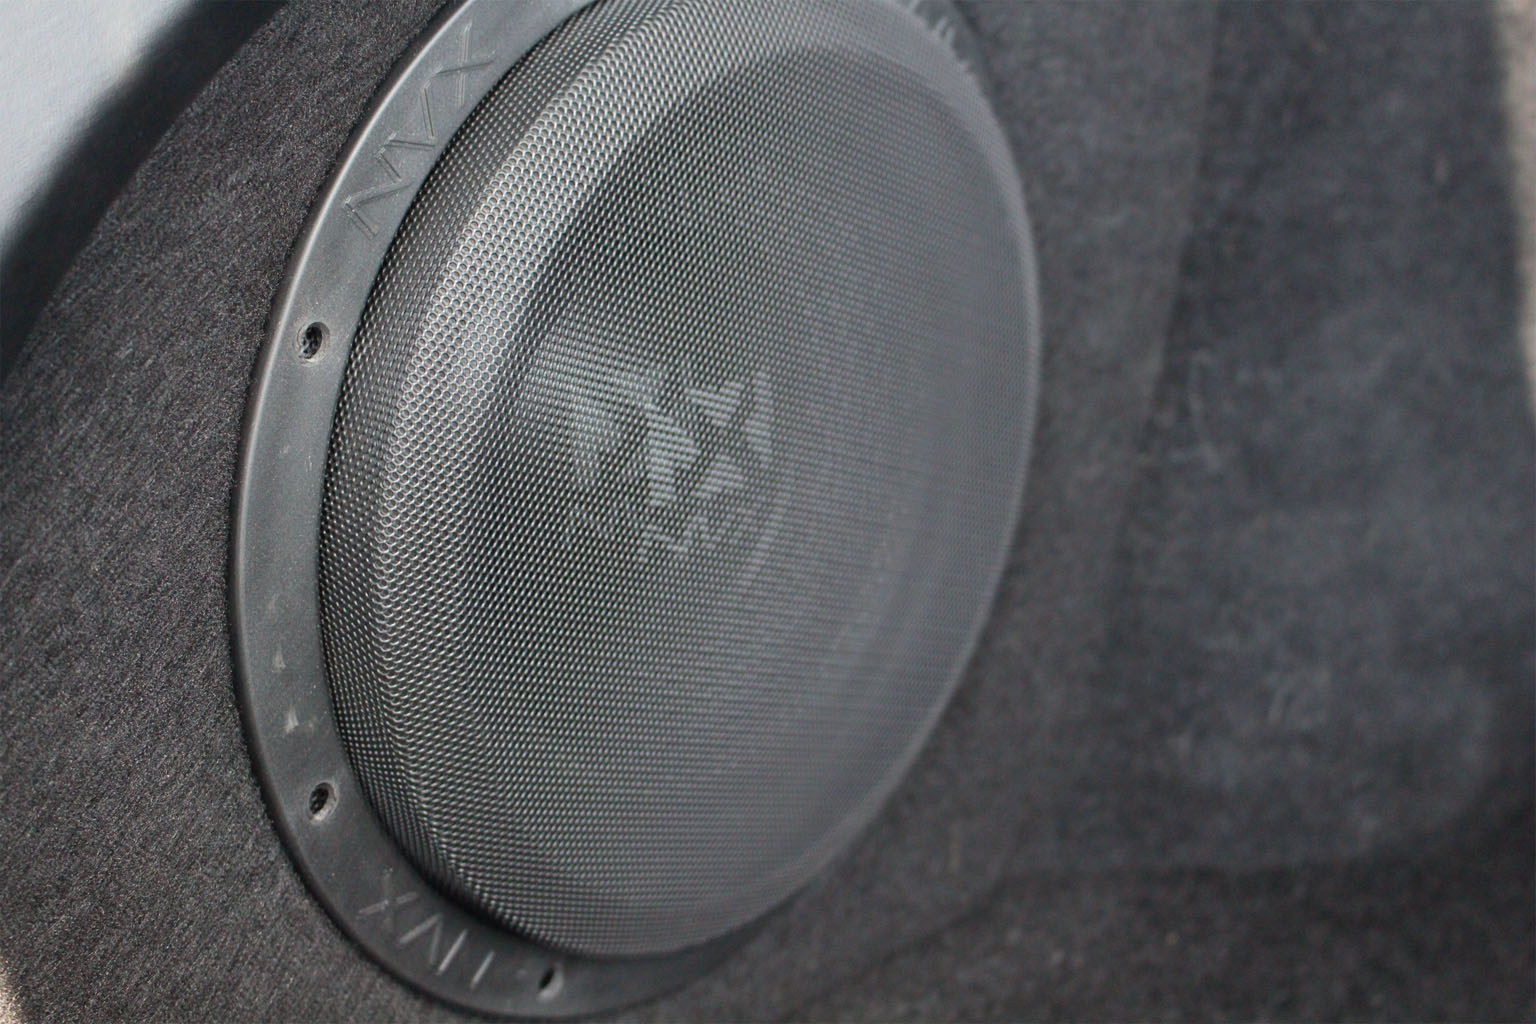
With everything out the wraps it looked and felt like some pretty good quality stuff. This speaker box is topped with a sturdy steel grill in place to protect the speaker from any sort of external damage, and it seems like it could withstand some serious abuse. I considered building my own speaker box to fit in the foot well area but this NVX enclosure is a superb solution. Larger items can still be stored under the rear floor space since the speaker box fits snug into the little storage space in left side of the trunk.
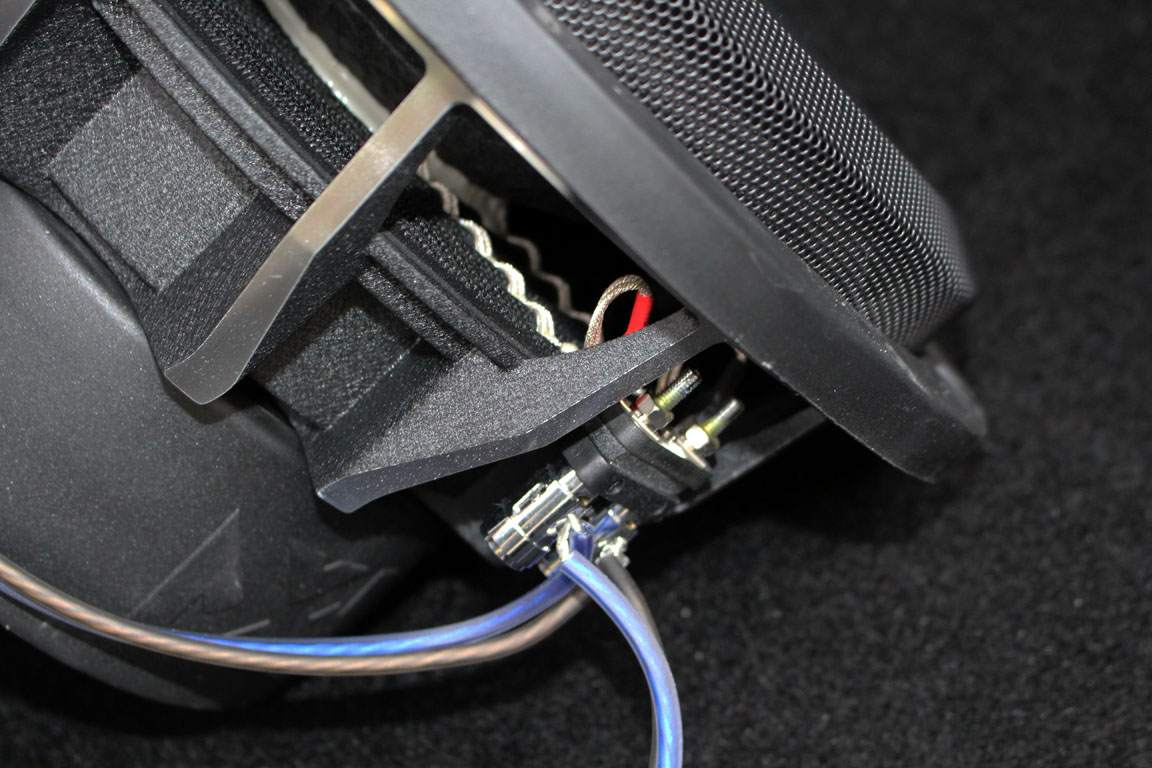
The 4 gauge wiring kit looks more than adequate to power the amplifier in any location you could justify placing it. It sports a 100 Amp fuse and distribution block to mount between the 12 Volt battery and amplifier. Included in the kit is a pair of shielded RCA cables, wiring for the speaker and a remote power switch plus an assortment of electrical connectors.
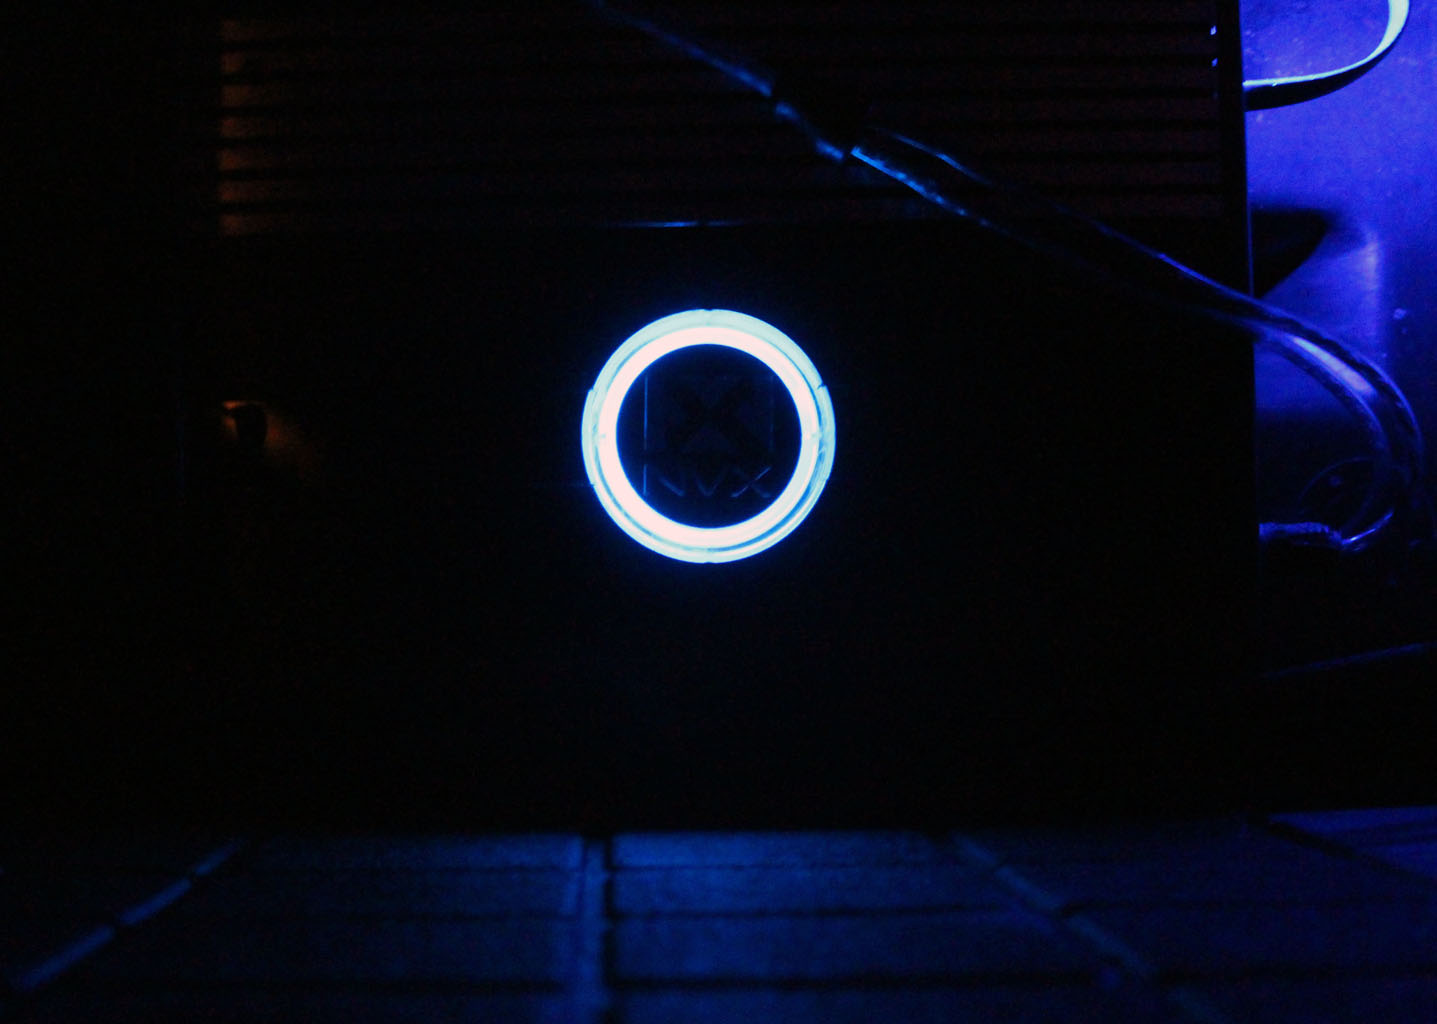
The amplifier’s appearance is rather typical but the power output is impressive for such a compact unit. It displays an NVX logo that glows blue when powered and is supplied with a remote switch so you can adjust the bass while sitting in the drivers seat.
There’s not much to the LC2i but one thing stands out to me. I have heard many complaints about the weakness of the rear sound or ‘forward sound stage’ in the Model S stereo. Looking at the LC2i it seems that you could really change the sound dynamics of the Tesla by using the other output to power a 2 channel amp and add some wide range speakers to the rear. Maybe add some rear deck speakers to a non-upgraded Tesla stereo?
Subwoofer and Enclosure – BE-TSLAS-VCW104 B.O.O.S.T
The B.O.O.S.T. enclosure for the Tesla Model S is composed of hand laid fiberglass and nicely contoured to slip into the left storage area in the trunk of the Model S. This placement allows both child seats and the
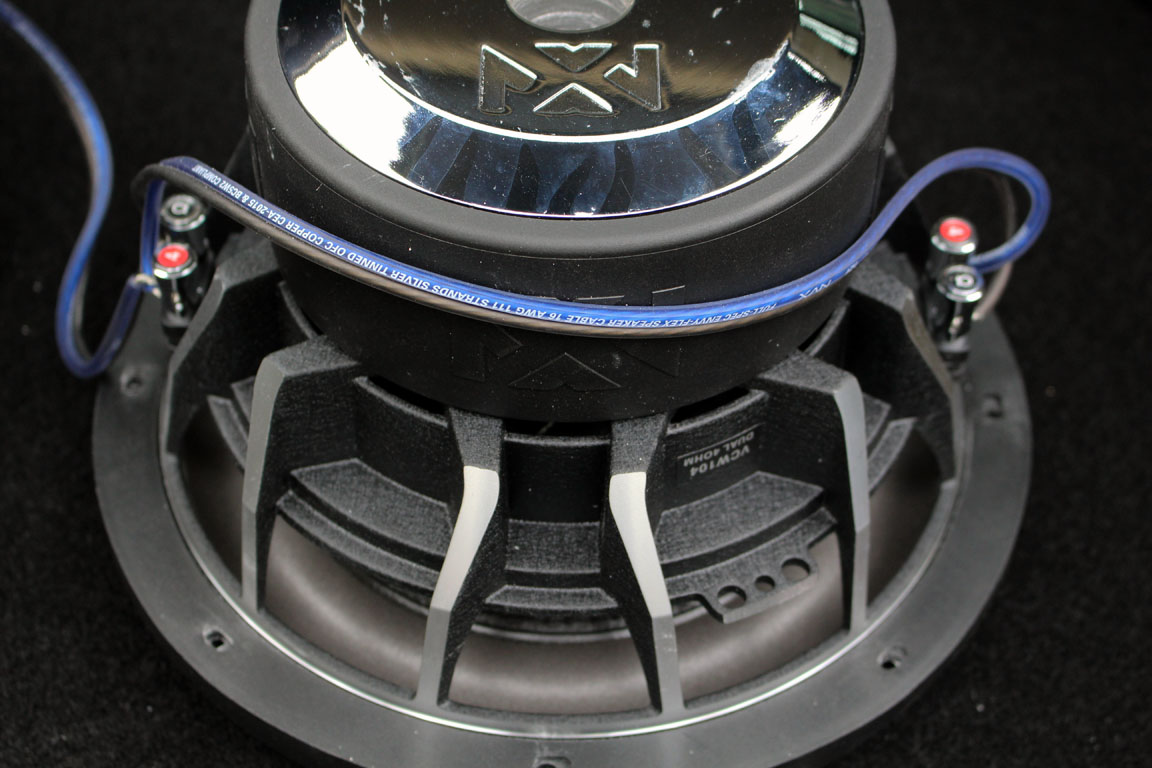
It didn’t take long before the engineer in me took over and unmounted the speaker from the box to take a look at the ‘guts’. In doing so I completely forgot to shoot any pictures of the inside of the box! What?? Bad cameraman! Well, the enclosure is rather thick, maybe almost 1/2″ and everything looked really well done on the inside, reminiscent of a fiberglass boat. A block of wood creates a step that locks the bottom of the box into its place. All of the fiberglass work is smoothly hand laid and the corners appeared to have some additional strips for strength. Since this is a sealed enclosure without a port the sound replication should be pretty accurate and I expect the bass to be tight.
protect things in the trunk from the pounding woofer – CAUTION: It might not be safe for kids to sit in the back with one of these kits!
Examining the rear of the speaker we see two sets of 4 ohm wire posts connected in parallel to match the output of the amplifier’s 2 ohms. The speaker is constructed very well and compares favorably to other drivers within a similar price range and power output. Can’t wait to hear what this thing can do!
Amplifier – BDA7501: Monoblock Class D
NVX produces this efficient amplifier with a footprint that almost fits within the margins of a sheet of binder paper. The built in circuitry protects the amp from overload or shorting and there are two 40A spade fuses located in one side of it.
This amplifier is rated for 750 watts at 2 ohms and can manage frequencies between 20 and 500 Hz.
Controls on the amp allow a subsonic filter to be tuned somewhere from 10 to 50 Hz to protect your speaker from potentially damaging low frequencies and a low-pass filter for 50-250 Hz to keep the the high notes out of the sub. There is also a bass boost dial capable of increasing output at 50 Hz by up to 18 dB, this boost frequency again is adjustable from 40-100 Hz. If you are planning on adding another powered device beyond this amp they added a set of RCA outputs that will pass the input source on to the next unit.
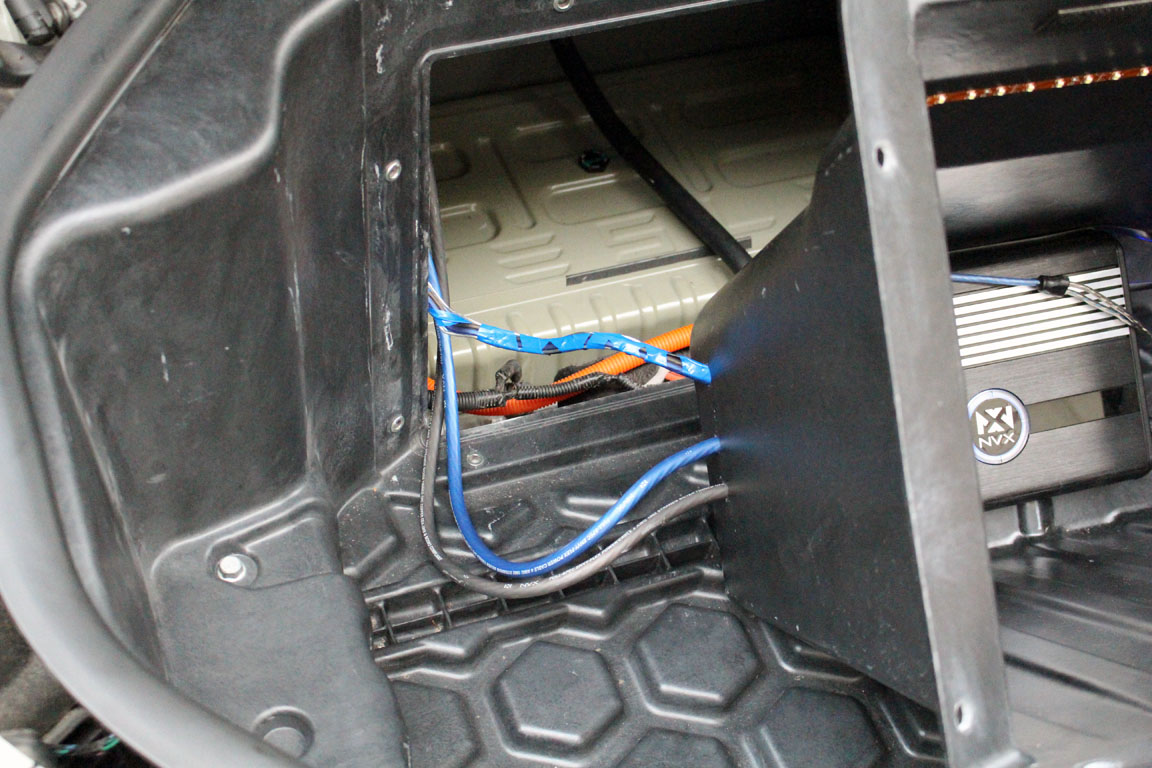
The amplifier fits deep in the the frunk of a non-AWD Model S and even deeper in the 2012 models. If one doesn’t want to locate the amp in the the frunk there is still a reserved space just beneath the sub-woofer enclosure that it fits nicely. No mater what location you choose for this piece of the setup it will still be necessary to run some wires from the front of the firewall to the rear area where the sub enclosure is.
Line Output Converter – LC2i
When adding speakers and an amplifier to any existing car audio system it is almost always easiest to tap into the existing speaker lines to provide an input sound source to the new equipment. The LC2i audio converter is included with the kit for just this purpose. It takes the higher powered sound from existing speaker wires and converts it to a lower level RCA output to send to the amplifier.
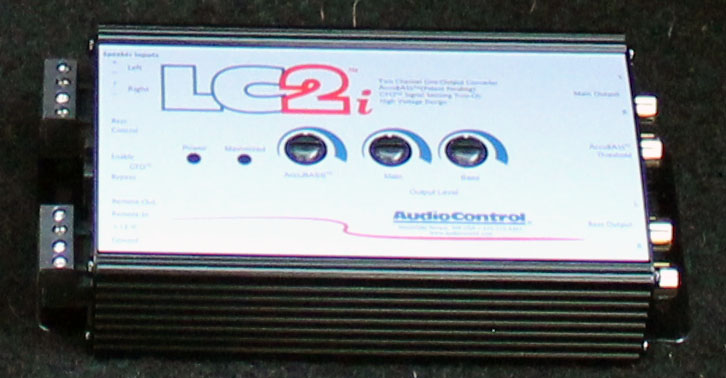
This little unit has a few adjustments to enable enhanced low end bass if the factory stereo cuts it out. Input power can be up to 400 Watts so no need to worry here with the factory Tesla speaker outputs. There are only two input channels but four RCA outputs. One pair of RCA outputs is dedicated to bass while the other set is a full range output channel. Each of these outputs can be controlled independently with dials on the front so you could add another amplifier for a 2nd (or 3rd) sub-woofer or some full range speakers in the rear.
Wiring Kit – XKIT42
42! Does that answer the question? The XKIT42 wiring kit is
Installation
I’ll just start with this: ‘Do it at you own risk’ or have a professional do it. There really should be nothing to worry about as long as you’re careful and know what you are doing. Installing a sub woofer and amplifier is a rather easy task to do. I have installed them in most cars I have owned, at least 8 now. These days there is even the internet to help! I think this kit could easily be installed in under 4 hours if you had all of the tools on hand and ready, probably faster if a couple of people worked together and knew what they were doing. Oh, before I forget, I have a 2012 Model S, a few items and wires were located differently in early cars than in subsequent models and of course the D’s are a bit different in regards to the frunk spacing. My car was delivered with the sound studio package but the way I installed my amp would also work for a car without it.
I’m only going to give a quick overview of the steps to install the kit and locating the amp in the frunk as I did mine. There are a couple of videos floating around the webs and images of installs that might help if you’re into it. So I think the installation can be broken down into a few parts:
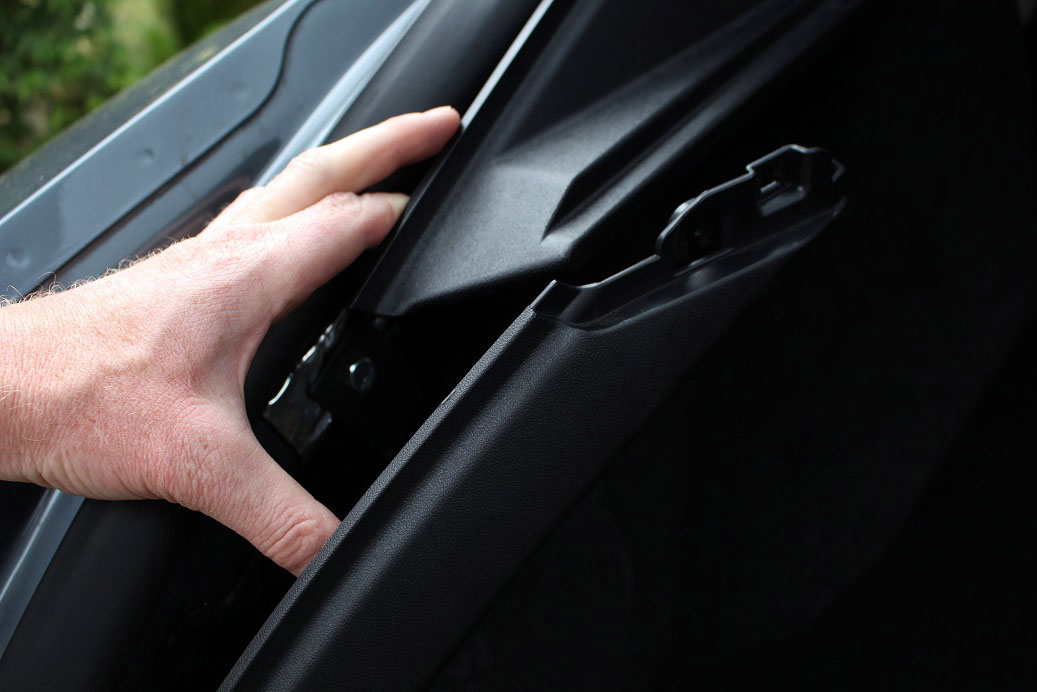
- Remove interior trim panels – both driver and passenger side door sills, dash undersides and end caps; drivers side knee pad; trunk left side plastic trim; rear left passenger door sill & partially remove left B pillar lower and rear seat plastic trim
- Remove frunk and AC filter unit
- Drill through firewall (ouch, she screams)
- Tap right and left speakers and run wires to LC2i
- Hook up power and ground and run a 12v to LC2i
- Run sub woofer, RCA and remote wires to frunk
- Connect LC2i
- Connect Amplifier
- Connect and Install sub woofer
BOOM. Easy…oh ya put it all back together, the hard part. Oops, what are all these left over screws and things for? Well I actually didn’t use any of the provided connectors from the wiring kit except for one to ground the LC2i.
Instead I picked up some tap splice connectors for the source wire connections and an add-a-fuse to place in an empty fuse slot for a 12v switch that turns everything on with the main contactors. These cars are assembled so things come apart and go back together pretty well. Common automotive clips are used everywhere and the injection molded plastics can take some pretty good flexing.
Tips
The only install guide included is for mounting the enclosure in the trunk. Sure enough I followed the instructions but the jack-nut that was supplied got ‘jacked’ when I tried to tighten the speaker bolt into it. Fortunately that was the only issue I ran into with the whole install
The LC2i fits amazingly well in a spot just to the left of the steering column. After the car is all buttoned up you can even still access it by popping the left end dash trim and just part of the drivers knee trim easily. You won’t need to touch this once it is set and the amp has plenty of power. For the sound inputs I spliced the front left and the rear right speaker sources. This has made the sound phenomenal with Dolby D turned on compared to it to ff, completely different.
When installing something wired in the frunk it is very important to make sure that Tesla Service can work on your car easily. I placed the 100 amp fuse near the other car fuses so it is easy to just remove the power cable from the side leading to the amplifier. After this is done all of the wires can be pulled from the amp quickly and the frunk parts can be removed.
Finding a shop that is willing to install an amplifier kit in a Tesla could be a challenge depending on your locale. I inquired at a place just down the street over a year ago and they wouldn’t put an amp in my car. Recently I went back and they expressed interest in learning about the Tesla and they sound like they might be open to doing such cars but need to learn more about them before they would be comfortable doing so. I am glad they didn’t just say ‘sure’ and hack at the car, instead they are trying to be cautious. I got an unofficial quote for $180 + materials for a normal car and possibly $250 for the Tesla because they didn’t know the car so it would take longer.
Sound
Really, if Tesla had just included this 10″ woofer in instead of the 8″ with the upgraded audio everyone would be happy! The front door speakers are already 8″ so why just an 8″ sub too? Until recently I thought the upgraded sound had decent bass. I almost forgot what it’s like to have a car that hits. With just the smallest amount of power given to this sub the stock sub woofer is completely neutralized.
Recently I have been using test tones, bass-track test music, rock, rap, ambient trance music and other stuff to test this setup – it all sounds really impressive. Whenever I turn the sub off I am shocked at what the stock sound is like on its own! This speaker has a great range for the size and I haven’t found any bad resonant frequencies that stand out as being too peaky. It can hit a little extra hard near the 30 Hz area if you really crank it up but the sound is audibly even across all frequencies from ~27 Hz up. The speaker manages pretty well below this level and the car shakes ferociously with the steering wheel rumbling like you’re running over delineators on the highway. This is enough for an internal massage but it wont make your drank jump out of its cup – a couple of 12″s would do better. The only other 10″ I tried in the past was a Kicker L7 Solobaric square 10″ sub woofer. I think this is comparable to that speaker in bass but it’s hard to compare memories and different cars.
Comparison:
So for a direct comparison I took the NVX speaker enclosure into Eureka Car Stereo, the local shop, where Steve let me hook it up to a switchboard with a 750 watt amplifier also connected to a JL Audio TW3 Powerwedge box. Both speakers have similar specification numbers but the JL is a shallow mount. If the JL was mounted in a fiberglass enclosure it might have been priced about the same as NVX. This was very useful to be able to switch back and forth between the speakers and hear the same music through each.
They both sound good although probably slightly a little different in a room than they would in a vehicle. The JL might have been a bit louder and could take a little more power but it had more punch which I didn’t really like. The punch seemed like a resonance which could be from the rectangular box or maybe just the speaker. In my opinion the NVX wins in overall sound quality and range. It sounded better hitting the lows and had a more consistent sound across the board through varied genres of music. Between just these two I would probably get the NVX after hearing it.
Final Impression
Sweet. It is so nice have a ‘real’ system now! I’m wondering if it would make sense to remove the factory 8″ sub from the other side of the trunk? The fit of everything in this kit is just perfect. I prefer the storage space under the enclosure compared to the space on top of the Tesla sub on the other side.
The sound output for the size of this kit is wonderful. If you want a really clean install and don’t want to spend a lot of time getting messy by laying your own fiber glass then really consider this kit. If you are looking for a moving violation or some show-car bass, maybe a 12″ or some top of the line 10″ speaker would be better. At $999.99 , the NVX Tesla Model S Subwoofer System is probably hard to beat without compromising on form or sound quality. My speaker isn’t fully broken in yet and it seems to be hitting a little harder and louder as it gets used more. It sounds great and receives compliments from everyone who has heard it.