DIY
Installing a Tesla Model X bike rack: once you go FullSwing, you can’t go back
As we prepared for two upcoming Tesla road trips through the windy roads of Big Bear Lake and Mammoth Lakes, both in California, we began our hunt for a Model X bike rack that would help us transport our electric bikes. A quick Google search led us to Tesla’s branded Model X Hitch Rack, sold through their online store, along with a few other popular racks by Yakima and Thule. Both of which were highly rated by consumers on Amazon and outdoor retail chain, REI.
Our search revealed that Tesla’s Model X Hitch Rack was in fact just a Yakima FullTilt Bike Rack except with a $130 mark up due to the Tesla logo. We love Tesla but not enough to justify paying 33% more to have their branding. But one thing we did decide on is to stick with the same manufacturer and select Yakima over Thule. Okay, cool. Let’s get the bike rack. But wait a minute. How does one actually Supercharge with bikes in tow especially if the stall requires one to reverse into?
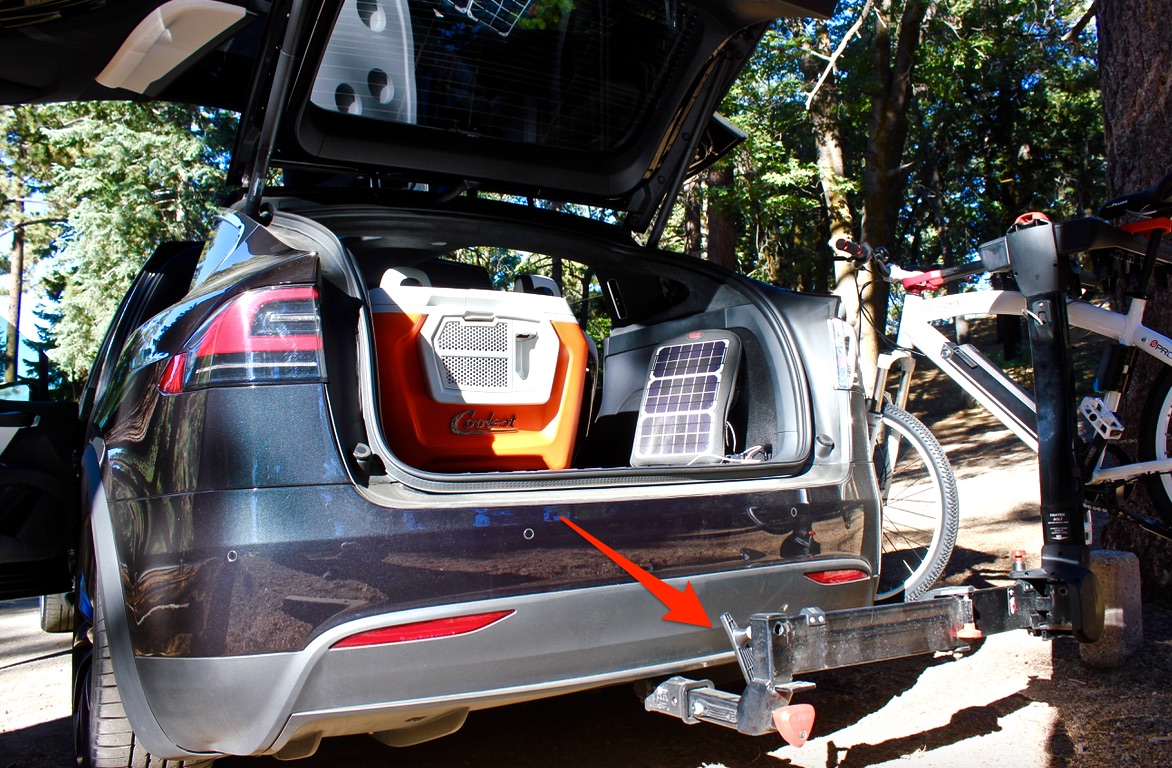
Flashbacks of the infamous red Model X taking up three Supercharger stalls immediately ran through our minds. Don’t be that guy. Also, with cooler, camping gear and equipment packed into the trunk, and bikes mounted, how does one actually open the rear hatch without having to off load all of the bikes? In short, you can’t. Unless the Model X bike rack was a swing away type.

Tesla Model X Supercharging at trailer-friendly Mammoth Lakes, CA
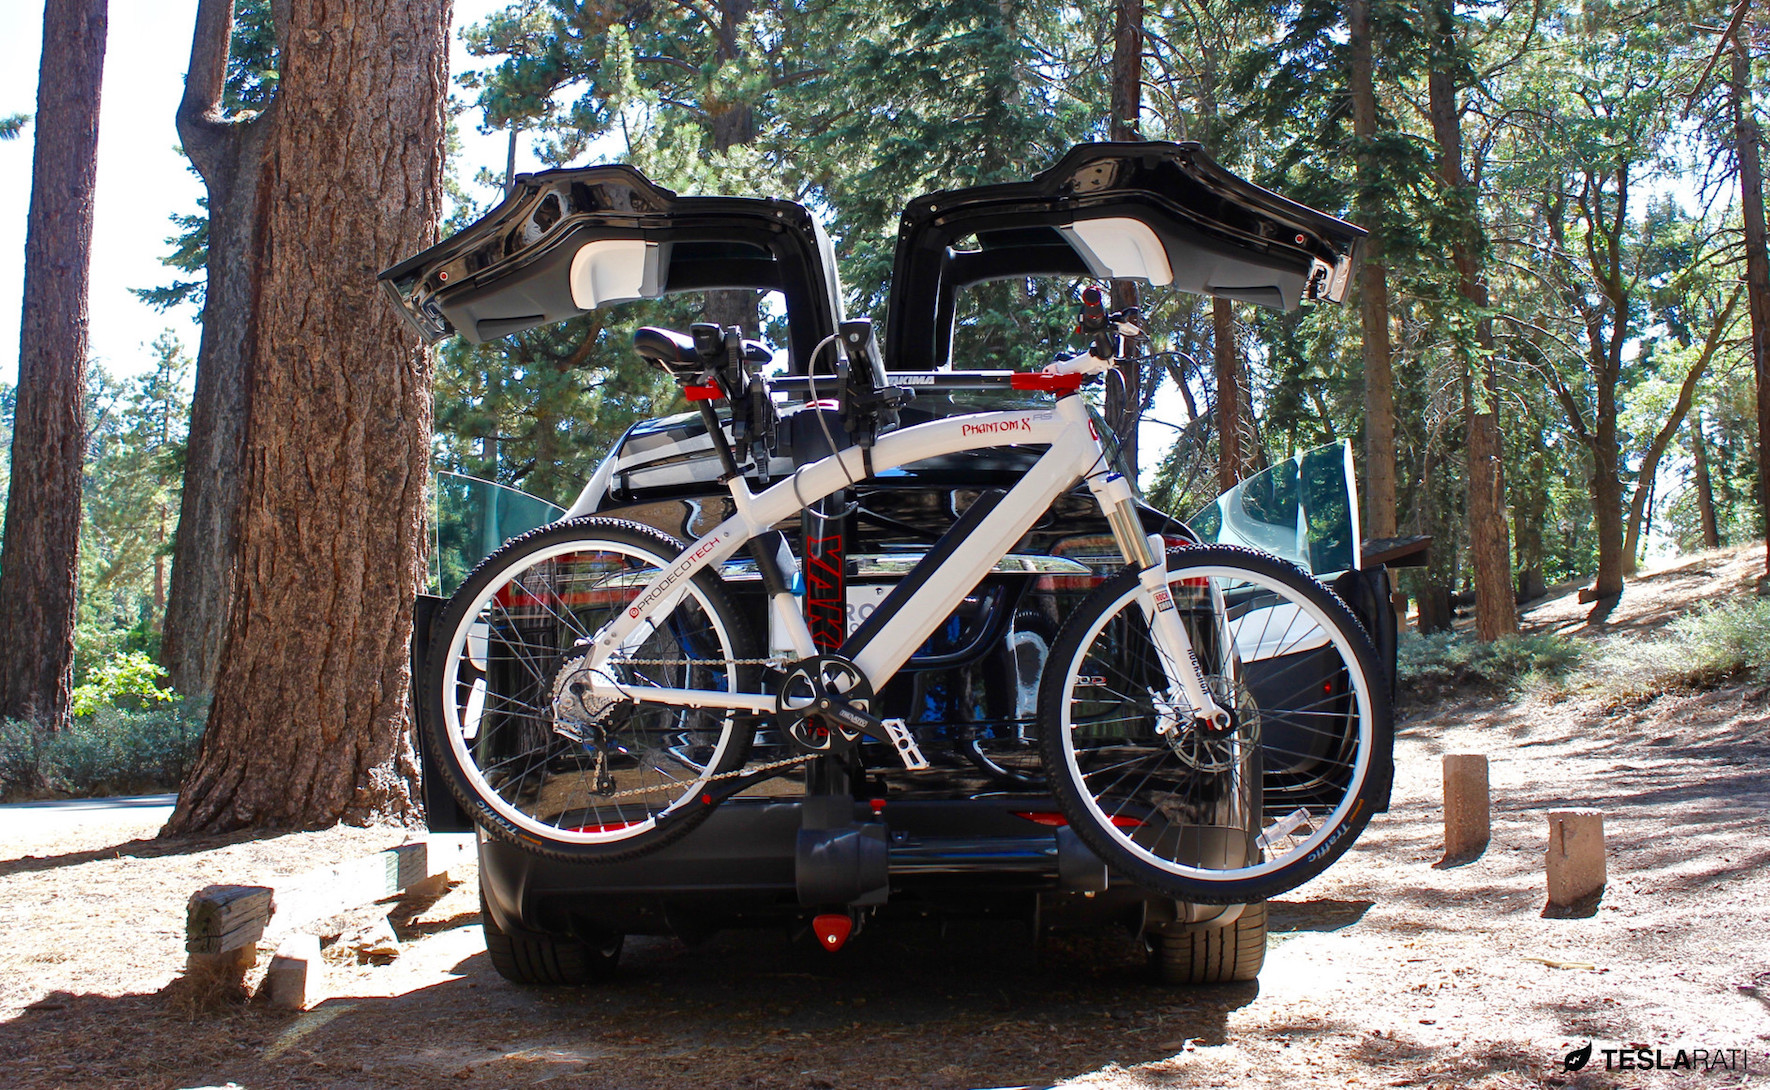
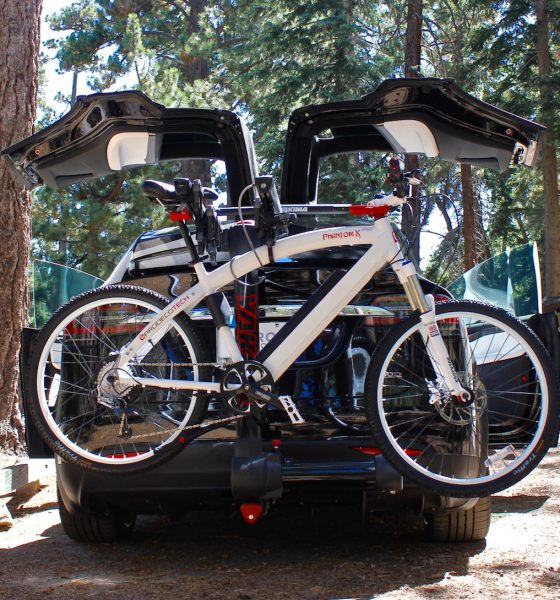
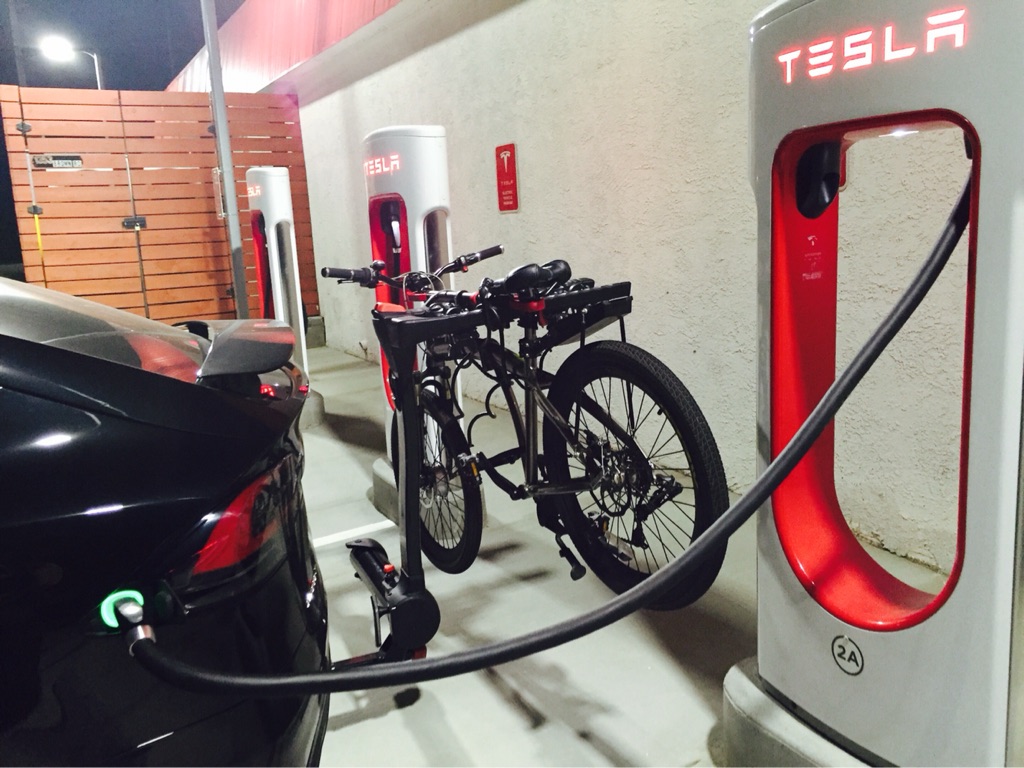
Tesla Model X Yakima FullSwing Bike Rack
Figuring out that we needed a bike rack that would allow us to easily Supercharge but also open the rear hatch, we decided on getting the Yakima FullSwing Bike Hitch Rack which was not only cheaper by nearly $100 under Tesla’s branded Yakima Model X bike rack, had all of the same features – scuff free zip straps, anti-sway cradle, and their SpeedKnob, which we’ll describe later – but also had the added convenience of being a swing away type rack.
Installation
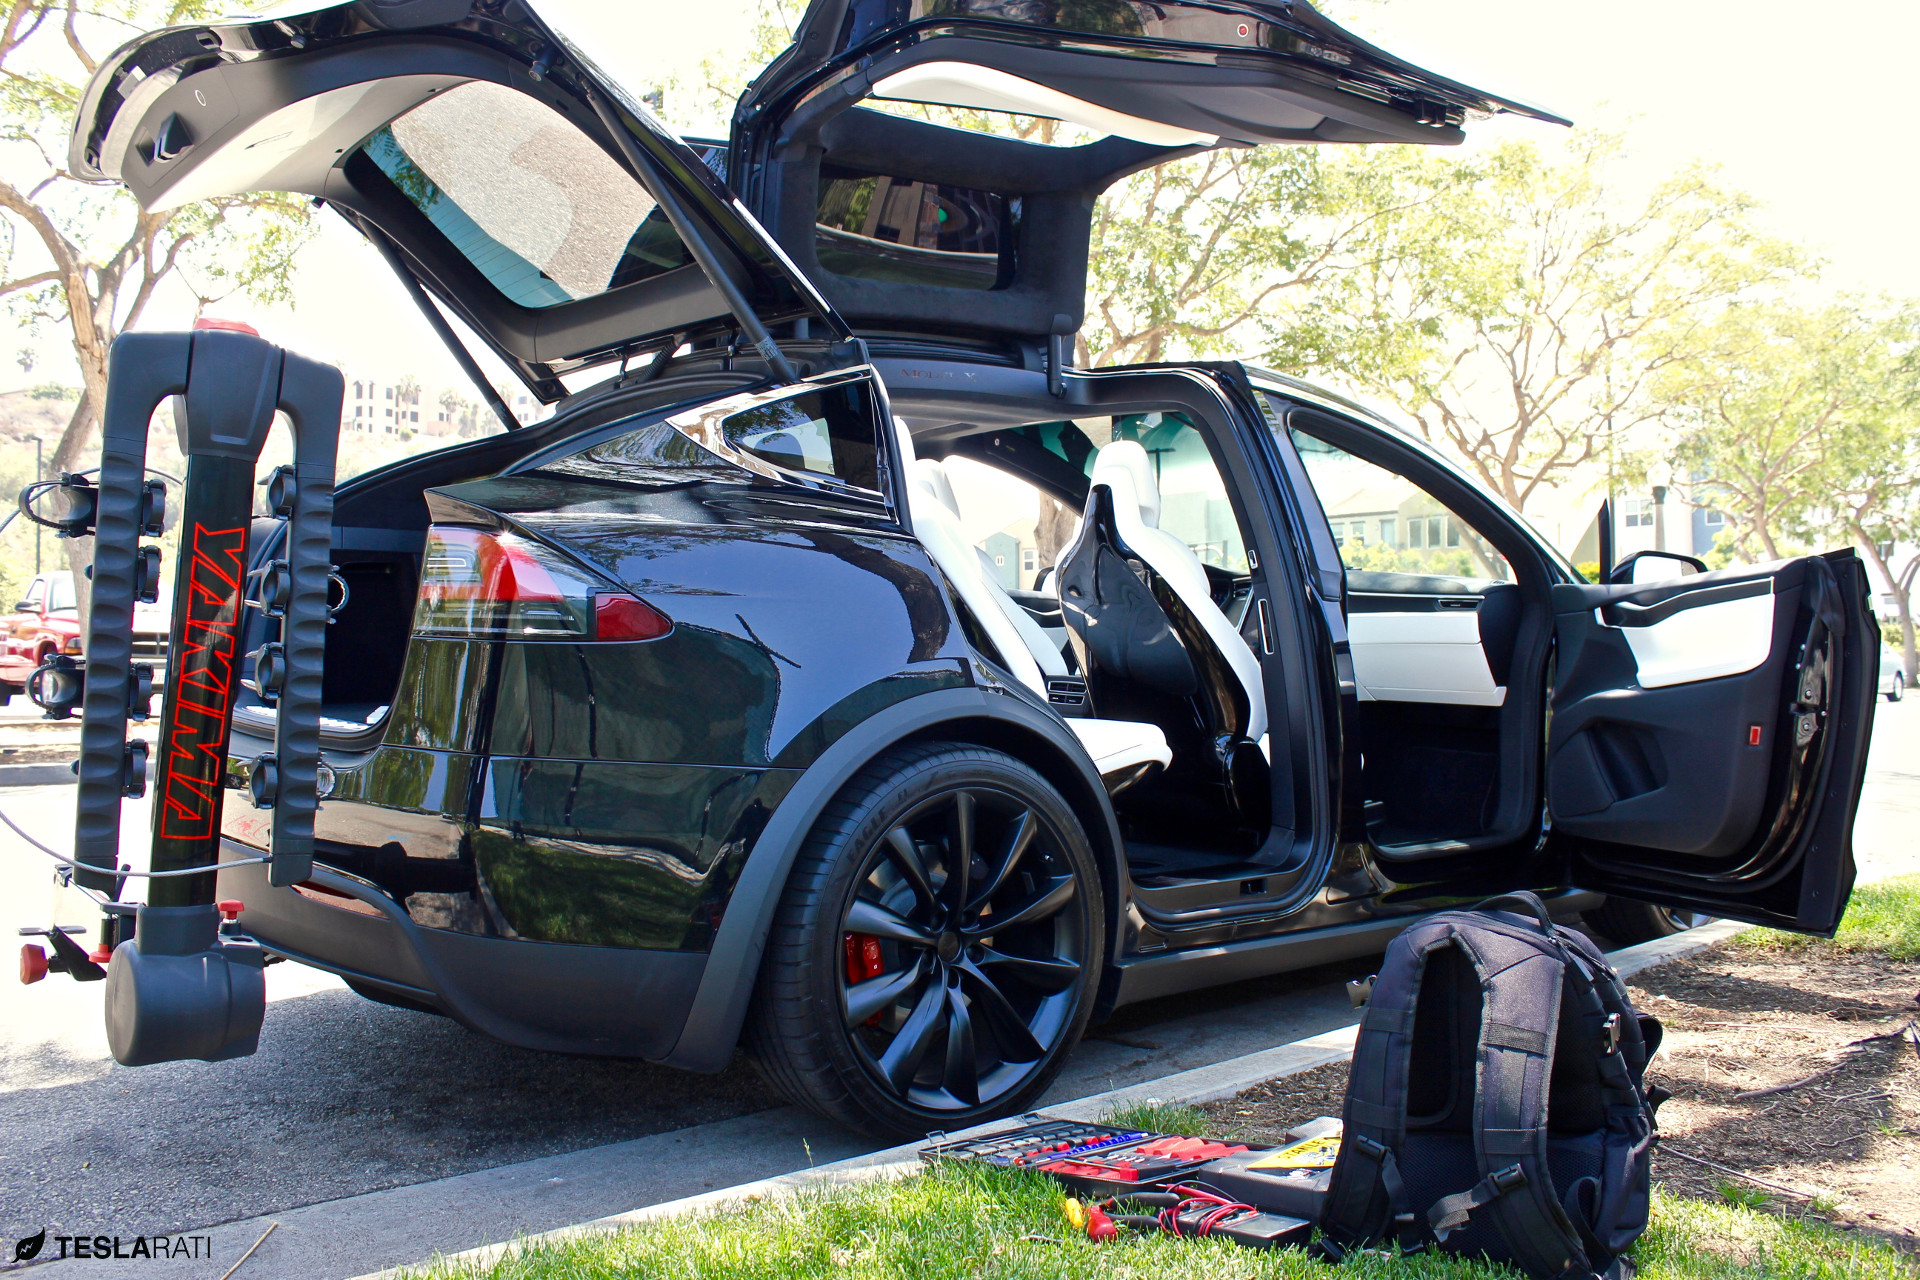
Installing the bike rack was no more difficult than installing anything into a hitch receiver. If your Model X has the tow package and you haven’t installed the hitch receiver yet, you may want to follow our guide on how to install the Tesla Model X hitch receiver first to understand how the assembly works.

Tesla Model X bike rack using Yakima’s FullSwing assembly.
The FullSwing bike rack slides right into Tesla’s 2″ hitch receiver and then clicks into place. Once in place, use what Yakima refers to as their Tool-Free SpeedKnob to fully secure the rack to the receiver by turning the big red knob clockwise until it’s fairly tight. What this feature does is eliminates any jiggle between the bike rack assembly and the receiver. In essence, it’s a feature that will allow you to enjoy the silence of your Tesla and spare you from losing your mind if you were to hear a persistent rattle, clank and squeak over hundreds, if not thousands, of miles while traveling with bike in tow.
How does it work?
Swinging the bike away from the vehicle can be achieved without using any tools whatsoever and can be done in approximately 30 seconds. The first step is to loosen a large lever behind the main assembly that secures the swing out arm to the rack itself. Loosen it counter clockwise until it is no longer threaded into the assembly. There’s no concern of over-loosening as the lever will dangle without falling off of the assembly.
Once the lever is unsecured, pull the red pin on top to dislodge the swing out arm from the main assembly. At this point, the entire bike rack will swing away from the vehicle. It’s worth noting that there’s two hinges and a red pin that’s used to secure the second outward hinge so that the bikes are perpendicular to the swing out arm. This pin ensures that the rack with bikes will not over-swing and slam into the side of the vehicle. This is especially useful when parking against a slope and the bikes have a natural tendency due to gravity to swing open.

Parking against a slope with the Yakima FullSwing rack.
Here are a few additional photos we captured showing the convenience of having a swing away type bike rack: one while on our camping excursion, and the other captured while installing the rear camera from our Model X BlackVue dash cam set.
Supercharging
Ironically, we purchased the bike rack not only for the added convenience of being able to open the rear hatch with bikes in tow, but because of concern over Supercharging. Rather, not being able to back into a Supercharger without coming into contact with the chargers themselves.
It turns out that Supercharger cables are just long enough to allow one to plug-in with bikes in tow and charge without putting too much tension on the cord itself. Though the extended bike rack protrudes from the vehicle, there’s still enough room between the end of the bike rack and the Supercharger to allow for backing in.
Conclusion
If you’re looking for a bike rack for the Tesla Model X or Model S and want the added convenience of being able to retrieve items from the trunk with bikes mounted, then we’d recommend using any swing away type bike rack. We happened to pick the Yakima FullSwing 4 bike carrier simply because Tesla decided to use Yakima for their own branded rack, and we’re glad we did.
The FullSwing rack is not only $100 cheaper than Tesla’s rack but provides more usability. That’s a win-win if you ask us.
(Model S owners that might be interested in installing this same rack, be sure to check out our review of the Model S hitch rack assembly first)
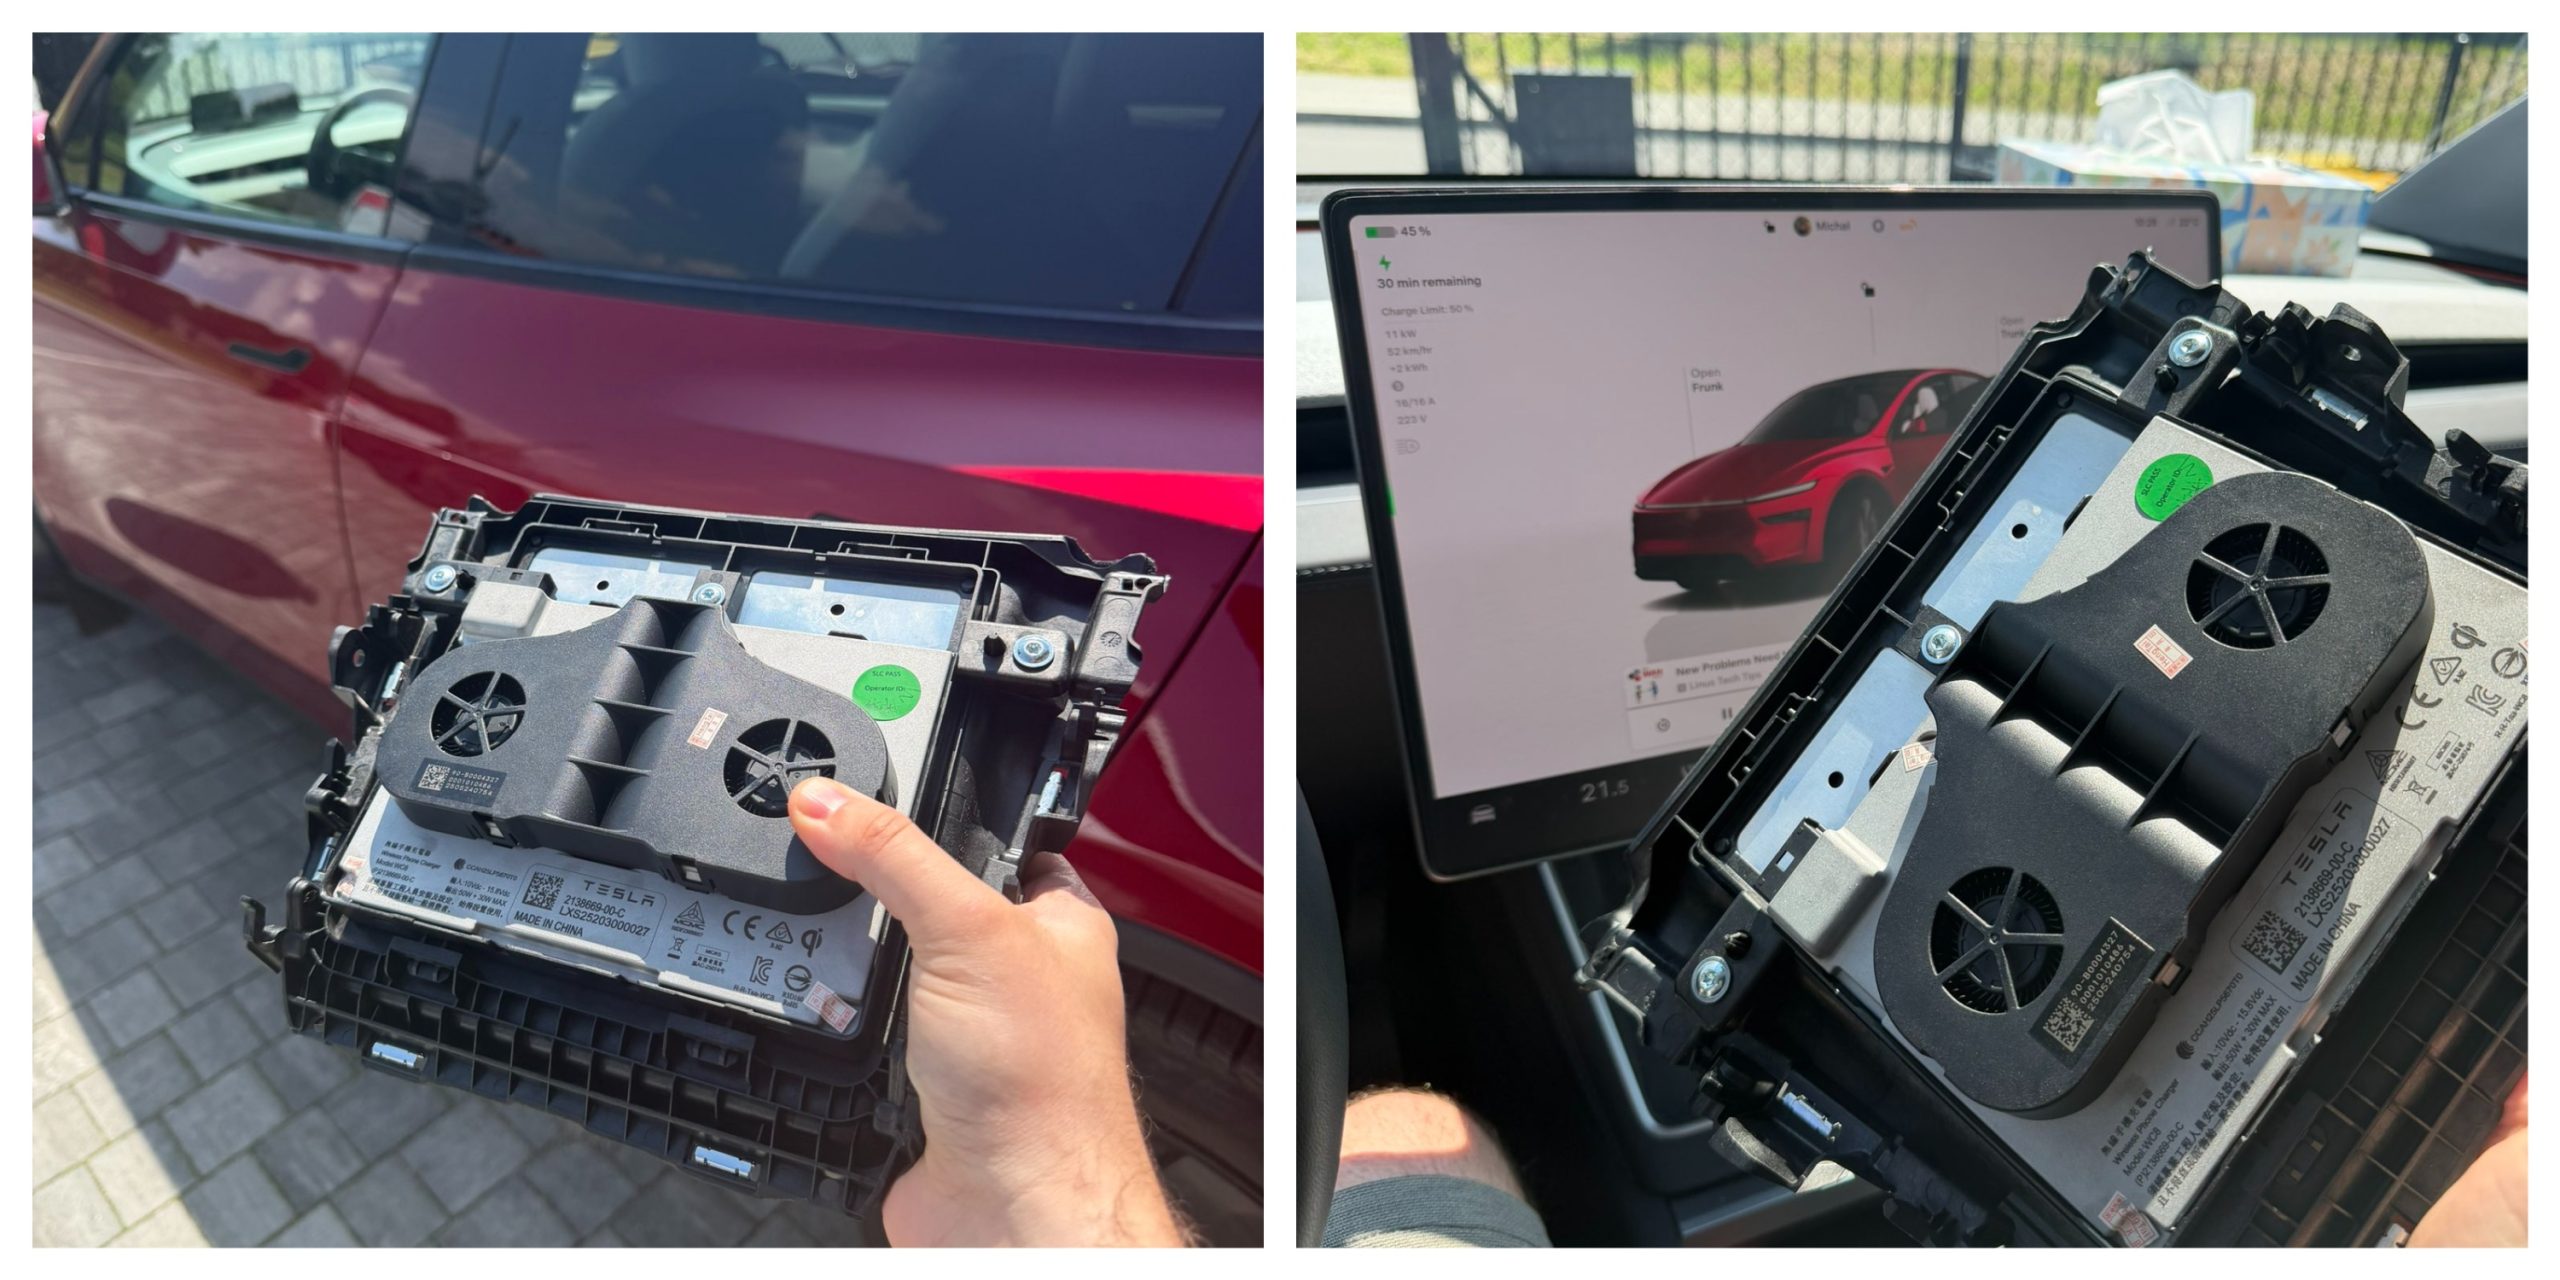
Tesla owners have long griped about the wireless phone charger in the Model Y and other vehicles. It often turns smartphones into miniature ovens rather than reliably topping them up.
Software engineer and Model Y owner Michał Gapiński tackled this issue head-on with a clever DIY upgrade, swapping the cooled wireless charger pad from the China-made Model YL in for the one that came standard in his vehicle.
There are several key differences between the U.S.-built Model Y’s wireless charging pad and the one that Tesla has been installing in the Model YL. The one installed in U.S.-built vehicles lacks active cooling and relies on basic heat dissipation, leading to rapid temperature buildup during charging. In contrast, the Model YL integrates a small fan for active cooling.
Will it fit? Fingers crossed, I want a first YL charger deployed in the regular juniper pic.twitter.com/wWDqSNFVkW
— Michał Gapiński (@mikegapinski) June 2, 2026
This design maintains lower temperatures even in warm ambient conditions, though it does not support faster Qi2 charging on iPhones. The connector matches exactly, making physical swaps feasible on compatible consoles, but coding is required to enable full functionality.
Owners in the U.S. have complained about the wireless charging pad, with many reporting that overheating is fairly common. Within 20 or 30 minutes of placing a phone on the wireless charging pad, many have reported overheating messages on their phones, which halt charging and essentially turn the pad into a fancy place to rest your phone.
Many owners have opted to simply plug their phones into a charging cord. Tesla has acknowledged the problem by releasing several solutions for owners, including a relatively new feature that allows you to simply turn off the charging and simply act as a holder for your phone while driving.
Gapiński said that he sourced the cooled pad affordably from China, and it cost under $200 for the part.
He removed the existing console charger, swapped in the new unit, confirming a perfect connector fit, and handled the trim differences. Since the parameter isn’t fully secured, he enabled it through custom coding outside official Toolbox.
Connector is identical, she fits, now time to code it. https://t.co/Y9idgDrpCq pic.twitter.com/uwwgq6blg7
— Michał Gapiński (@mikegapinski) June 2, 2026
The fan activates quietly, blending with AC and seat cooling. He reported the installation was effective and the wireless charging pad worked perfectly; it even kept the phone cool as it stayed at just 86 degrees Fahrenheit. Many times, the wireless charging pad will bring the phone’s temperature well above 100 degrees, sometimes even being relatively hot to the touch.
The retrofit worked, no issues. First Model Y with a cooled wireless charger! No QI2/faster charging on the iPhone but it does not boil the phone even when it is 30 degrees outside.
The fan kicks in, it is not audible especially with the air conditioning and seat cooling. The… https://t.co/JOyR8Tb1Yo pic.twitter.com/kJcYhQIlYq
— Michał Gapiński (@mikegapinski) June 2, 2026
This retrofit highlighted an elegant, owner-driven solution to a factory shortcoming. It is expected that Tesla will begin installing the cooled charging pads into new cars in the U.S. soon, and hopefully, it will offer some sort of retrofit service or kit to owners here who want to use the charging pad effectively.
For those who love to tinker, it’s an accessible upgrade, proving that innovation thrives beyond the production line.
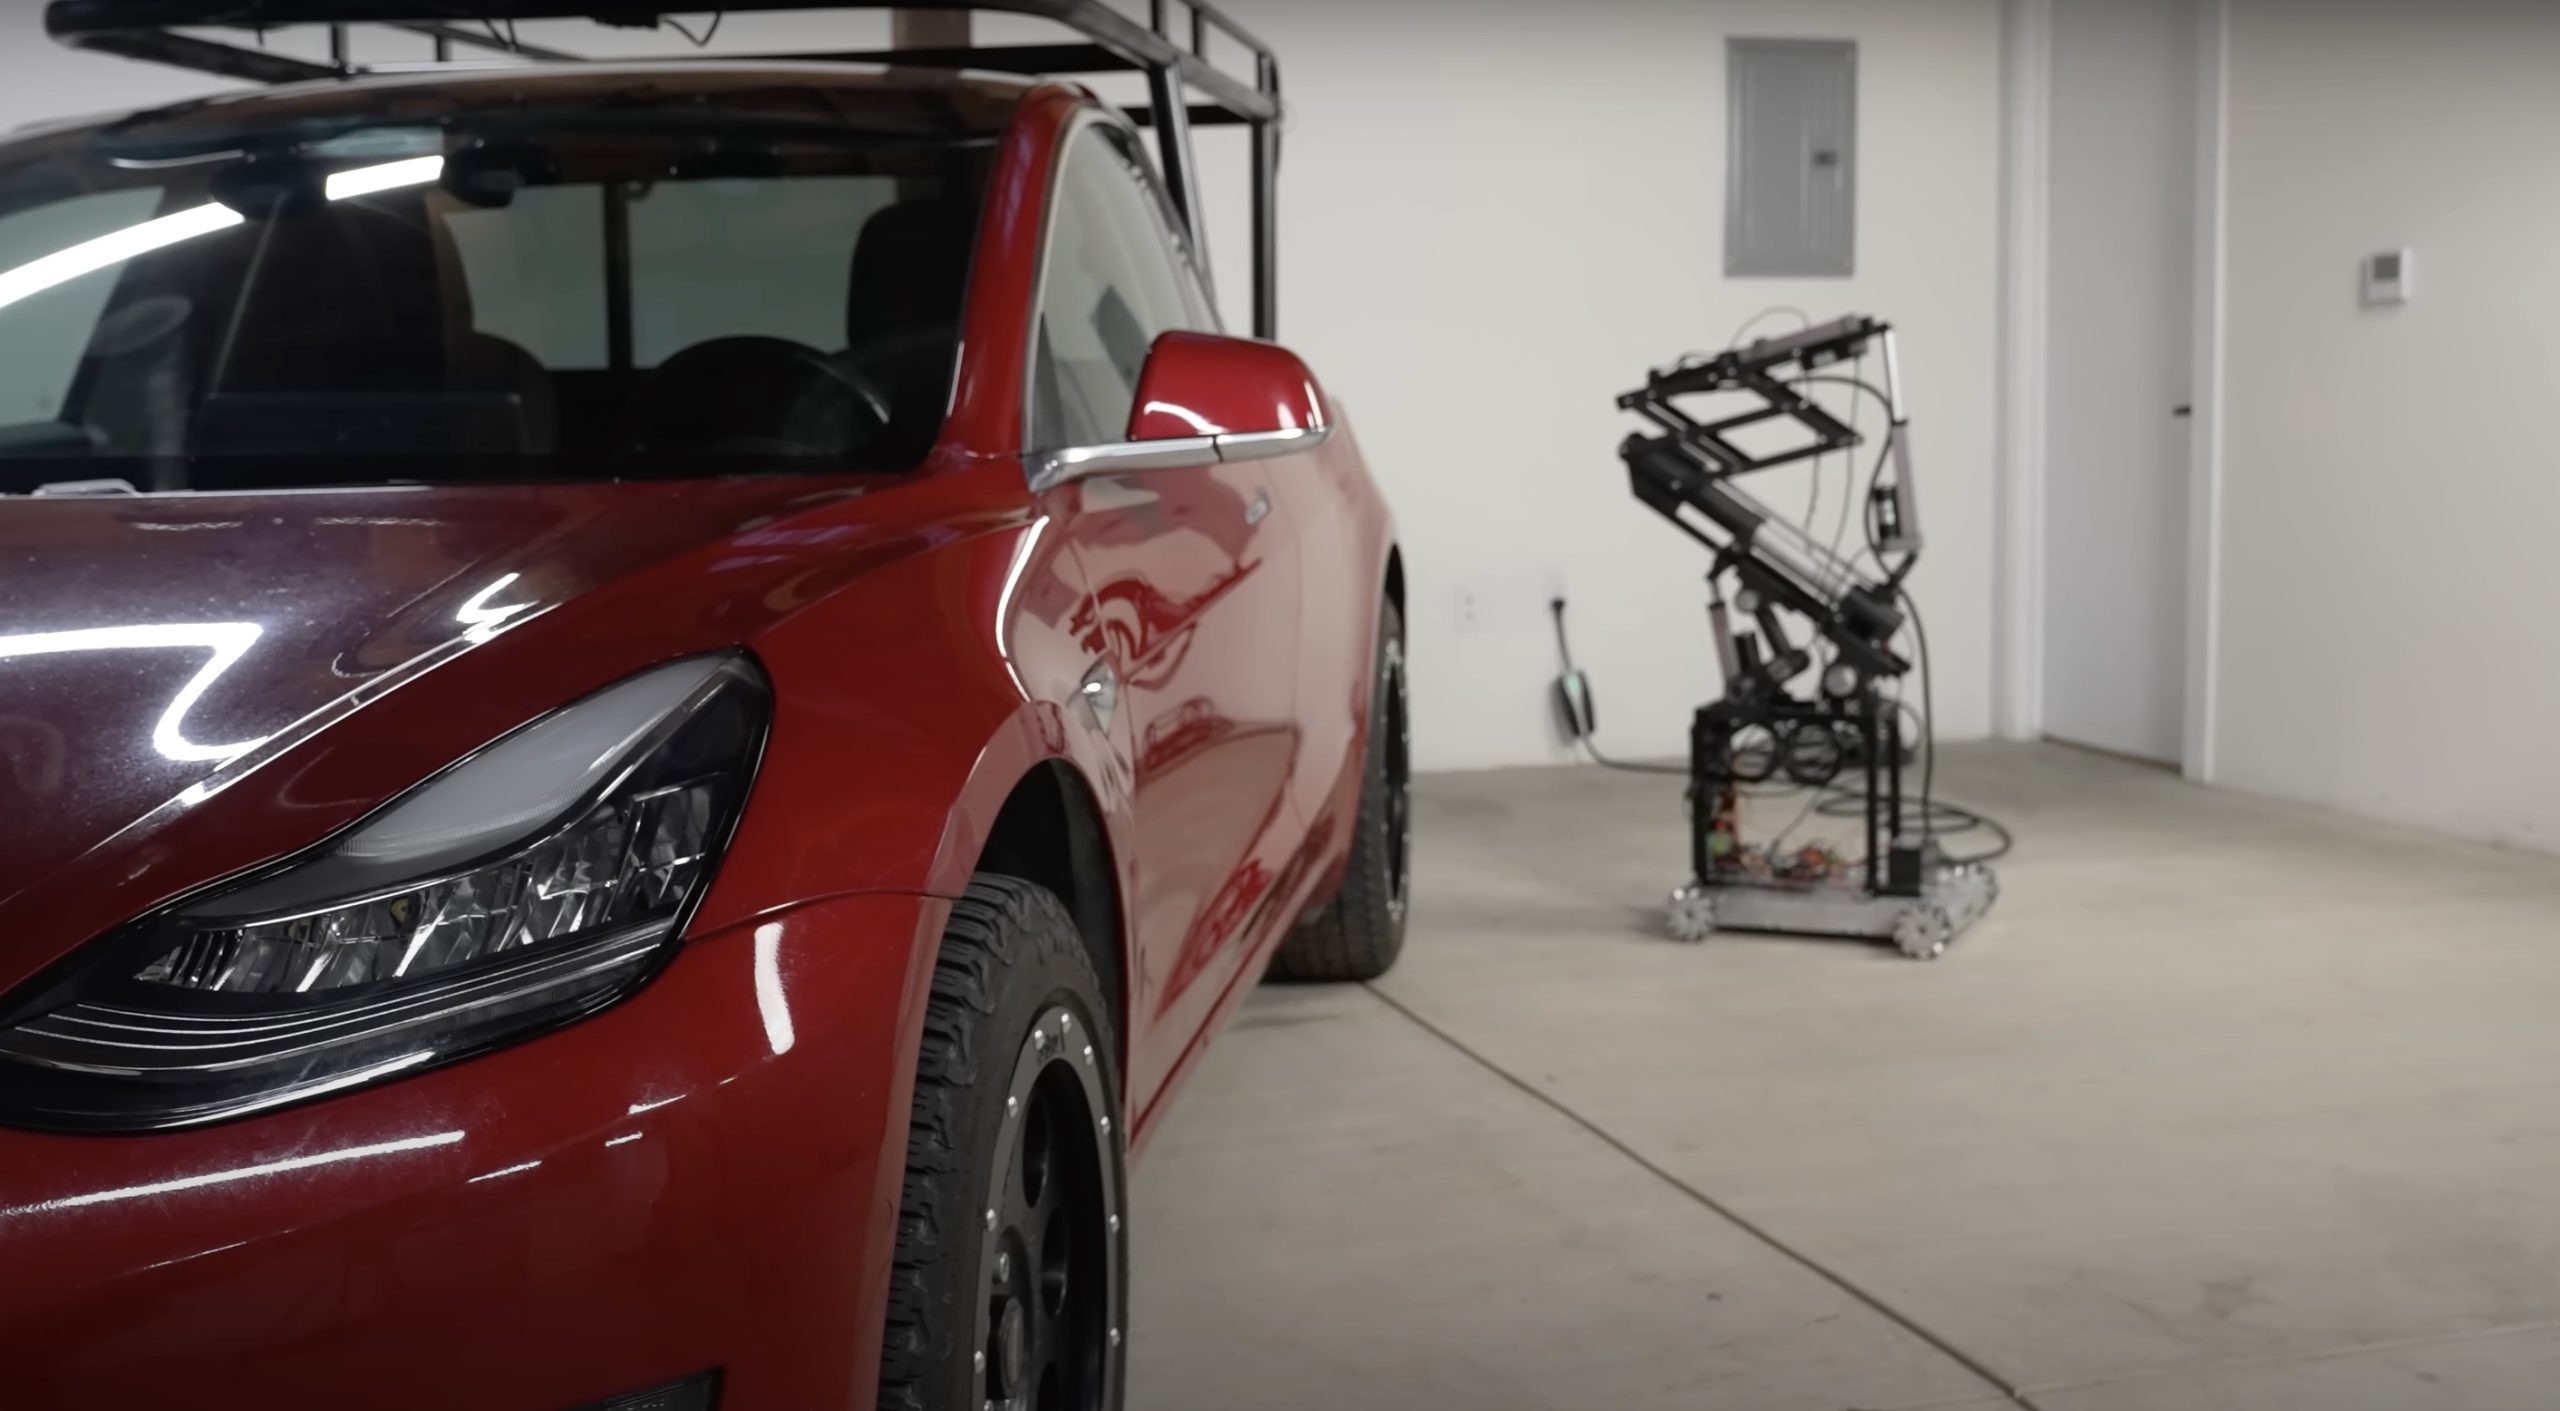
Back in 2019, YouTuber Simone Giertz, the self-proclaimed “Queen of Sh*tty Robots,” created a one-off Tesla Model 3 build that took the automotive world by storm. Fondly dubbed as “Truckla,” Giertz noted that the vehicle was actually her dream car — as crazy as that may sound.
Now almost four years later, the YouTuber posted an update on Truckla. And just like every other big project that one probably started, Giertz stated that she actually stopped working on Truckla when the vehicle was about 80% complete. The car is driving though, but a lot of stuff was not really working very well.
Thus, for her Truckla update, Giertz shared how most of her Model 3 pickup truck conversion was essentially completed. Truckla got a lot of detailing done, she got a slight lift, and she now has a functional tailgate. One has to admit, Truckla’s tailgate is pretty darn cool.
The “Queen of Sh*tty Robots” also opted to give Truckla a friend in the form of an automatic robot charger. Unlike Tesla’s rather interesting snake charger from years past, Truckla’s charger would come in the form of a rover, thanks to her friends at robotics platform Viam. Giertz aptly named Truckla’s robot charger friend “Chargela,” which is an appropriate name for such an invention.
Also true to form for Giertz, Chargela’s first encounter with Truckla was just a tiny bit awkward. One could say that Chargela may have just been a little bit nervous on his first try without human hands helping him. Most importantly, the system did work, so Giertz would likely keep using Chargela for her Model 3 pickup.
Teslas are very tech-heavy vehicles, so projects like Giertz’s Truckla are always remarkable. The fact that the Model 3 works perfectly fine despite having a good chunk of it cut off and turned into a pickup truck bed is mighty impressive any way one looks at it. Overall, Truckla will always be one of the coolest Tesla DIY projects to date, so any updates about the vehicle are always appreciated.
Truckla’s nearly four-year update can be viewed below.
Don’t hesitate to contact us with news tips. Just send a message to simon@teslarati.com to give us a heads up.
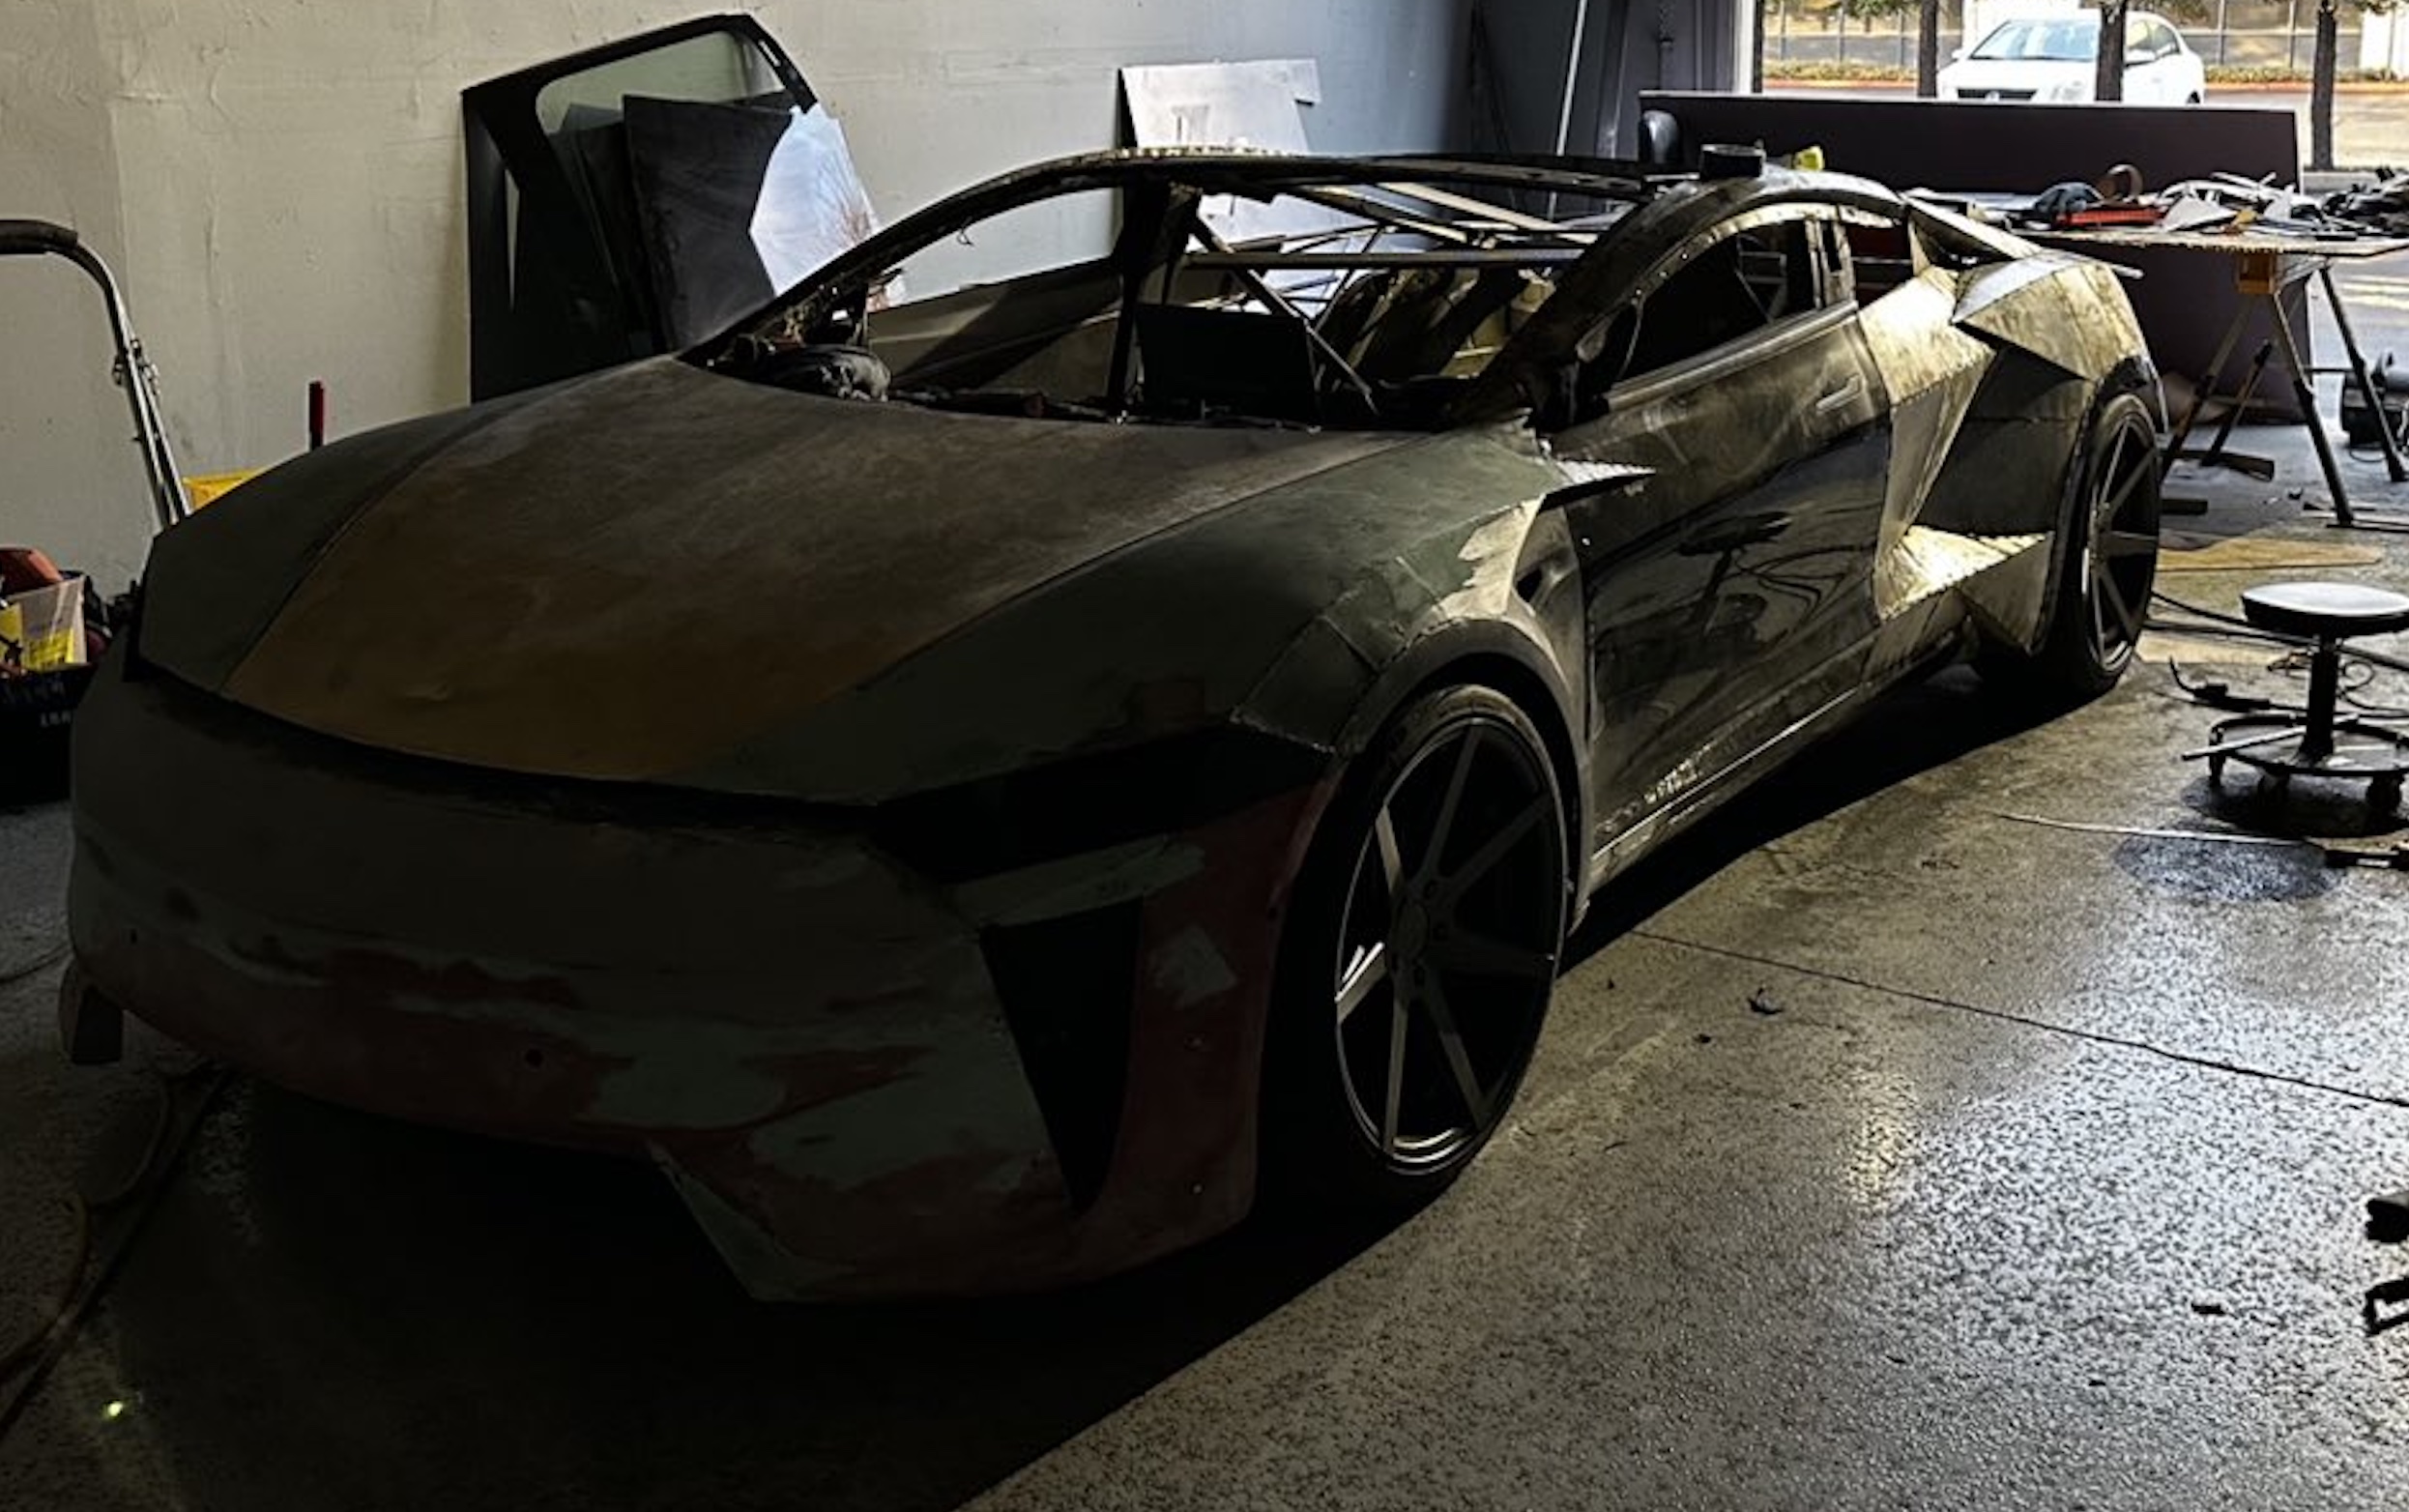
A Tesla owner is taking his hobby and love for electric vehicles to new levels by creating what could only be described as one of the coolest EV-related DIY projects to date. The idea for the project is simple: what happens when you cross a supercar with the Cybertruck? You end up with a two-seater CyberRoadster.
Tesla owner David Andreyev, who goes by the username @Cyber_Hooligan_ on Twitter, has spent the last few months creating a Cybertruck-inspired version of the next-generation Roadster made from a salvaged Model 3 Performance. Starting with a Model 3 Performance is an inspired choice, considering that it is Tesla’s first vehicle that has a dedicated Track Mode.
A look at Andreyev’s YouTube channel, which can be accessed here, shows the meticulous build that the Tesla owner has implemented on the project car. What’s particularly cool about the CyberRoadster is the fact that it’s being built with parts that are also from other Tesla vehicles, like its front bumper that came from a new Model S. Recent videos suggest that the project car’s rear bumper will be from a new Model S as well.
The journey is long for Andreyev, so the completion of the CyberRoadster will likely take some more time. Despite this, seeing the Tesla owner’s DIY journey on such an epic build is more than satisfying. And considering that the CyberRoadster is evidently a labor of love from the Tesla owner, the final results would likely be extremely worth it.
There’s a lot of crazy Tesla modifications that have been done as of late. But some, as it is with a lot of things on the internet these days, have become more silly gimmicks than serious automotive projects. Fortunately, car enthusiasts like Andreyev, who just happen to also love electric vehicles, are taking it upon themselves to create one-of-a-kind EVs that would surely capture the attention of anyone on the road.
Check out the latest video in the CyberRoadster’s creation below.
Don’t hesitate to contact us with news tips. Just send a message to simon@teslarati.com to give us a heads up.

Lucid denies rumors of bankruptcy after over 40% stock drop

Tesla owner attempts resale of Model S Signature Edition for over $260k


