
DIY
Tesla Model S hitch by Torklift (3 year update): Eaten alive
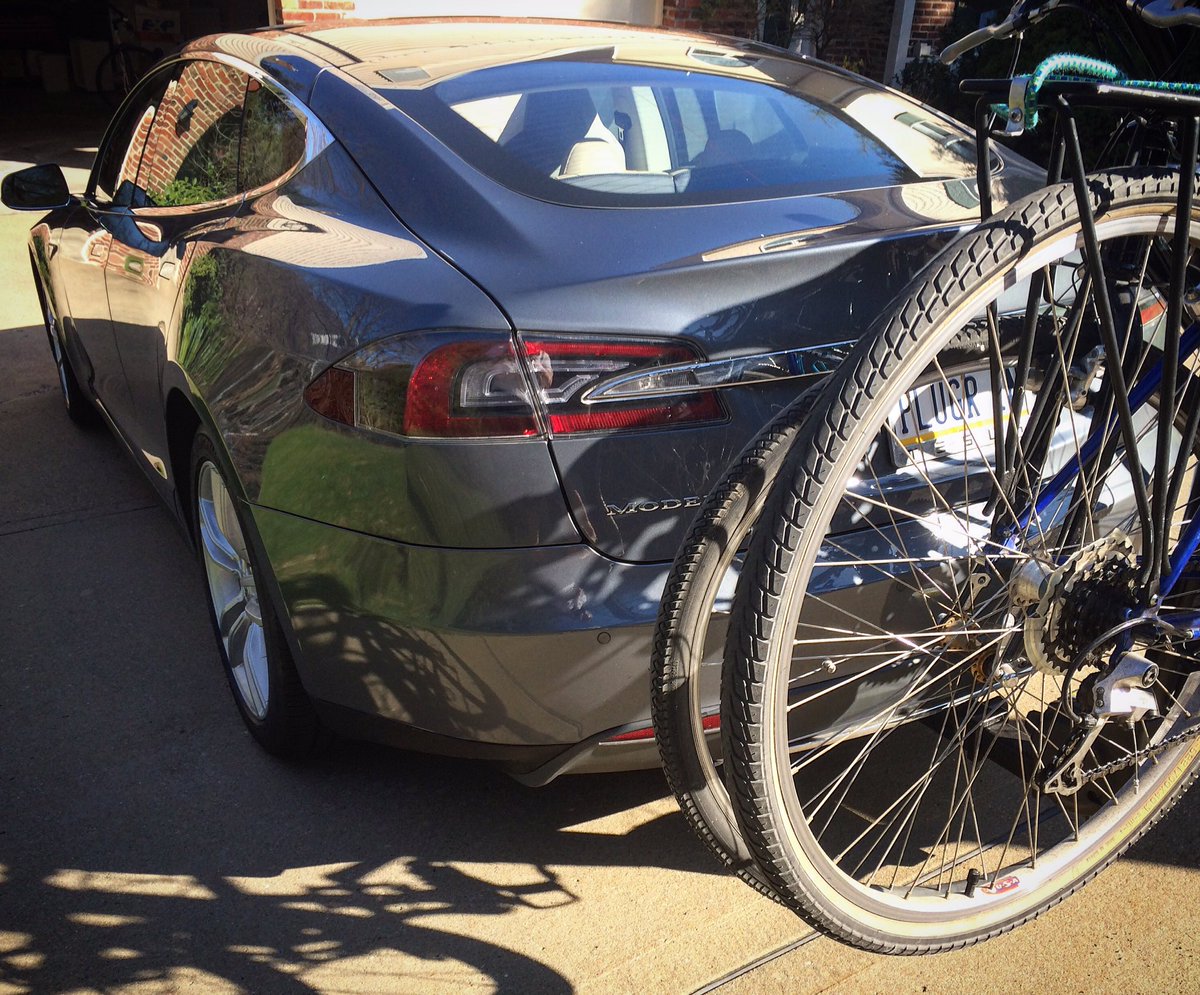
The first major modification we had done to our Tesla– and one of the first reviews I did for Teslarati– was the installation of our Torklift EcoHitch. It was a huge opportunity to get functionality we wanted but I was very nervous about the installation process and, three years later, I’ve discovered my concerns were justified.
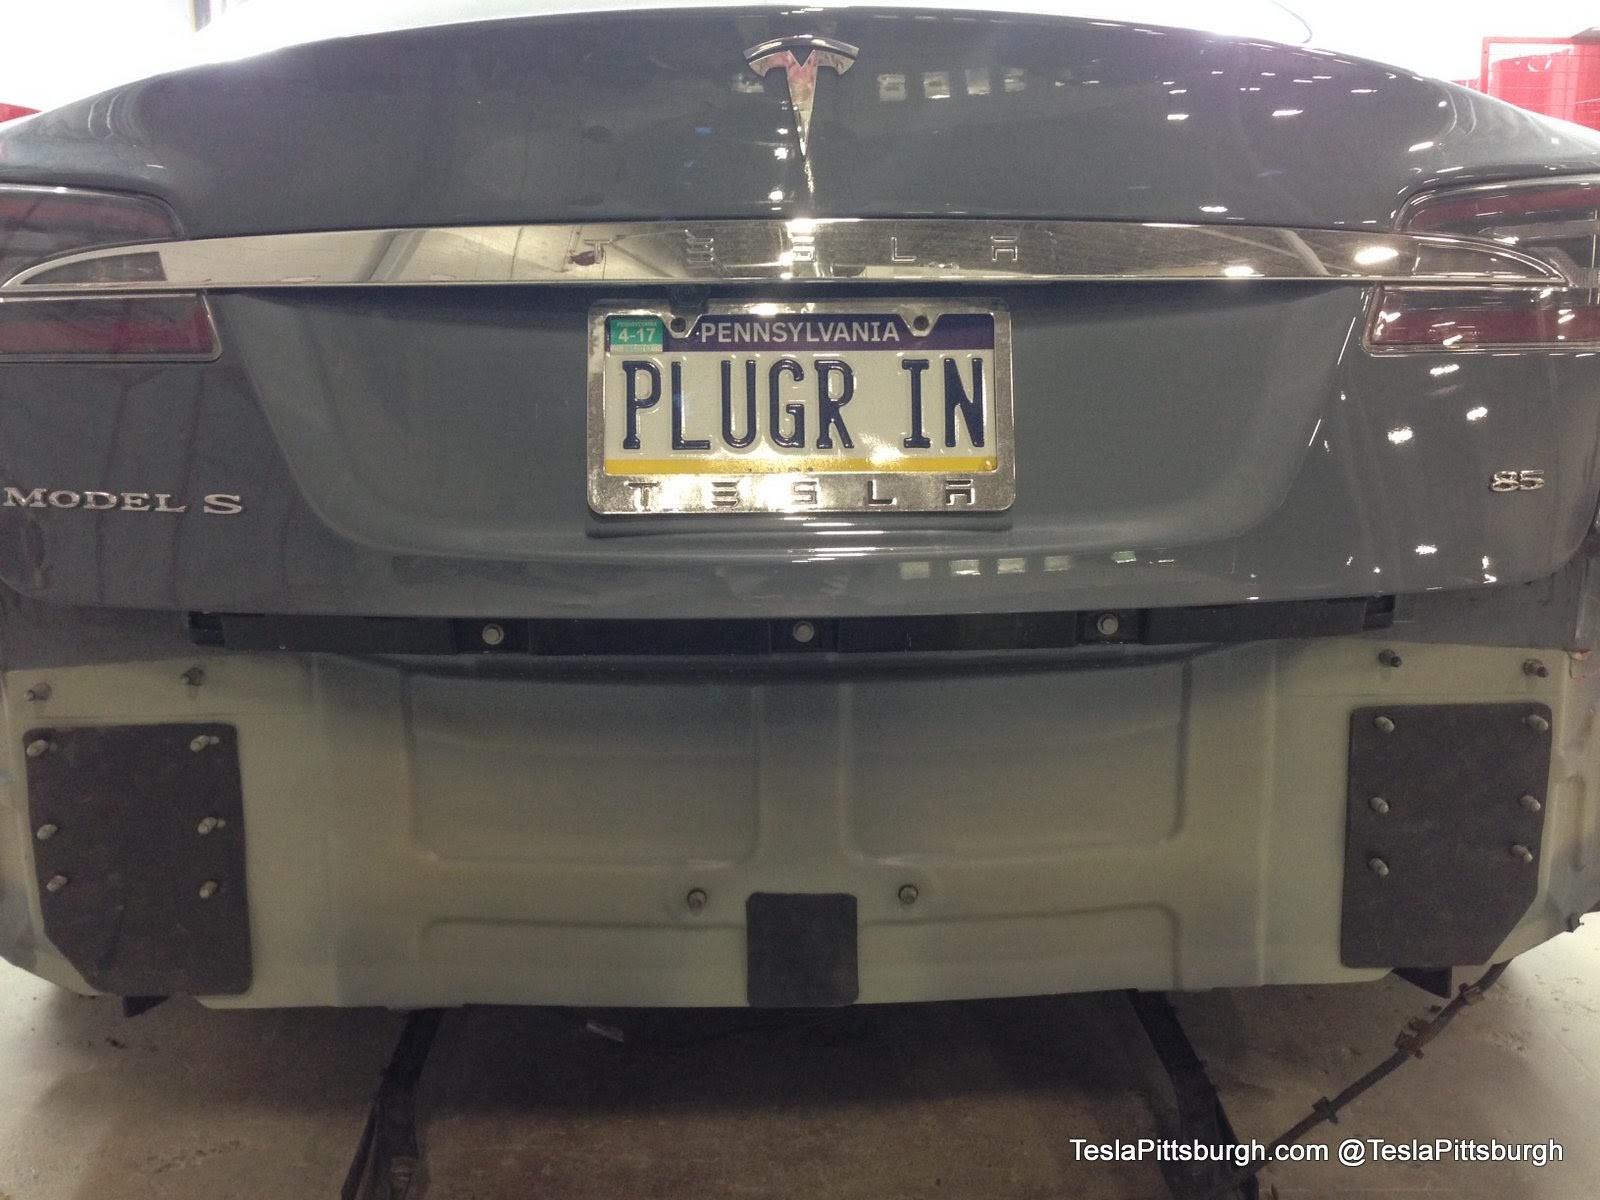
Our Tesla made it over three years without a blemish, but this summer an inattentive minivan driver somehow missed the 3 foot long brake light and rammed our rear bumper. Fortunately, no one was hurt and we were somewhat heartened to see that the damage appeared to be superficial and the car was still usable.
Body by Cochran, our local Tesla-approved body shop, had been working on my car for only a day or so when I got some bad news. I noticed earlier in the summer that when I pulled the hitch cover out it was rusty and hard to remove. Since the experts at Cochran would be removing the bumper anyway, I asked them to poke around and let me know what the condition of the hitch was like. I had been recently working under my old Subaru and after eyeballing the Titanic-level rust on its hitch, the cogs in my brain were turning… wondering if the hitch on the Tesla would be better protected hidden behind all those underbody shrouds and the bumper itself.
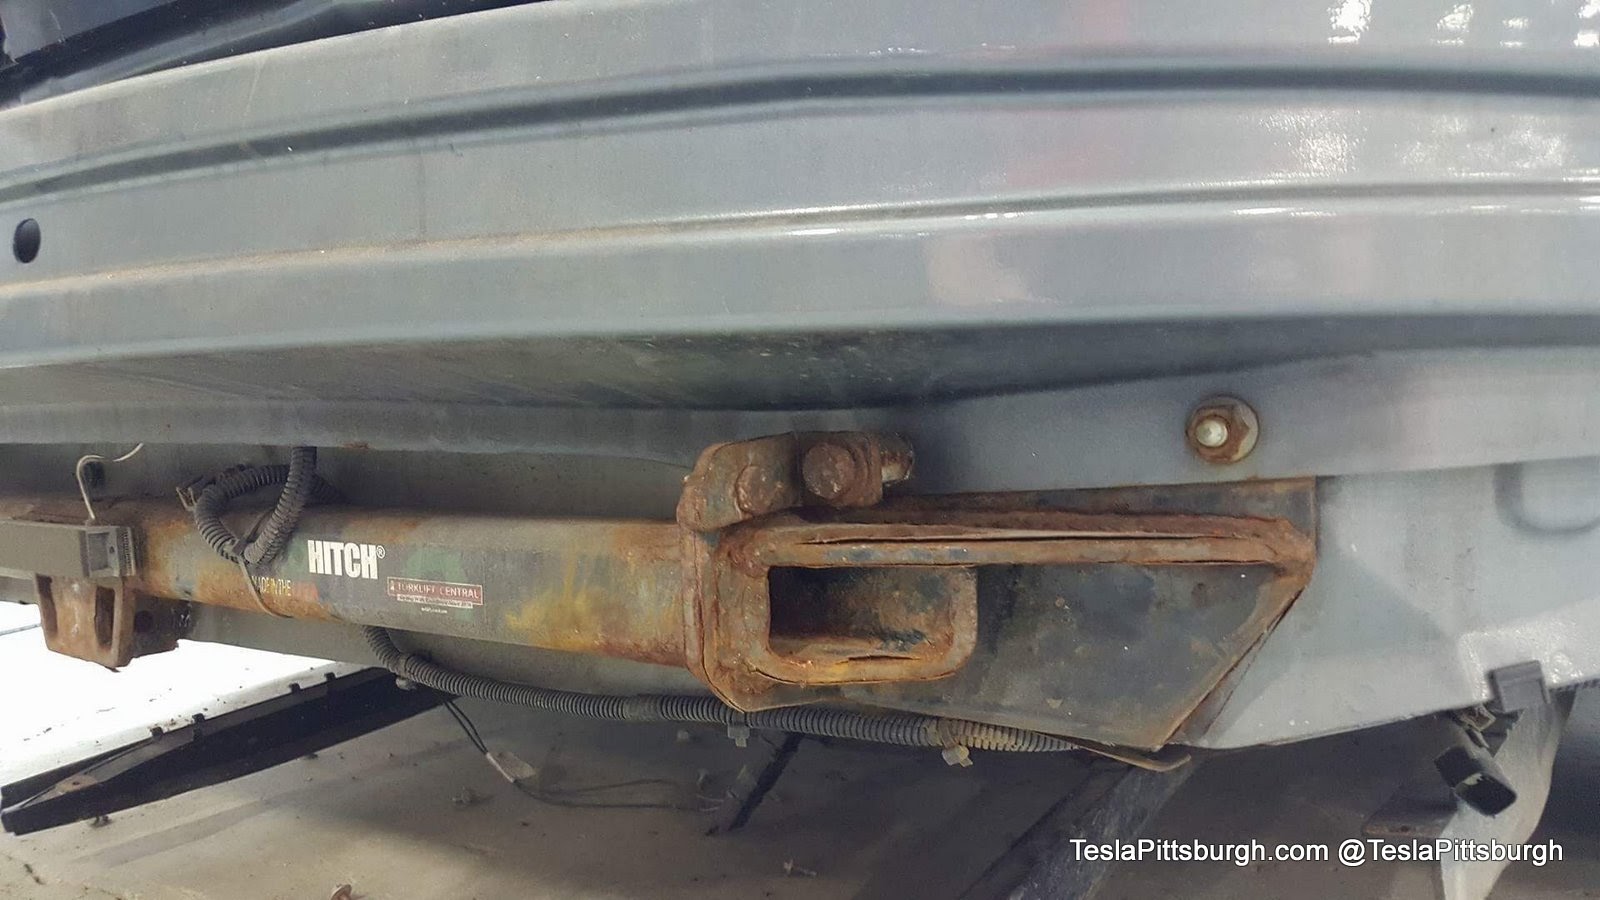

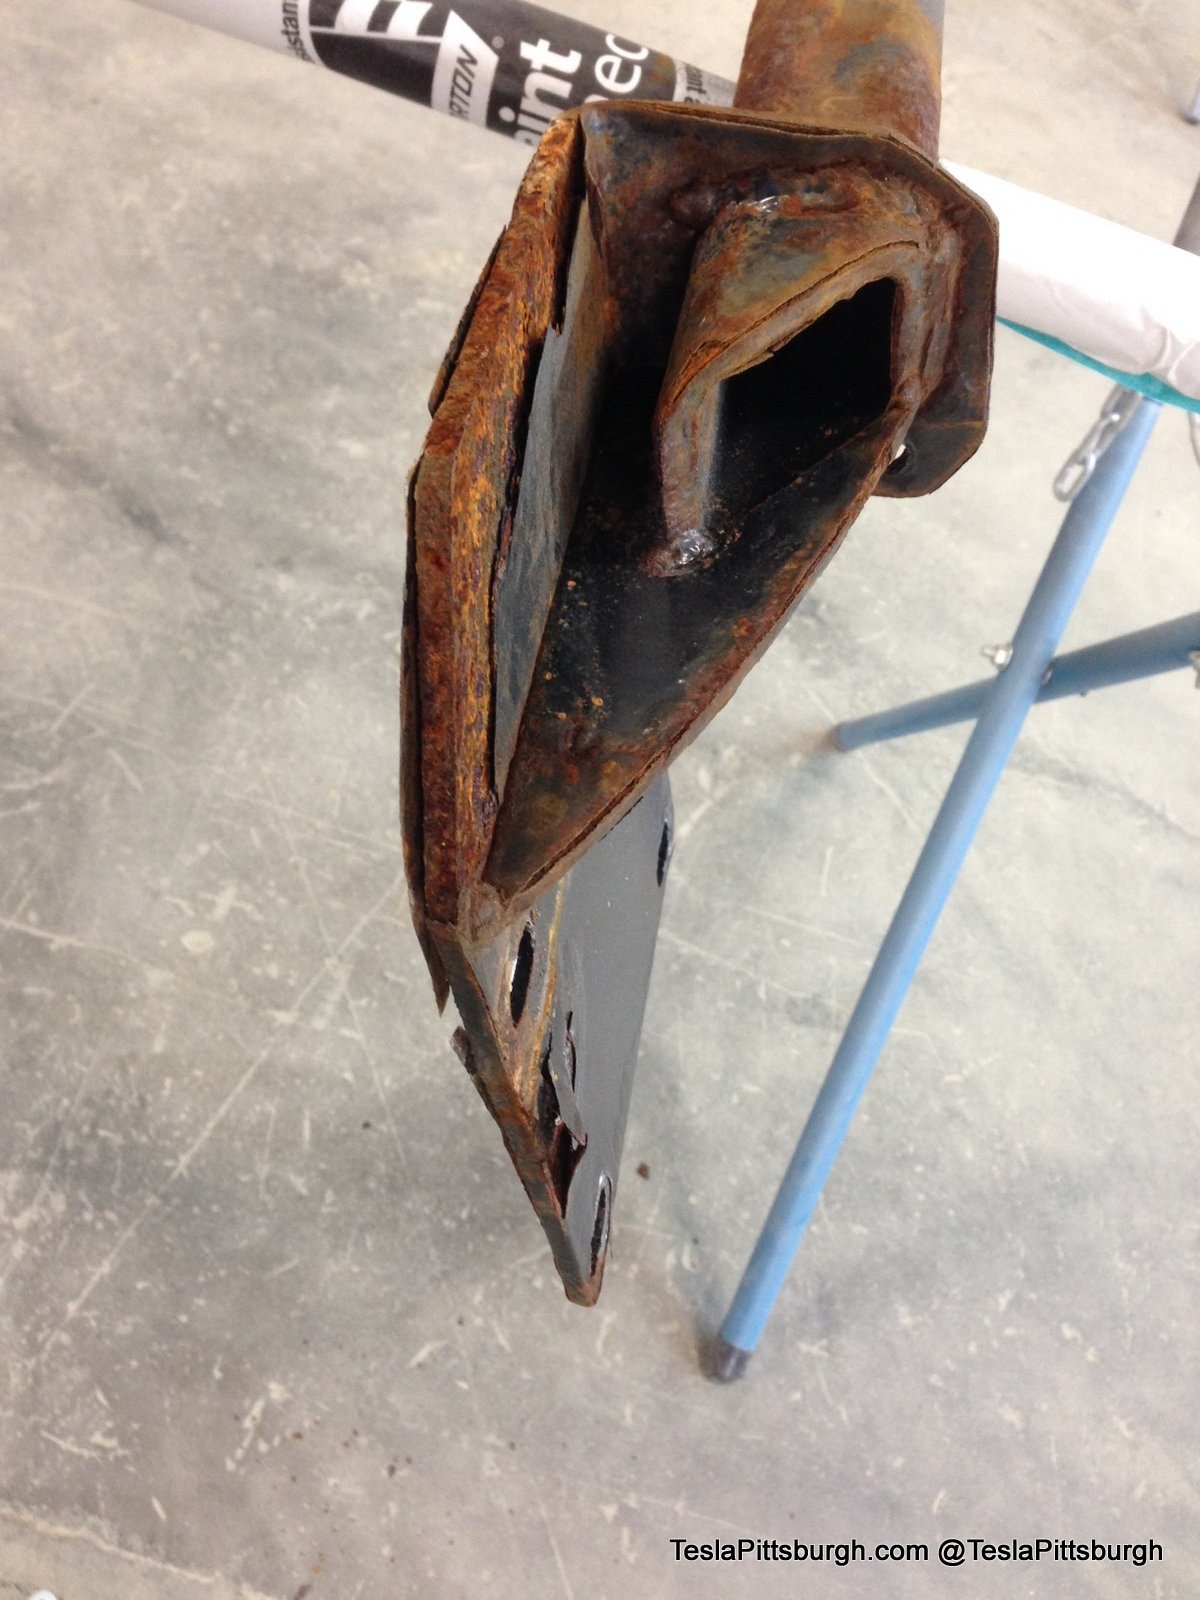
The pictures sent from Cochran were disturbing. At first the shock of all the rust was concern enough, but I couldn’t figure out why the finish on the hitch was so badly disintegrated. It was only three years old, installed with maniacal attention to detail and all the instructions were followed to the letter and then some. Yet there was no refuting the pictures and the Cochran techs agreed that the failure of the finish was troubling.
I could understand the rust on my old Subaru’s hitch. Like most ICE vehicles, it’s slung under the rear bumper and it’s completely exposed to the elements churned up by the winter roads. Not a single bit of it is protected. Debris and road grit impact the paint, the paint is compromised and slowly but surely, rust takes hold and soon coats the entire assembly. But on the Tesla, the Torklift Ecohitch is completely encased by the bumper and I even had the optional cover on to seal it the rest of the way. Nothing EVER touches the hitch as it is completely protected by various aero shields and the bumper itself.
Even more troubling, the experts at Body by Cochran expressed that they were concerned about what was going on behind the hitch and implored me to have it completely removed and inspected. The surface rust was only part of the problem. As one of the few Tesla-authorized body shops in the region, Cochran’s staff has been educated in the unique problems with restoring crunched Teslas, namely: galvanic corrosion. I didn’t hesitate. Take it all off, baby!

You don’t have to be a metallurgy expert to understand the potential insidiousness of galvanic corrosion. Essentially, two dissimilar metals will have different electrode potentials. These potentials result in one of the metals corroding the other, much like rust, but it can happen without any other outside elements. As the ions migrate from one metal to the other, the corrosion can be aggressive and catastrophic. It’s the basic principle behind the anode rods in your hot water heater, except on the Tesla nothing is sacrificial and certainly not the aluminum structure of the car itself!
Keeping steel and aluminum separate is– no exaggeration– a full-time job. When I picked up the car, the Cochran staff walked me through their shop and explained to me how they have separate work areas and tools for aluminum parts. There are even large curtains to cordon off areas of the shop because even sanded metal grit can get airborne and into the structures and cause problems later. It’s an obsessive nightmare trying to work around all the weird metallurgy, but just another day at the office for these guys.
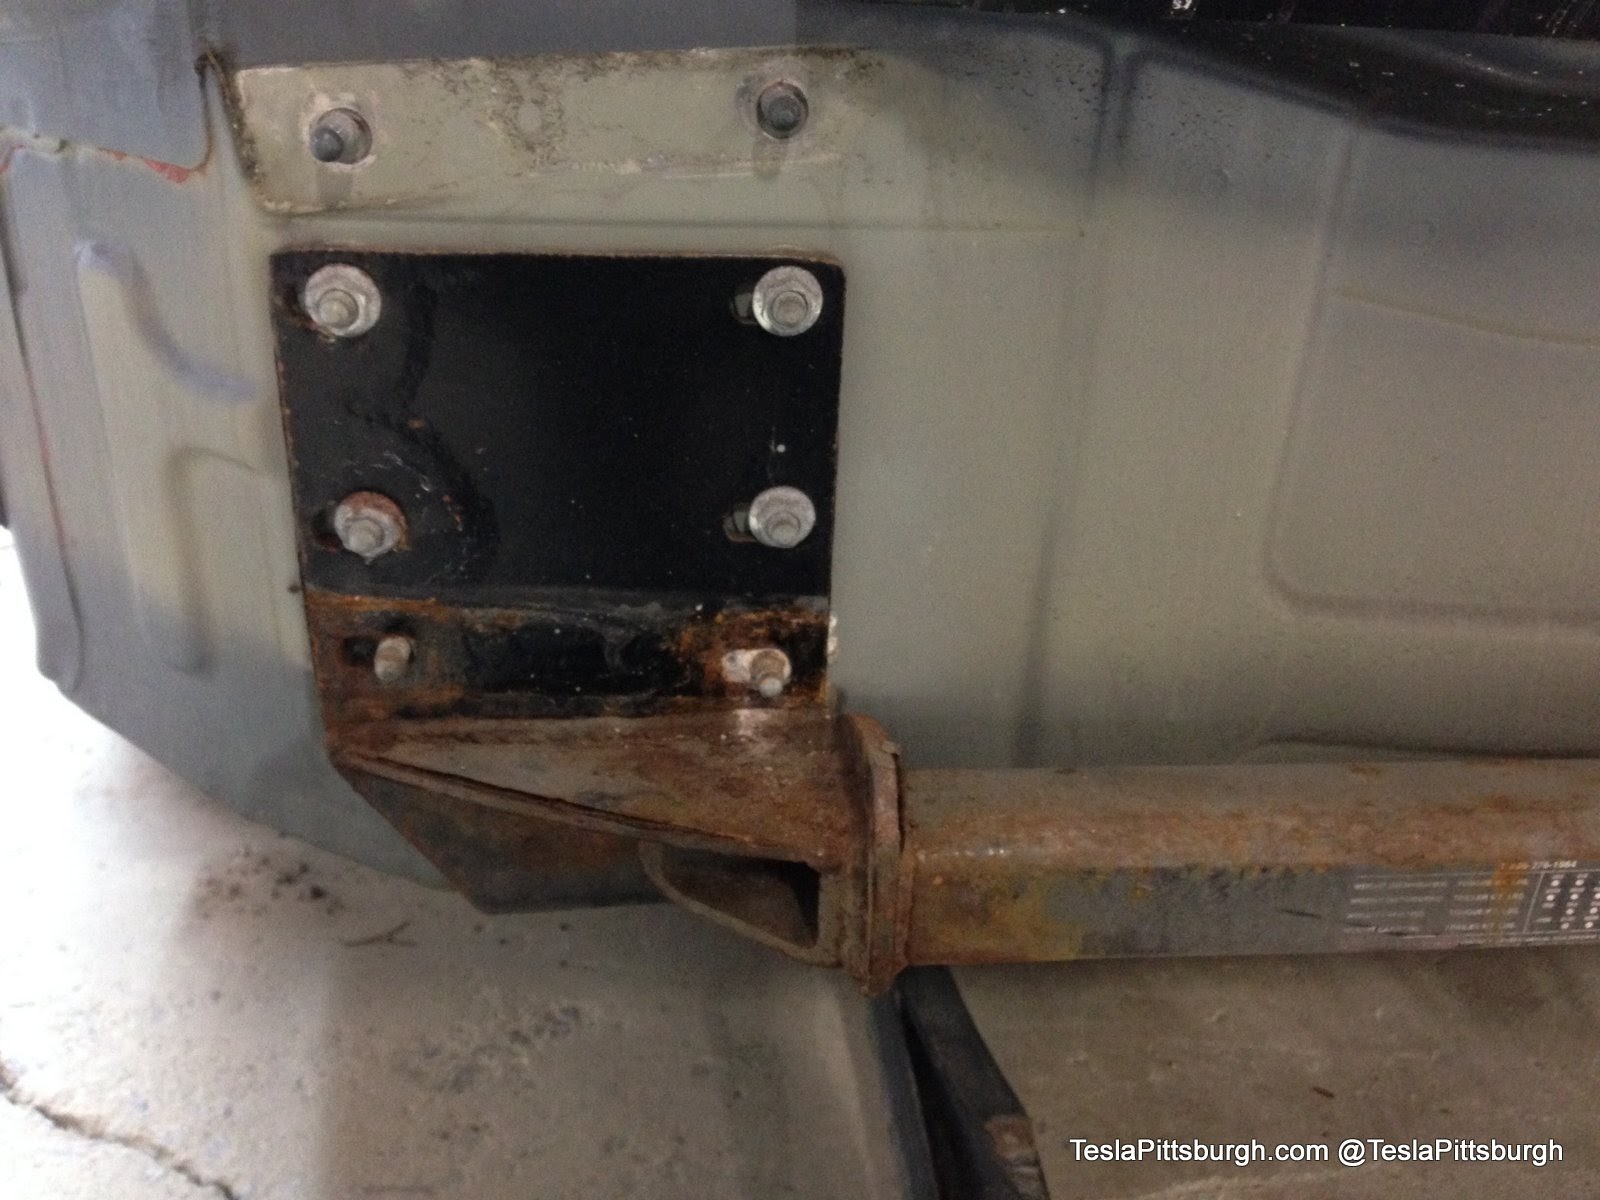
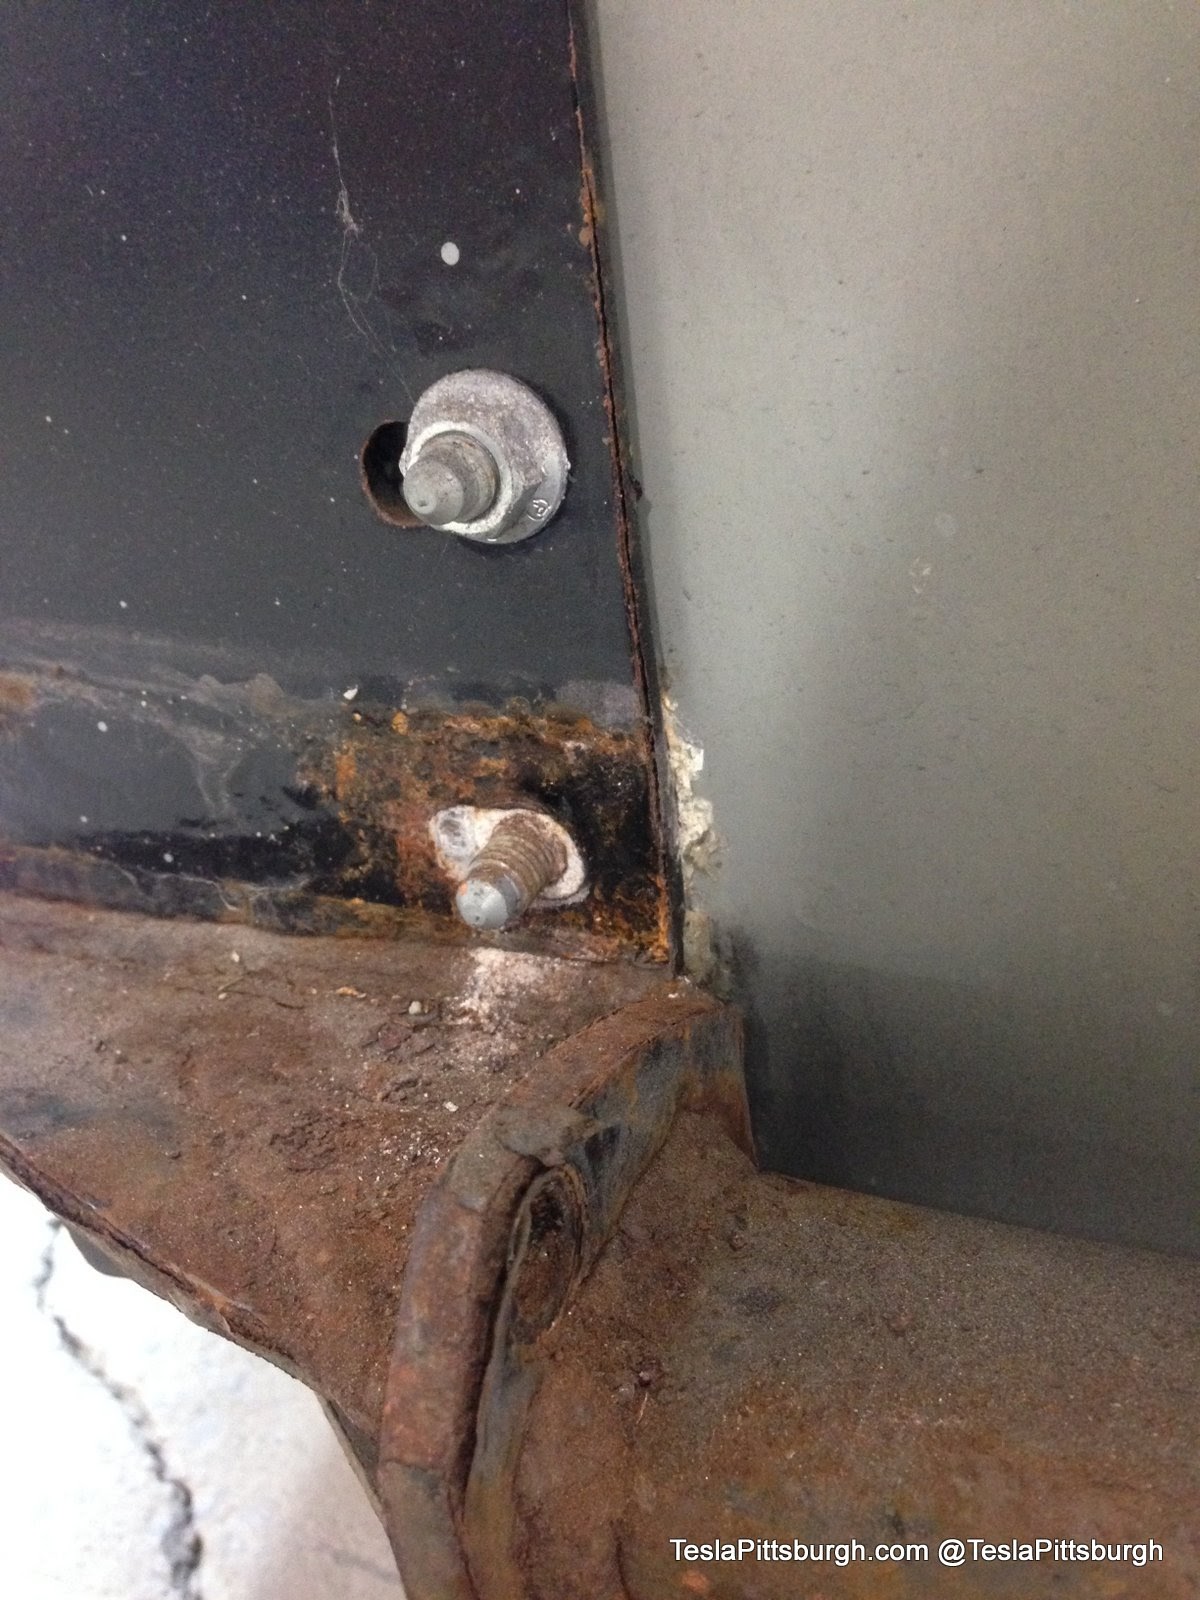
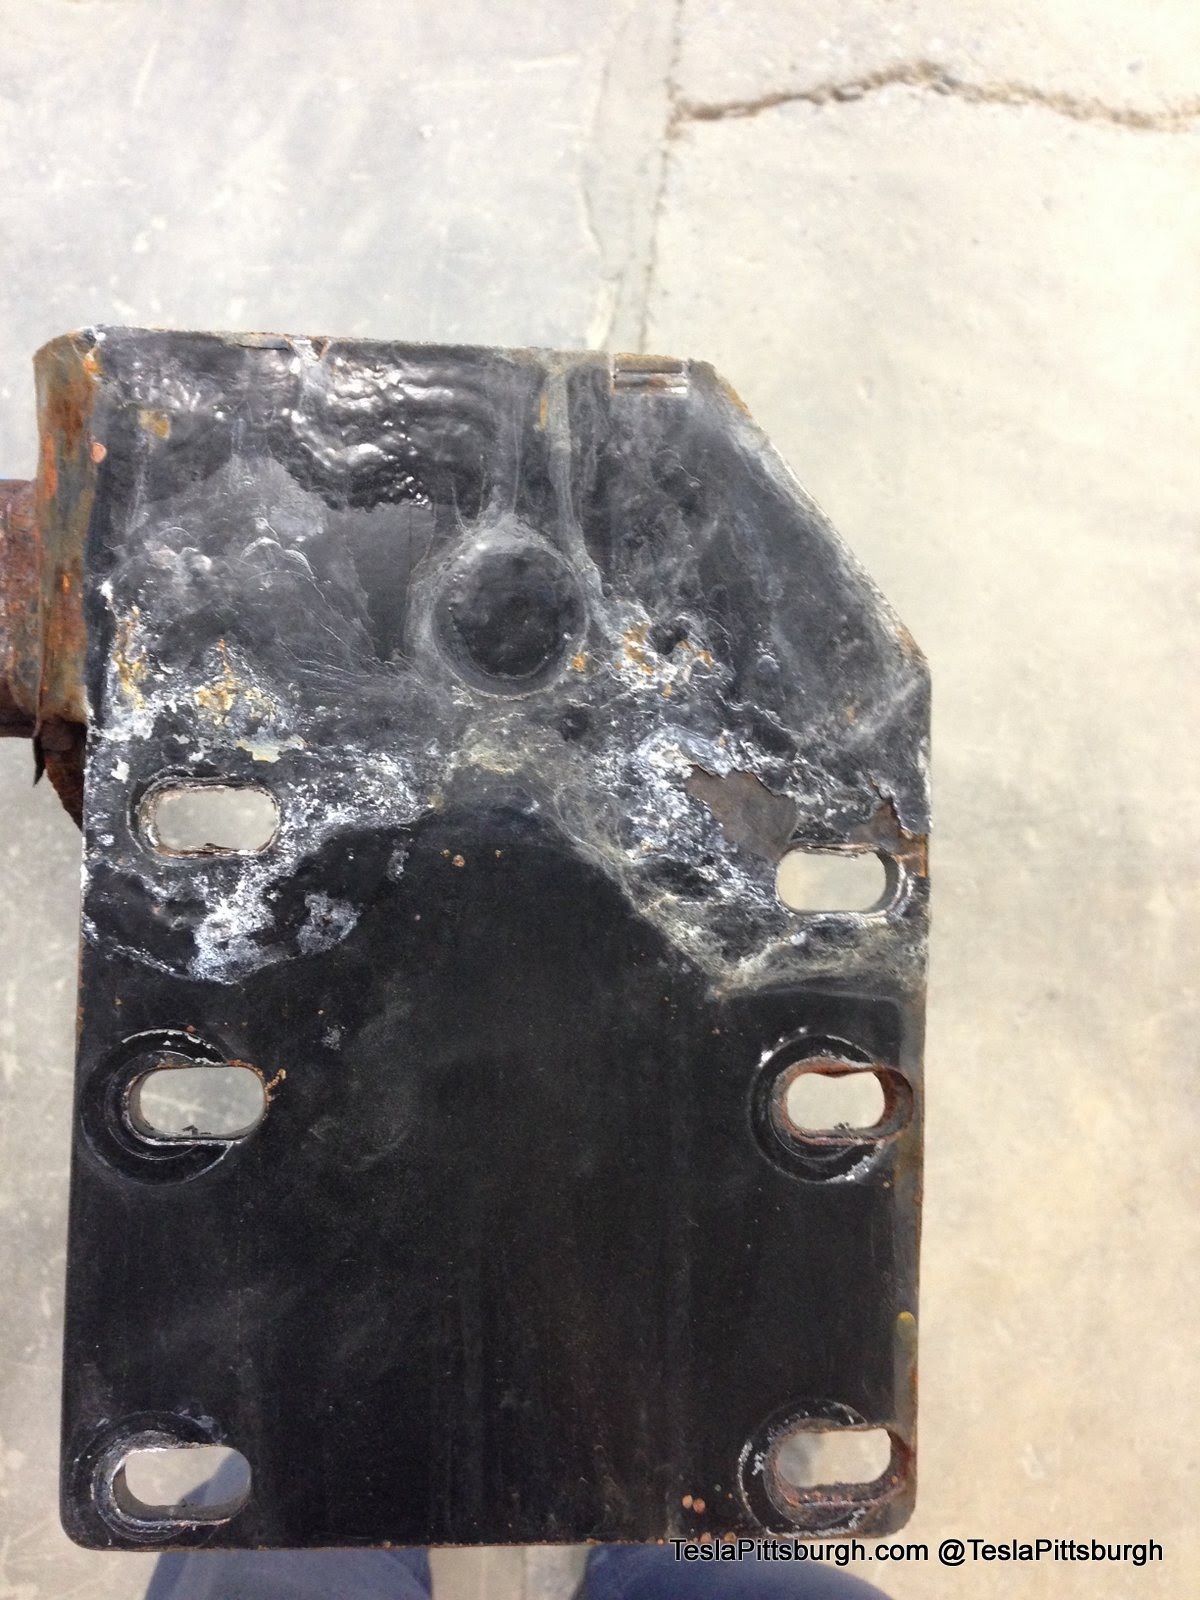
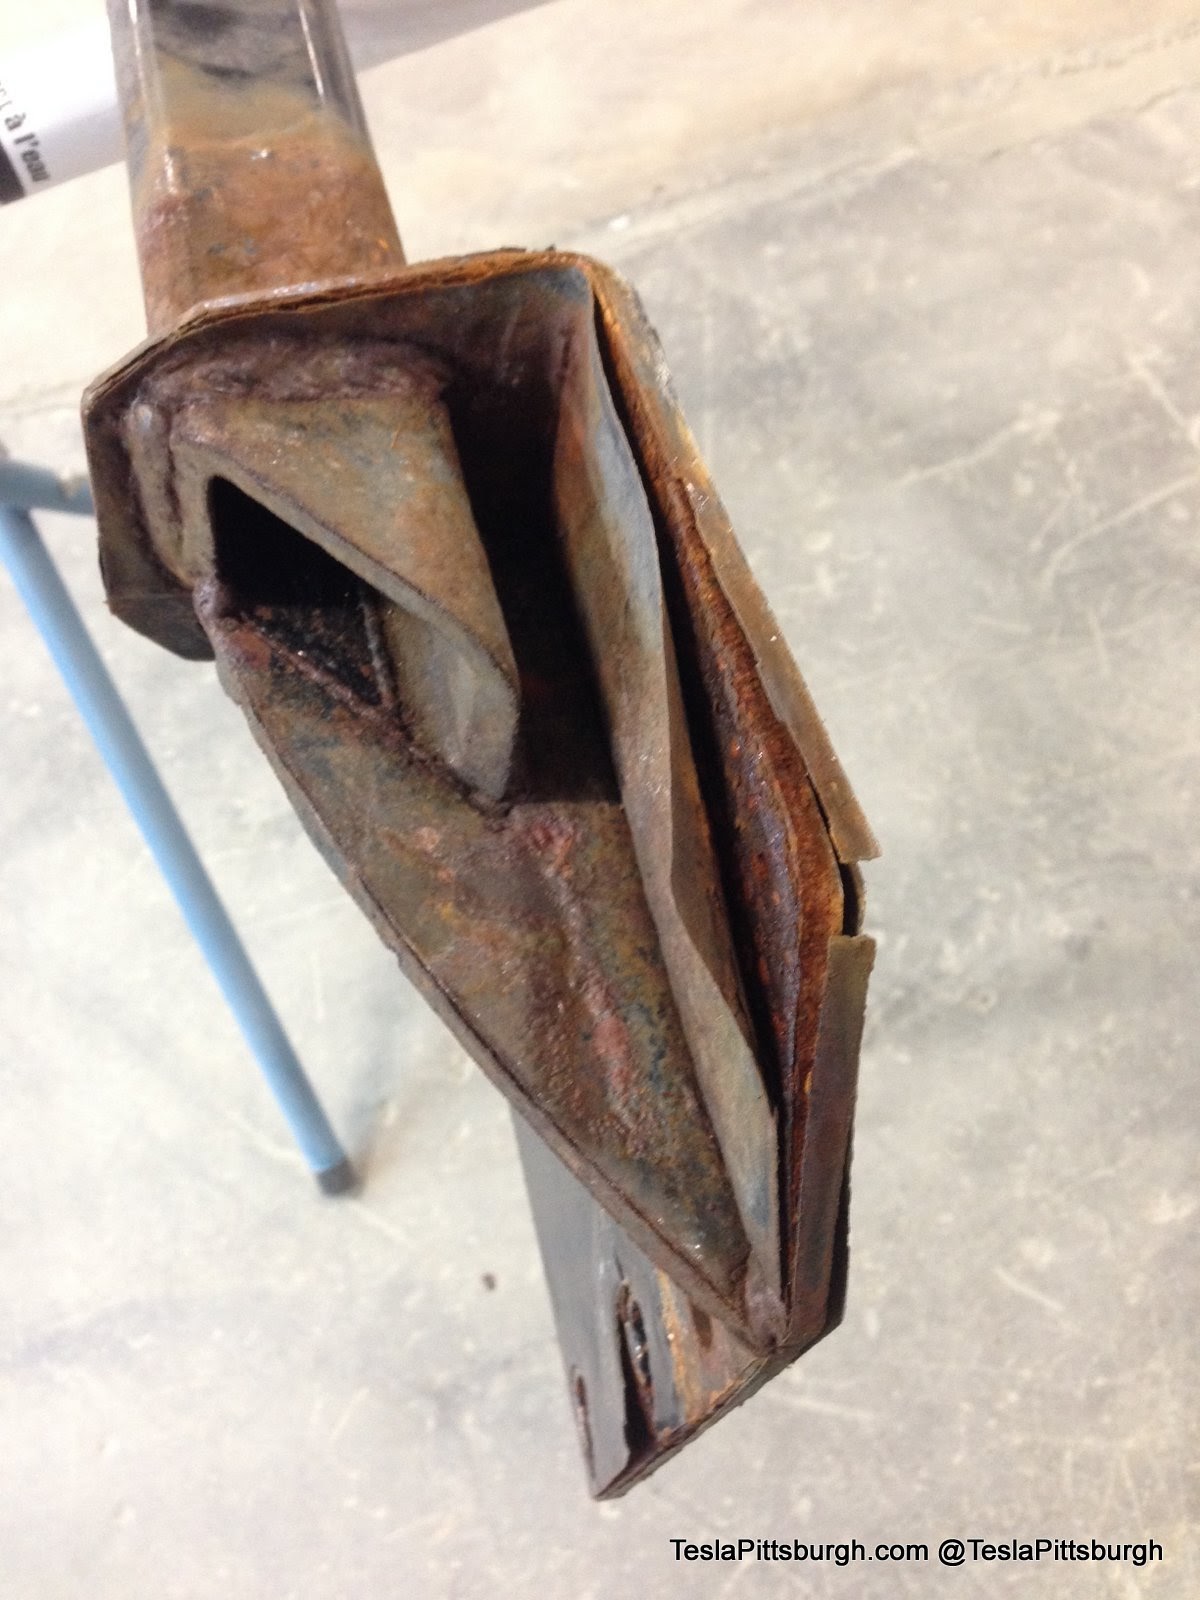
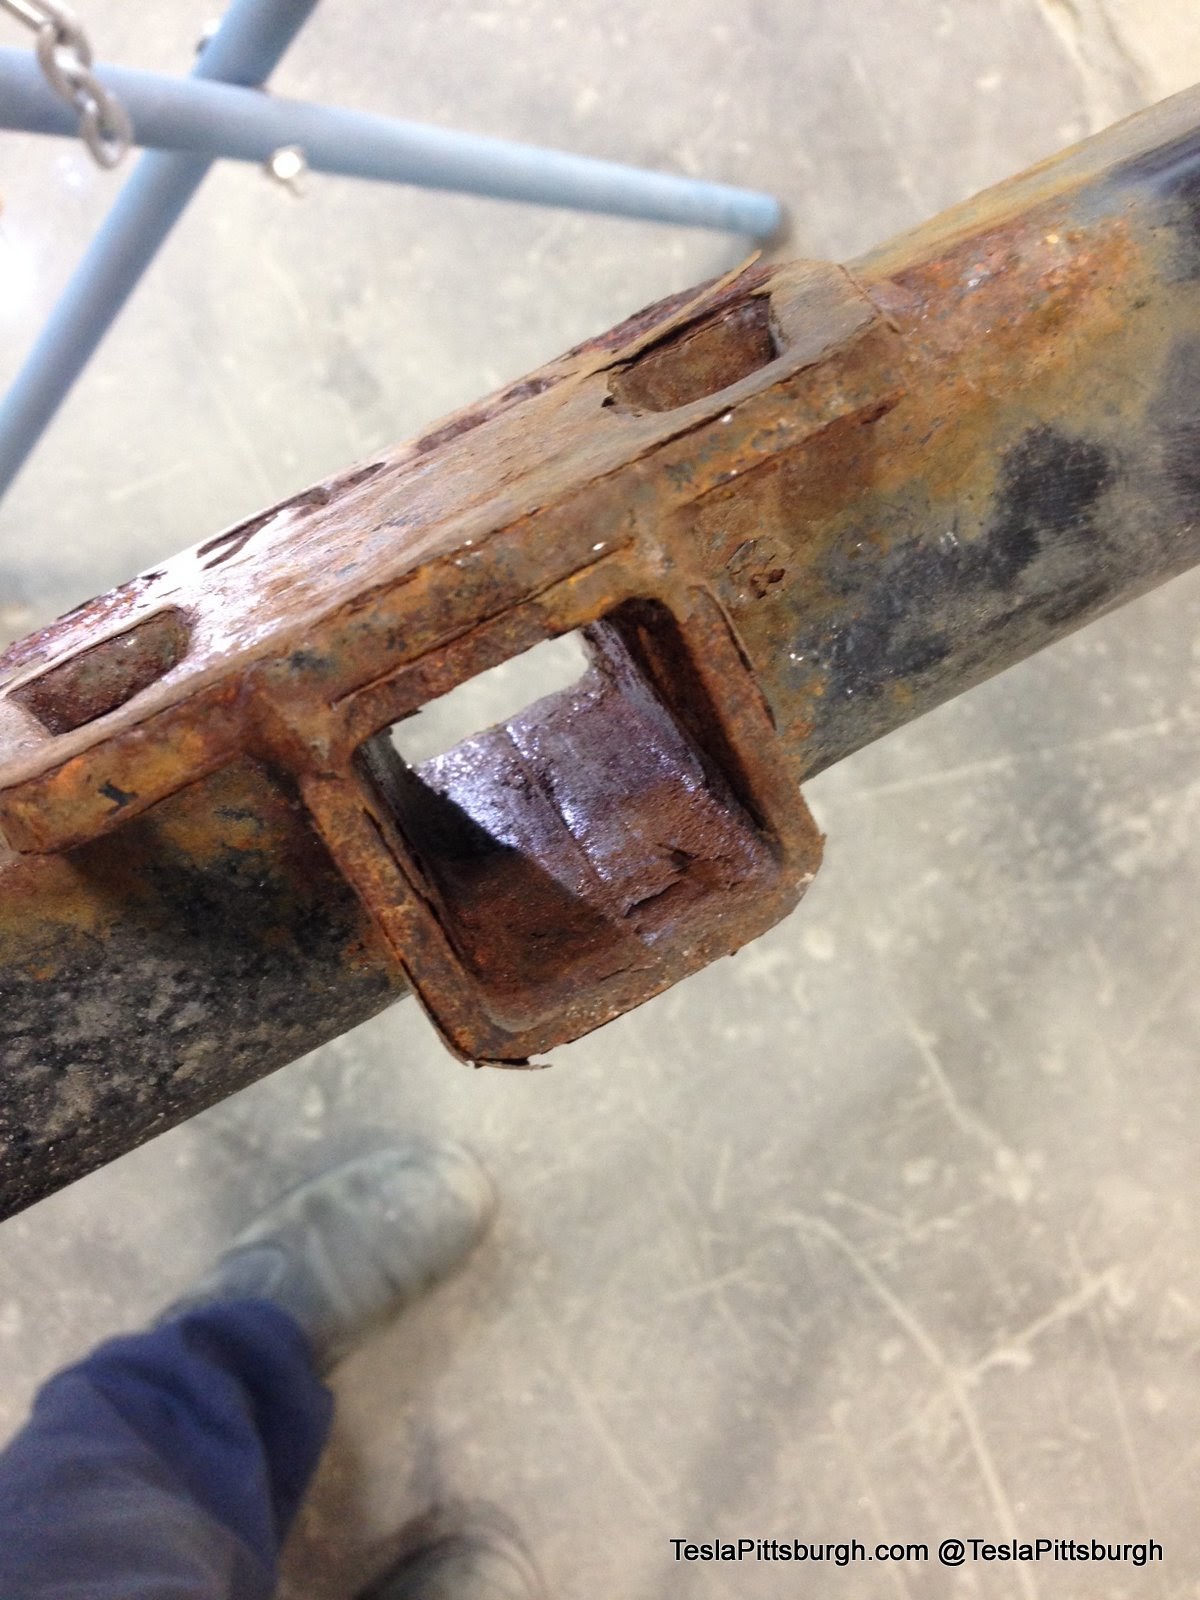
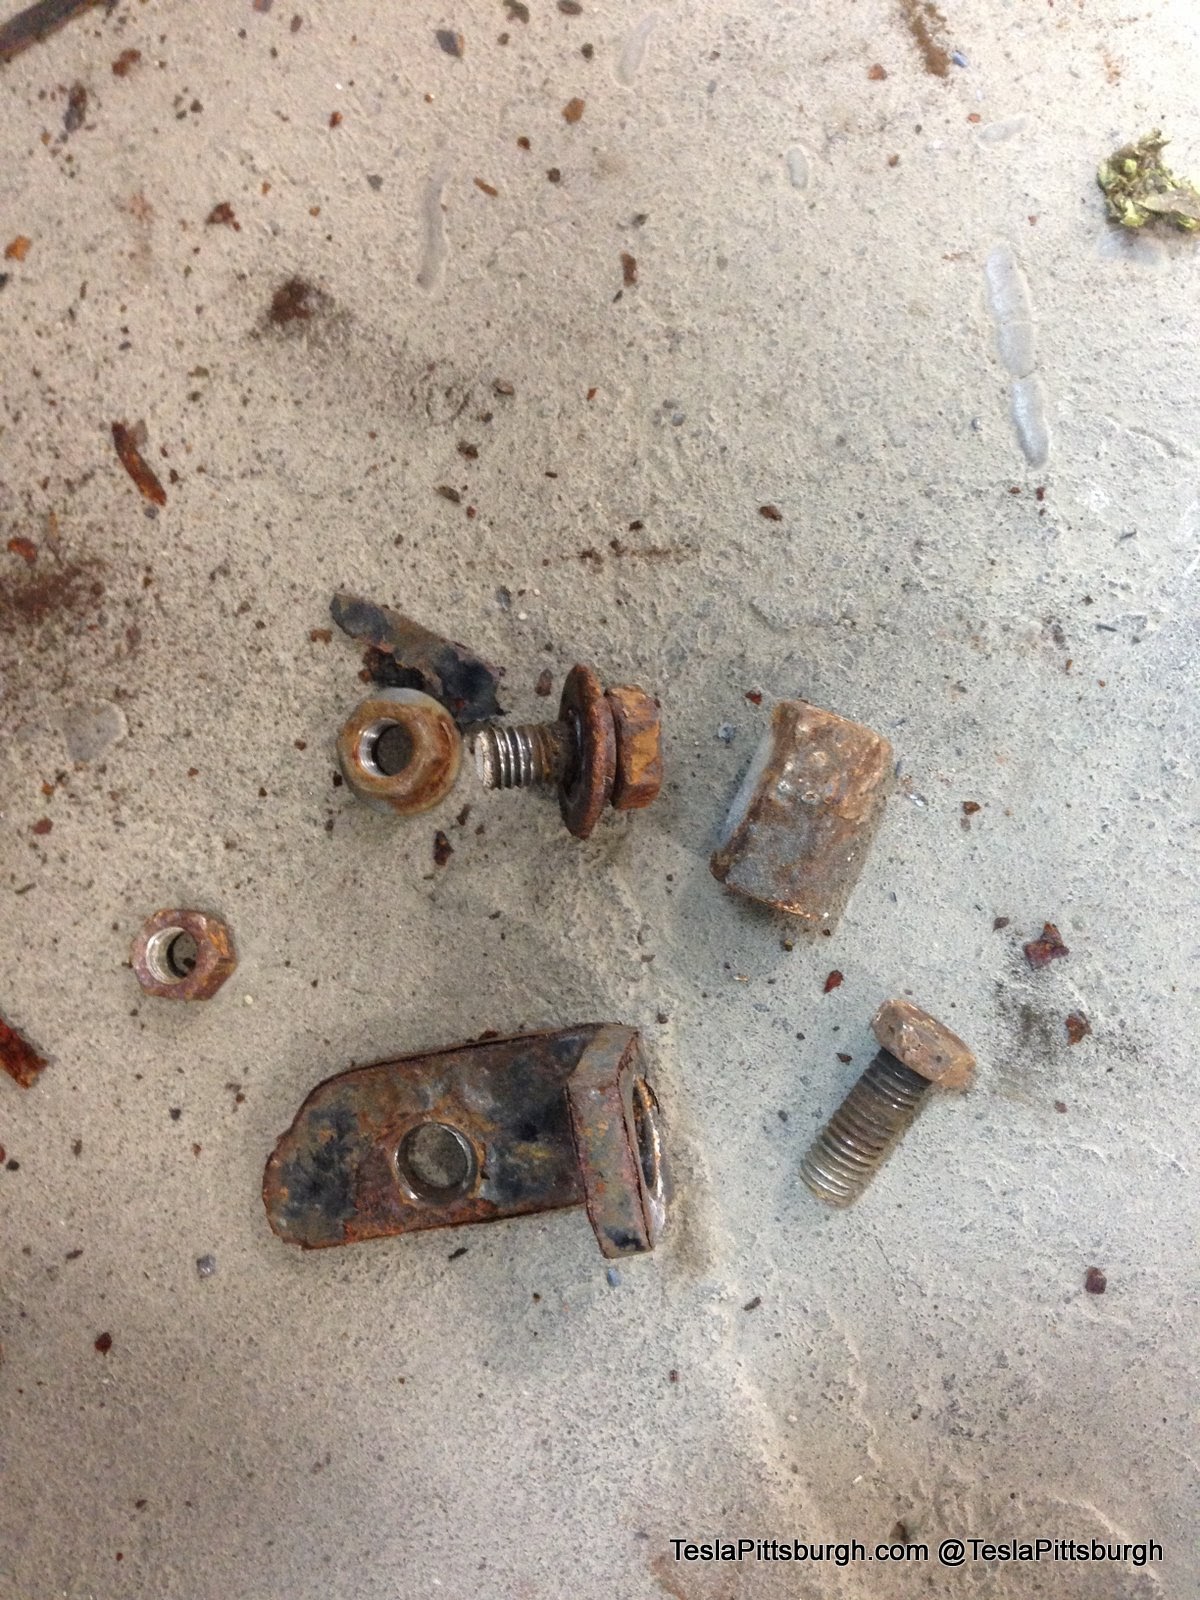
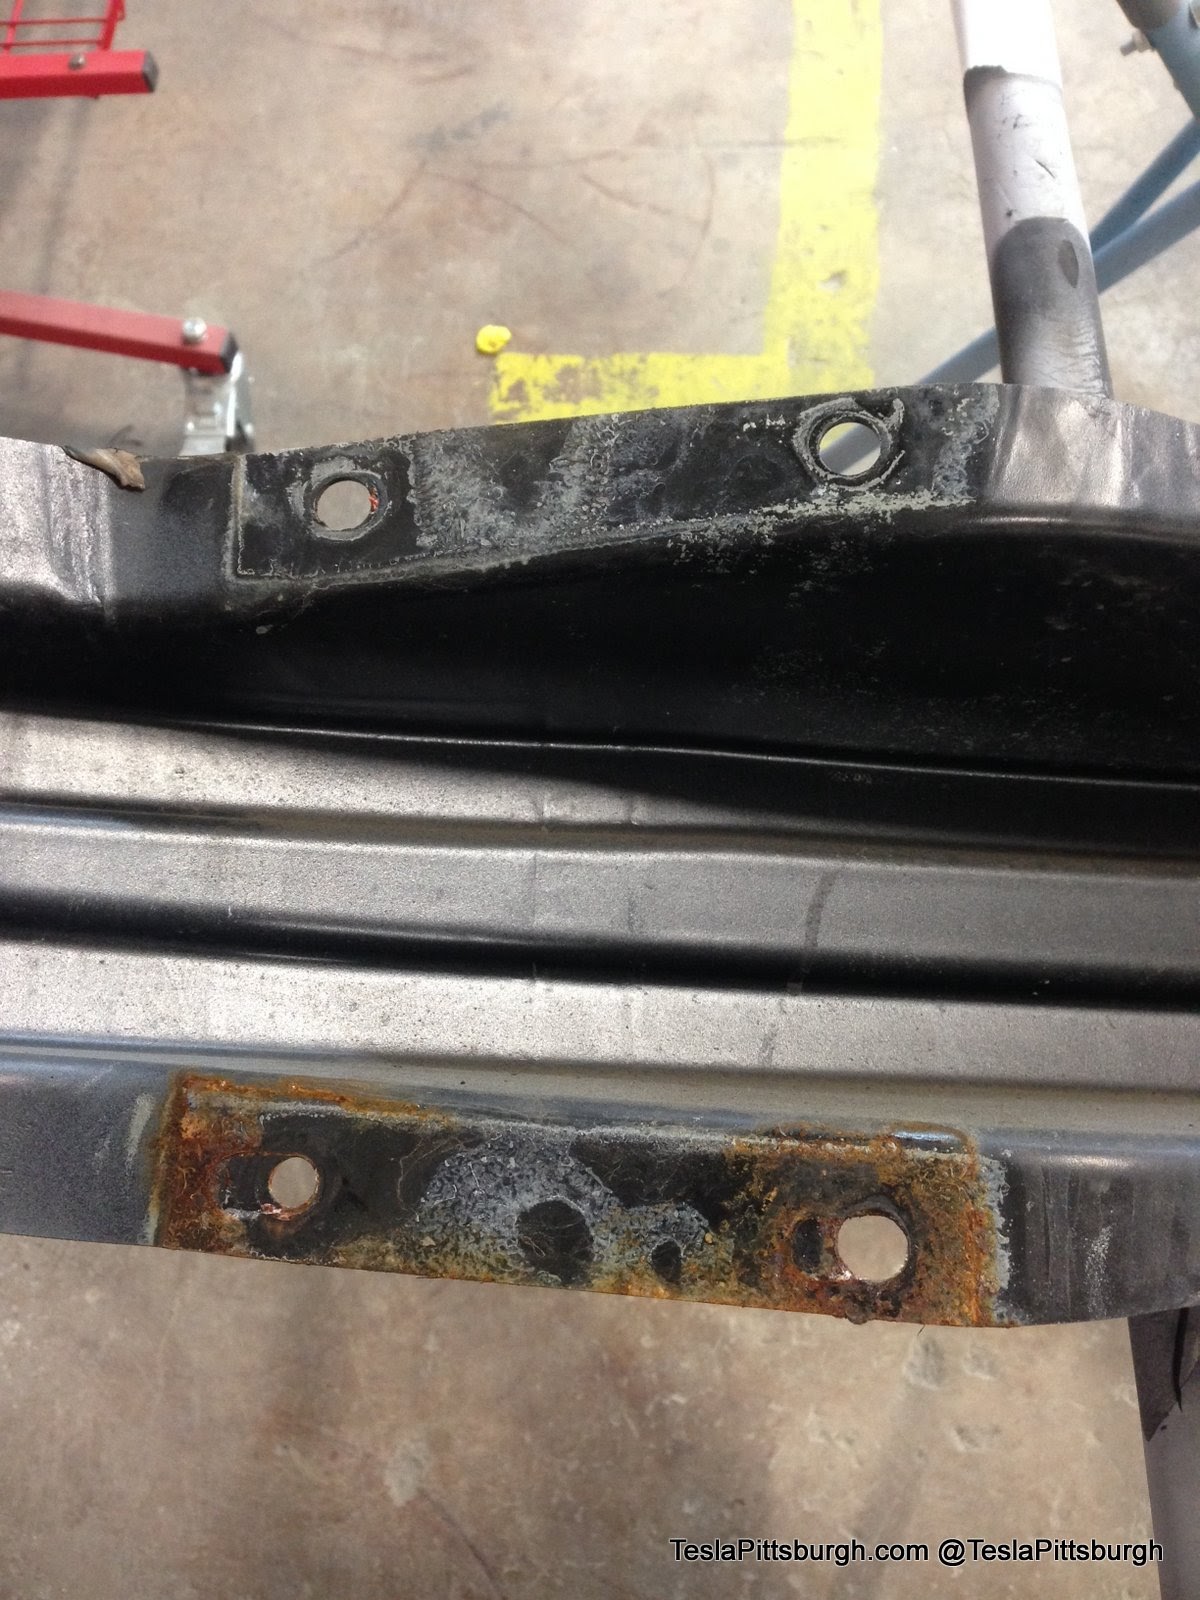
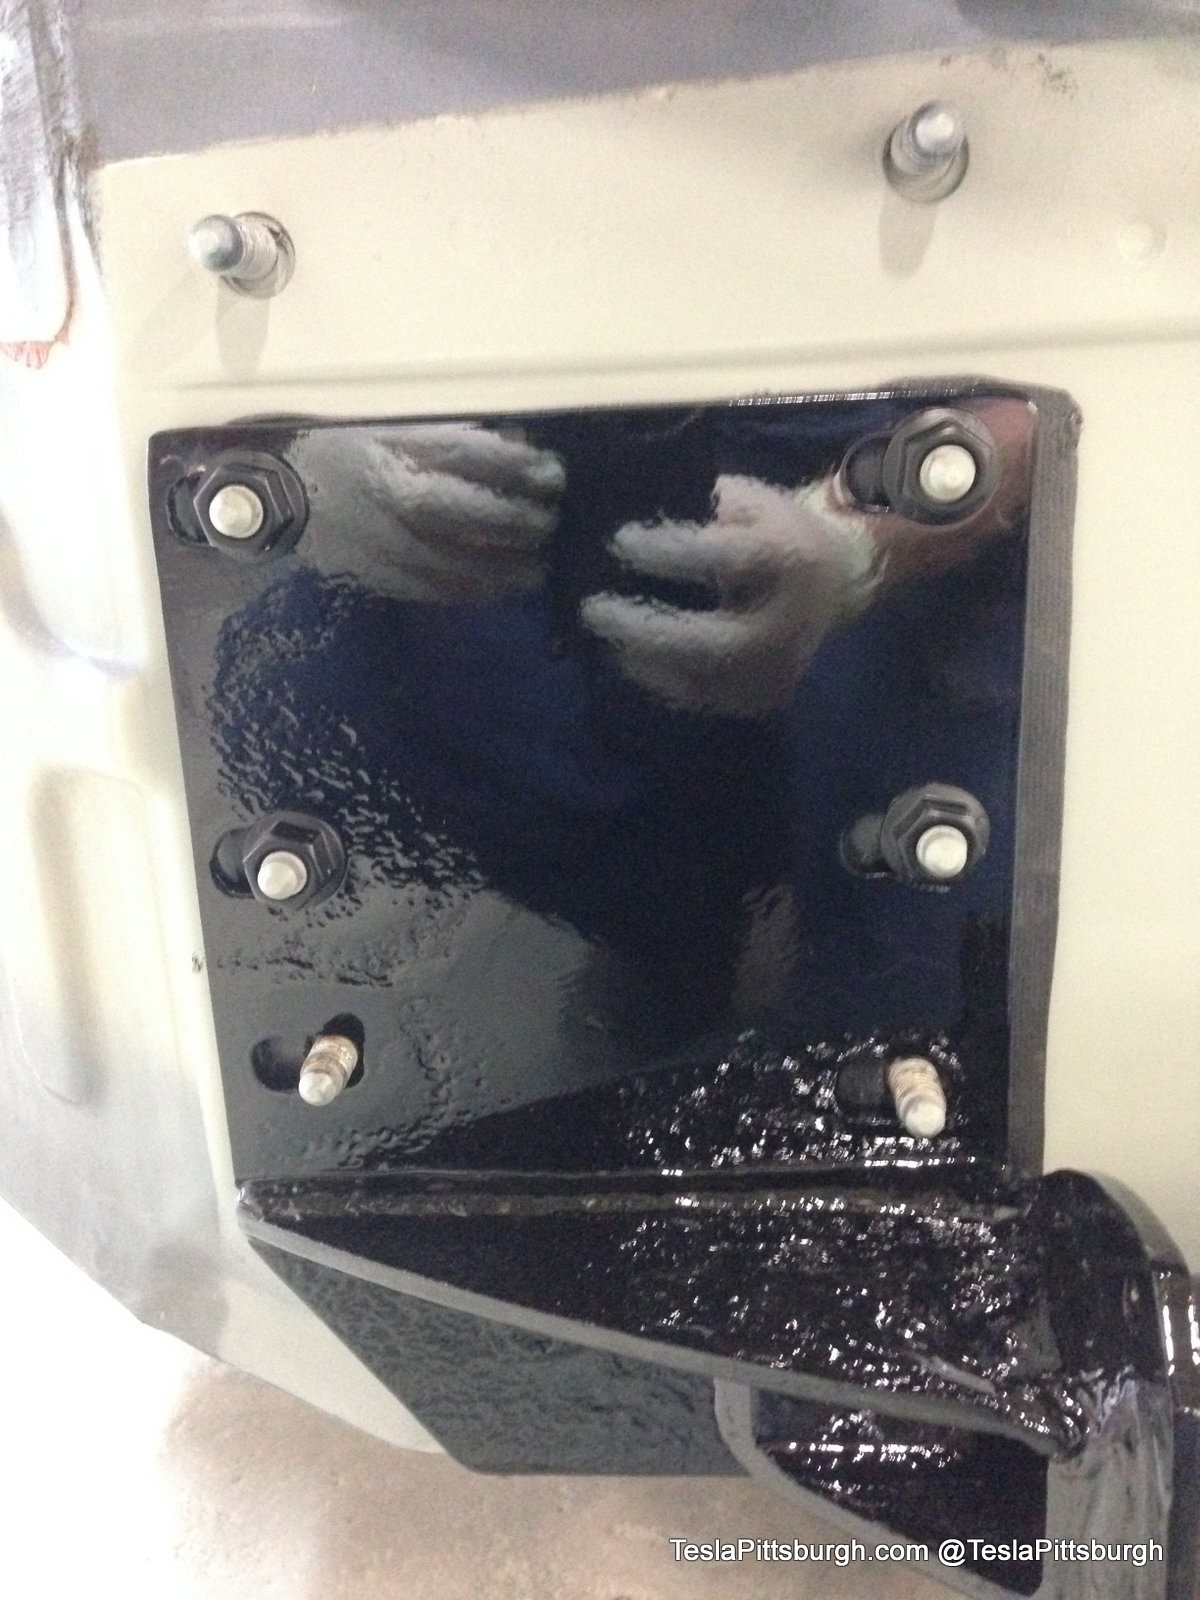
When the steel Torklift Ecohitch was first installed, it was separated from the aluminum structure of the Tesla by its coating. As the coating failed, the steel began to make a direct contact to the aluminum and it was eating away at the frame of the Tesla. The brownish-red rust of steel is then complimented by the white-grey ash of the galvanic corrosion. Warning! These pictures are a little disturbing (at least to me):
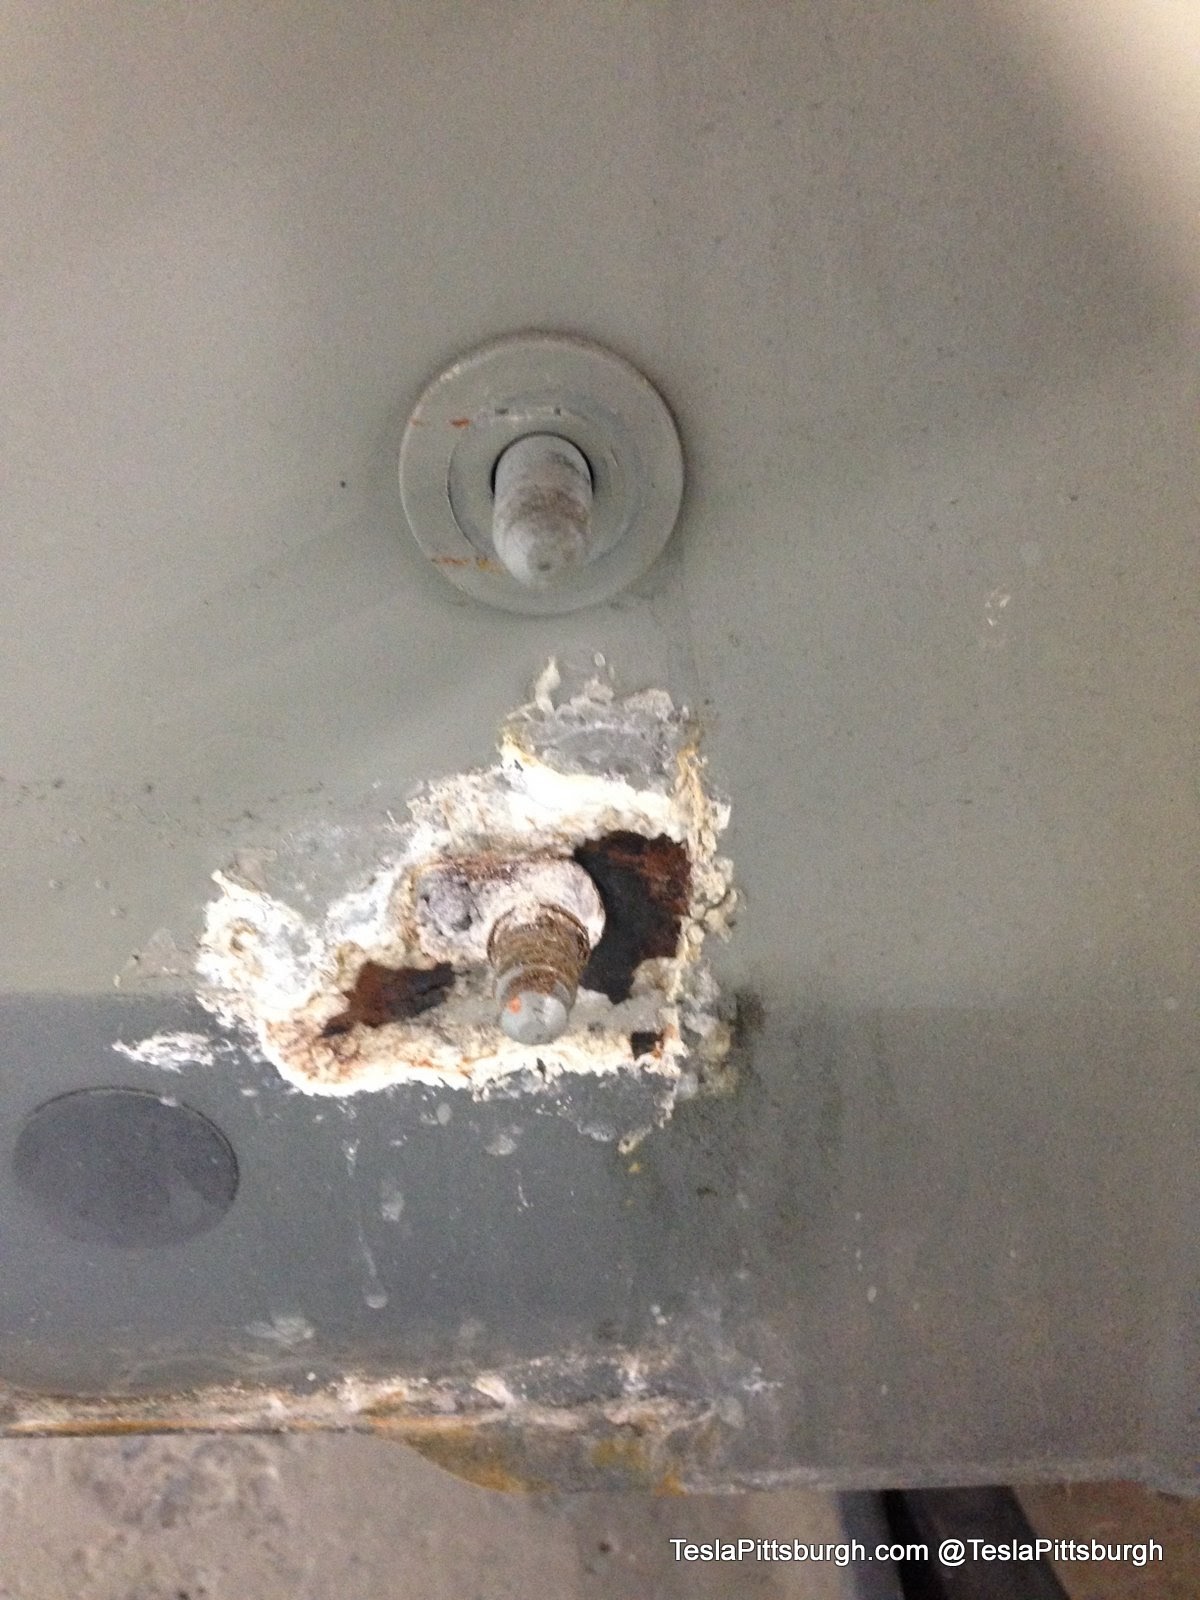
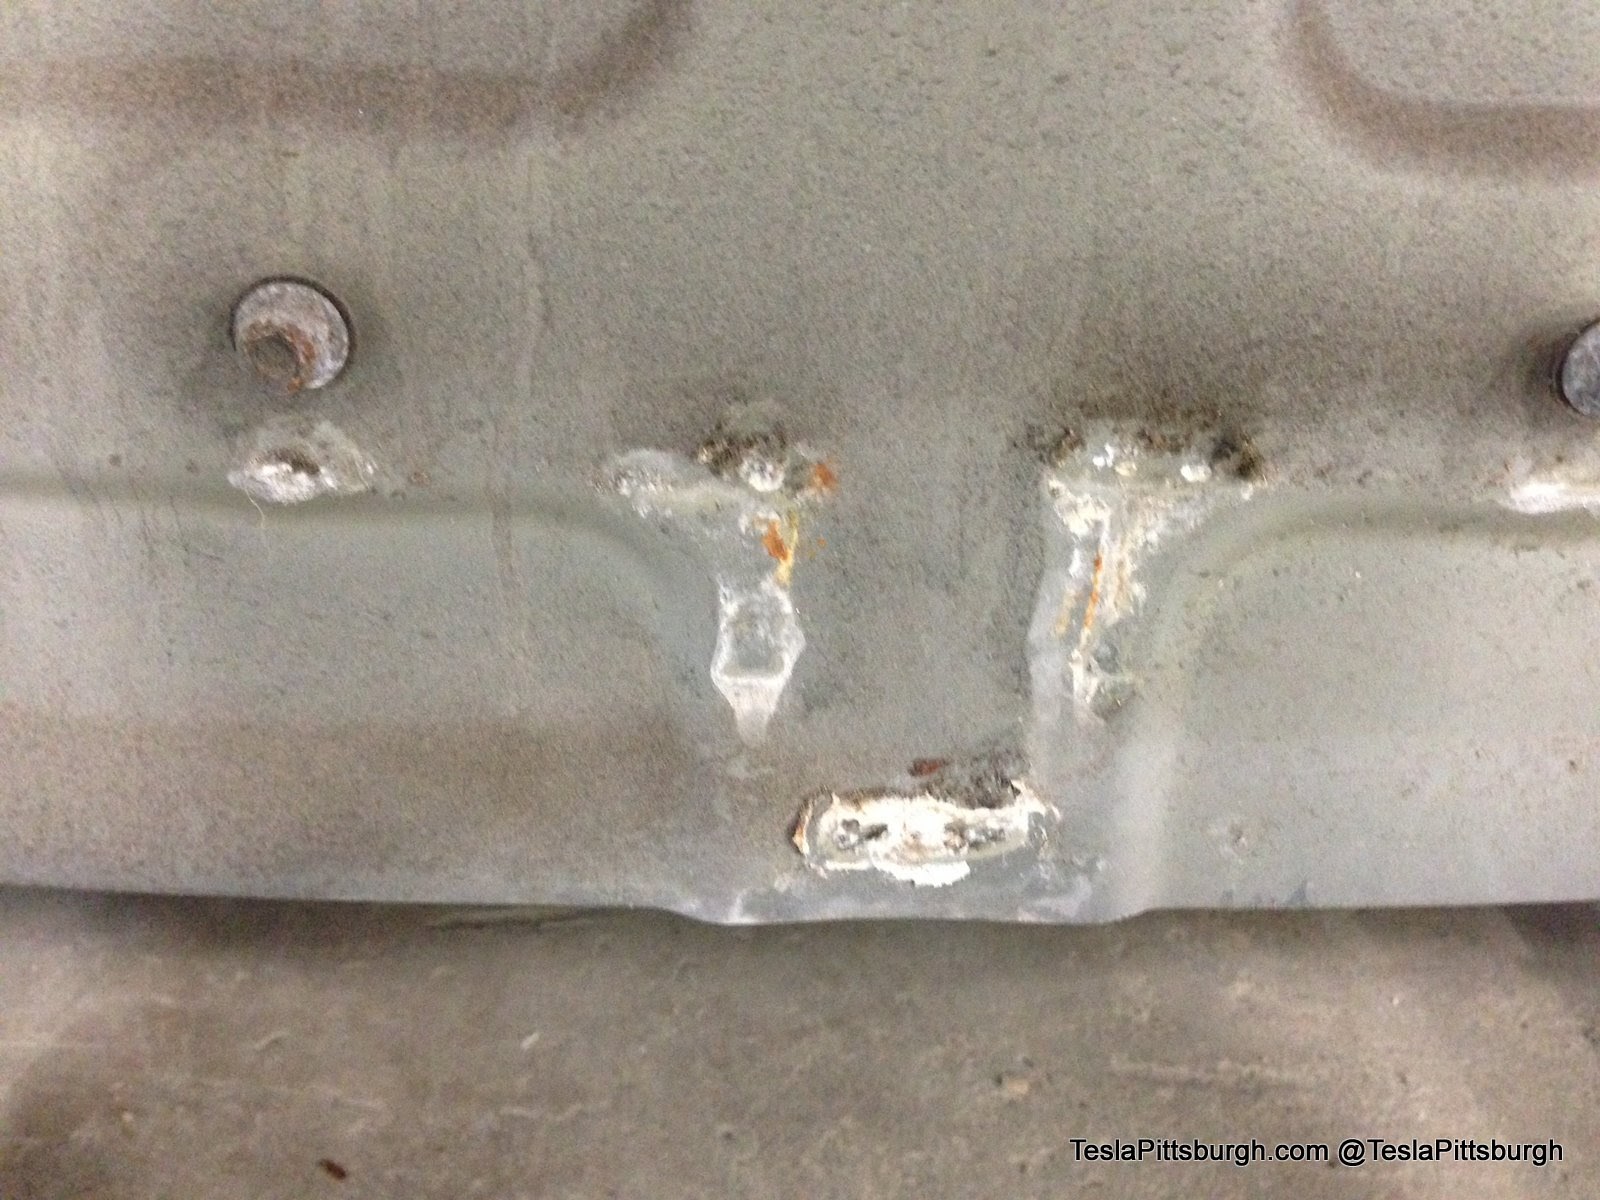
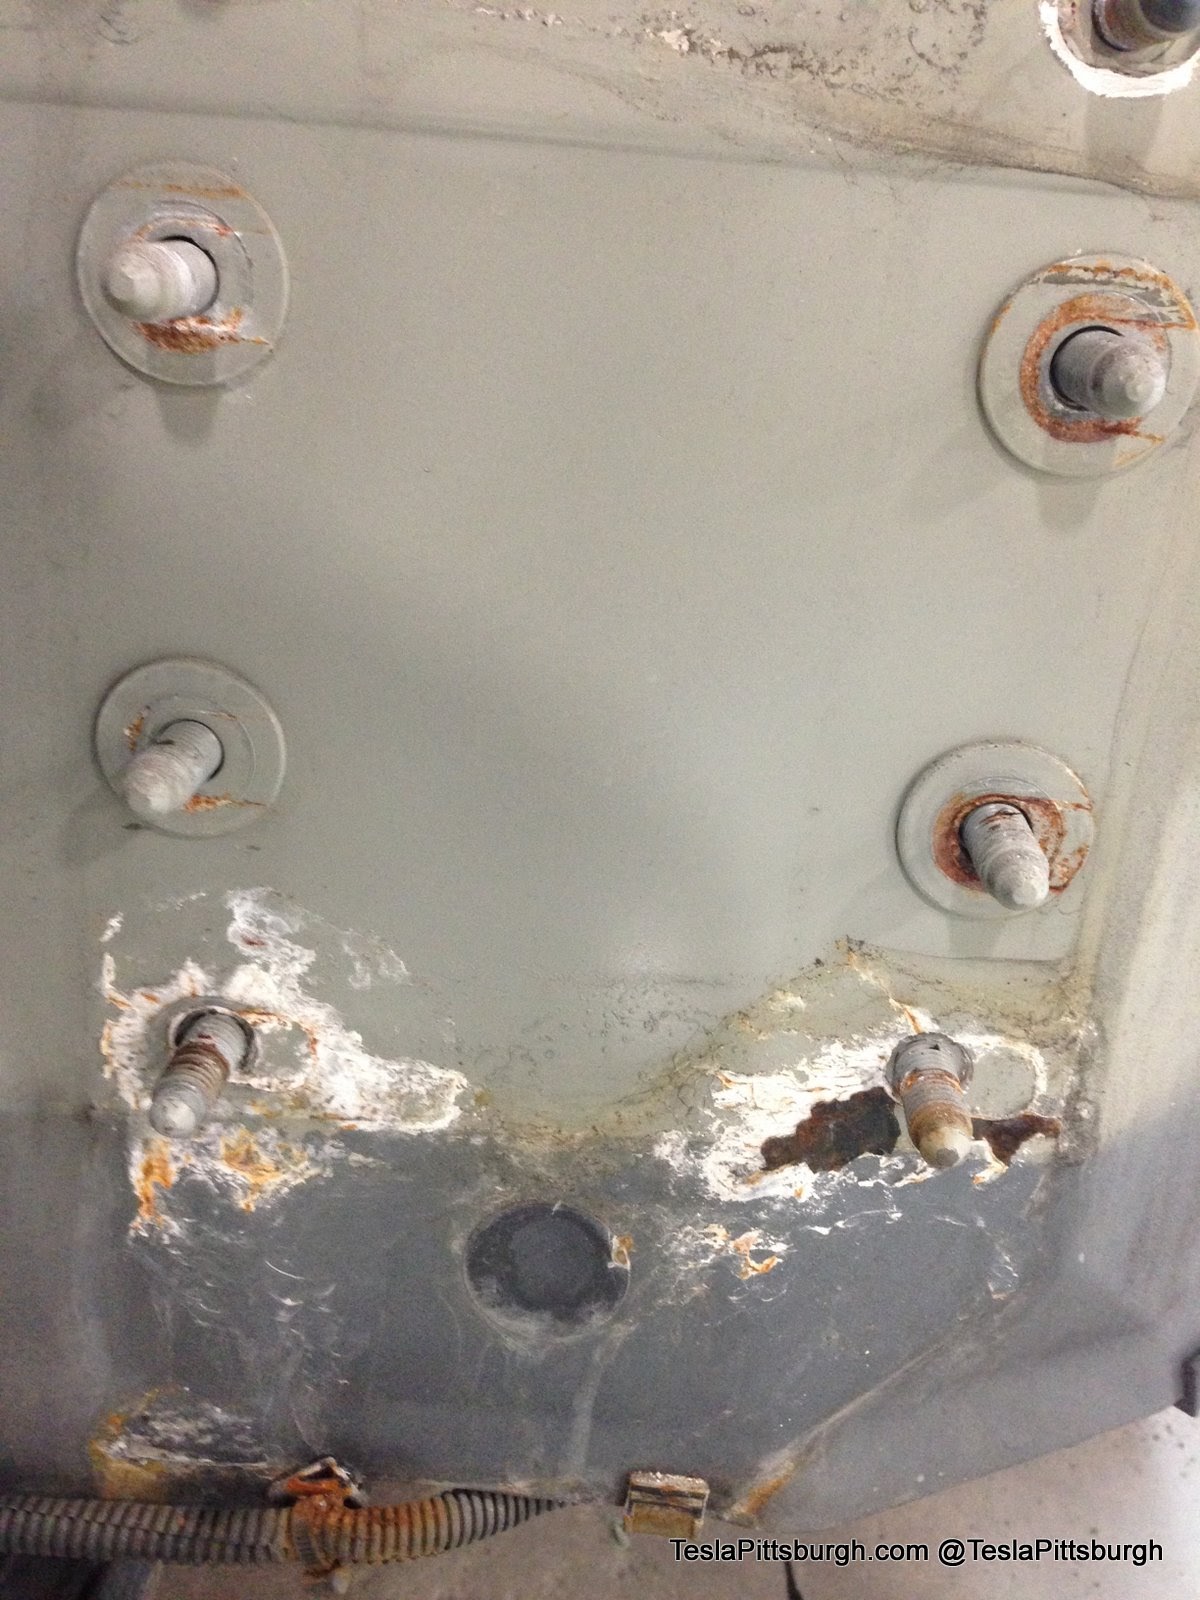
This was all done independent of the rust on the rest of the hitch and in a place completely obscured without removing the entire rear bumper, the rear crash bar and uninstalling the hitch.
For the past three years, we’d been garaging our car and pampering it with hand washes… but underneath a silent killer was consuming the rear bumper structure behind the hitch, and were it not for this accident repair we would never have known until… Well, I’m not even sure of all the ways it could have manifested.
Having seen the pictures, I was almost a little grateful that the car was hit. Now the condition was known and caught soon enough to be stopped. Even better, it wasn’t just me blindly trying to figure it out in my garage, but I was in the hands of Tesla-reconstruction experts. They knew all the procedures and had all the right tools and expertise to restore the car and preserve our ability to use the hitch for our bike rack and protect the car from further damage. The Tesla’s ability to haul a family’s worth of bikes, without heavy lifting, was something I didn’t want to lose.
As luck would have it, we realized the seriousness of the hitch about the same time Cochran discovered Tesla had sent the wrong wiring harness for my new rear bumper. There was a production change made at some point that moved the parking sensors very slightly farther around the bumper. If you didn’t know it was different, I bet you’d never spot the difference– we sure didn’t! Anyway, Tesla had made the change but still managed to send the wrong harness and it couldn’t be adapted. While Serena waited, the Cochran team re-engineered the Torklift Ecohitch installation process.
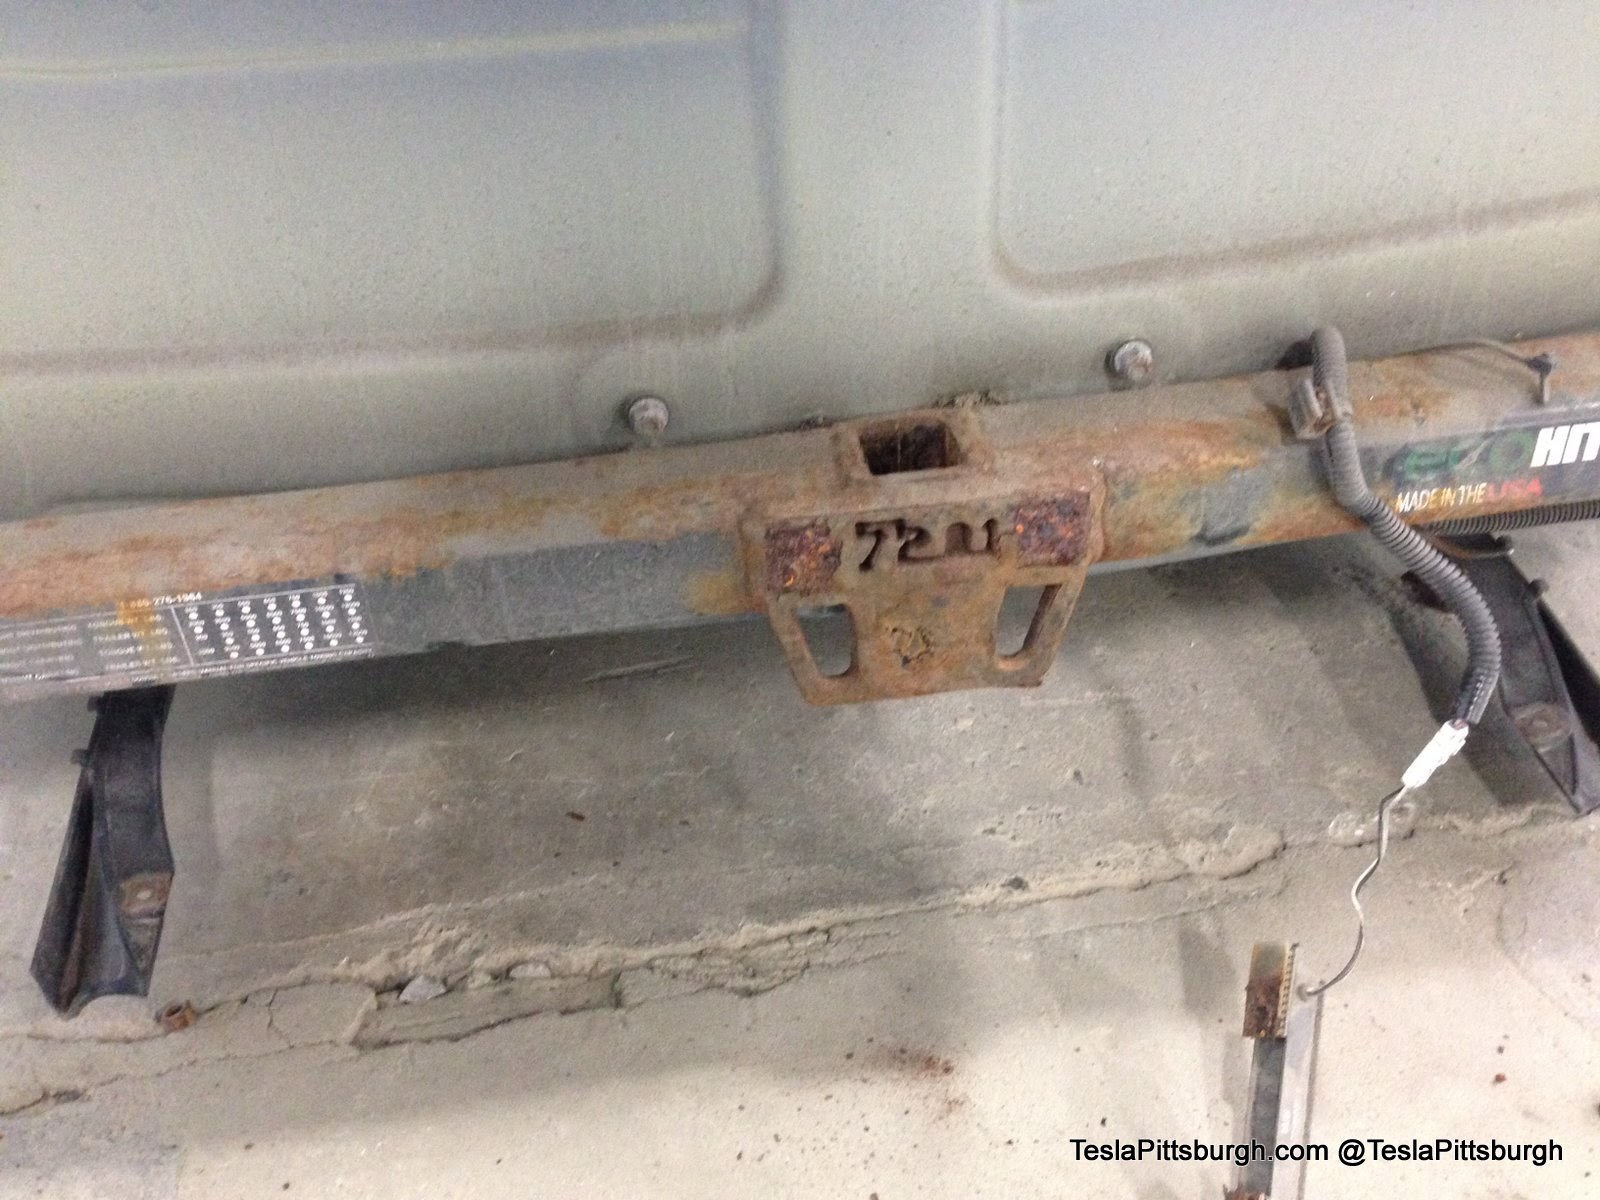
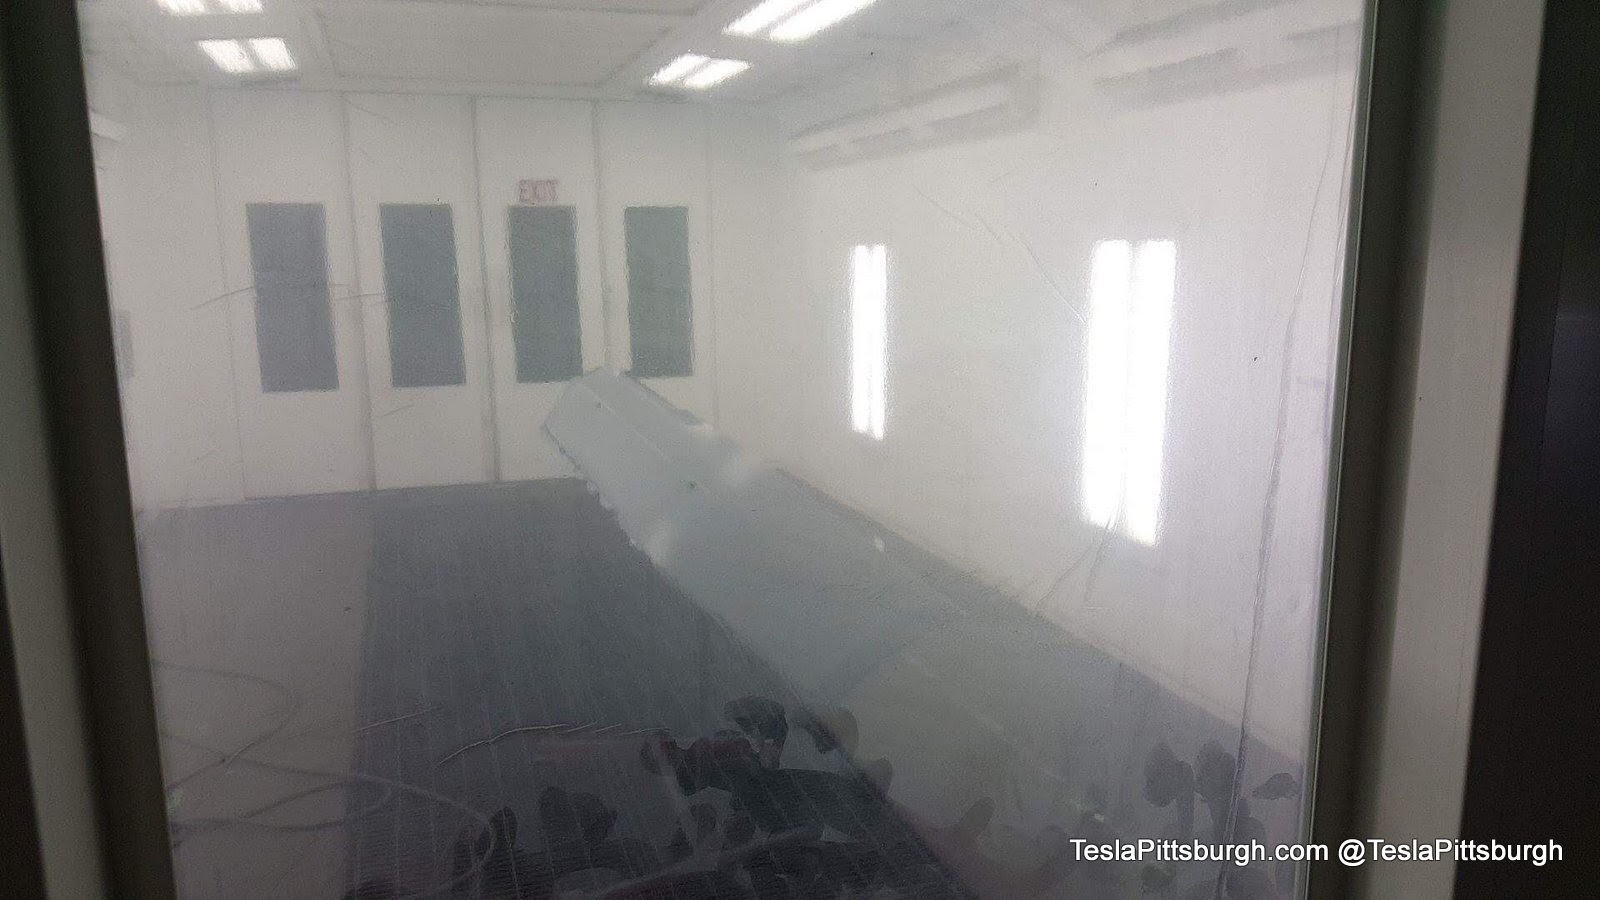
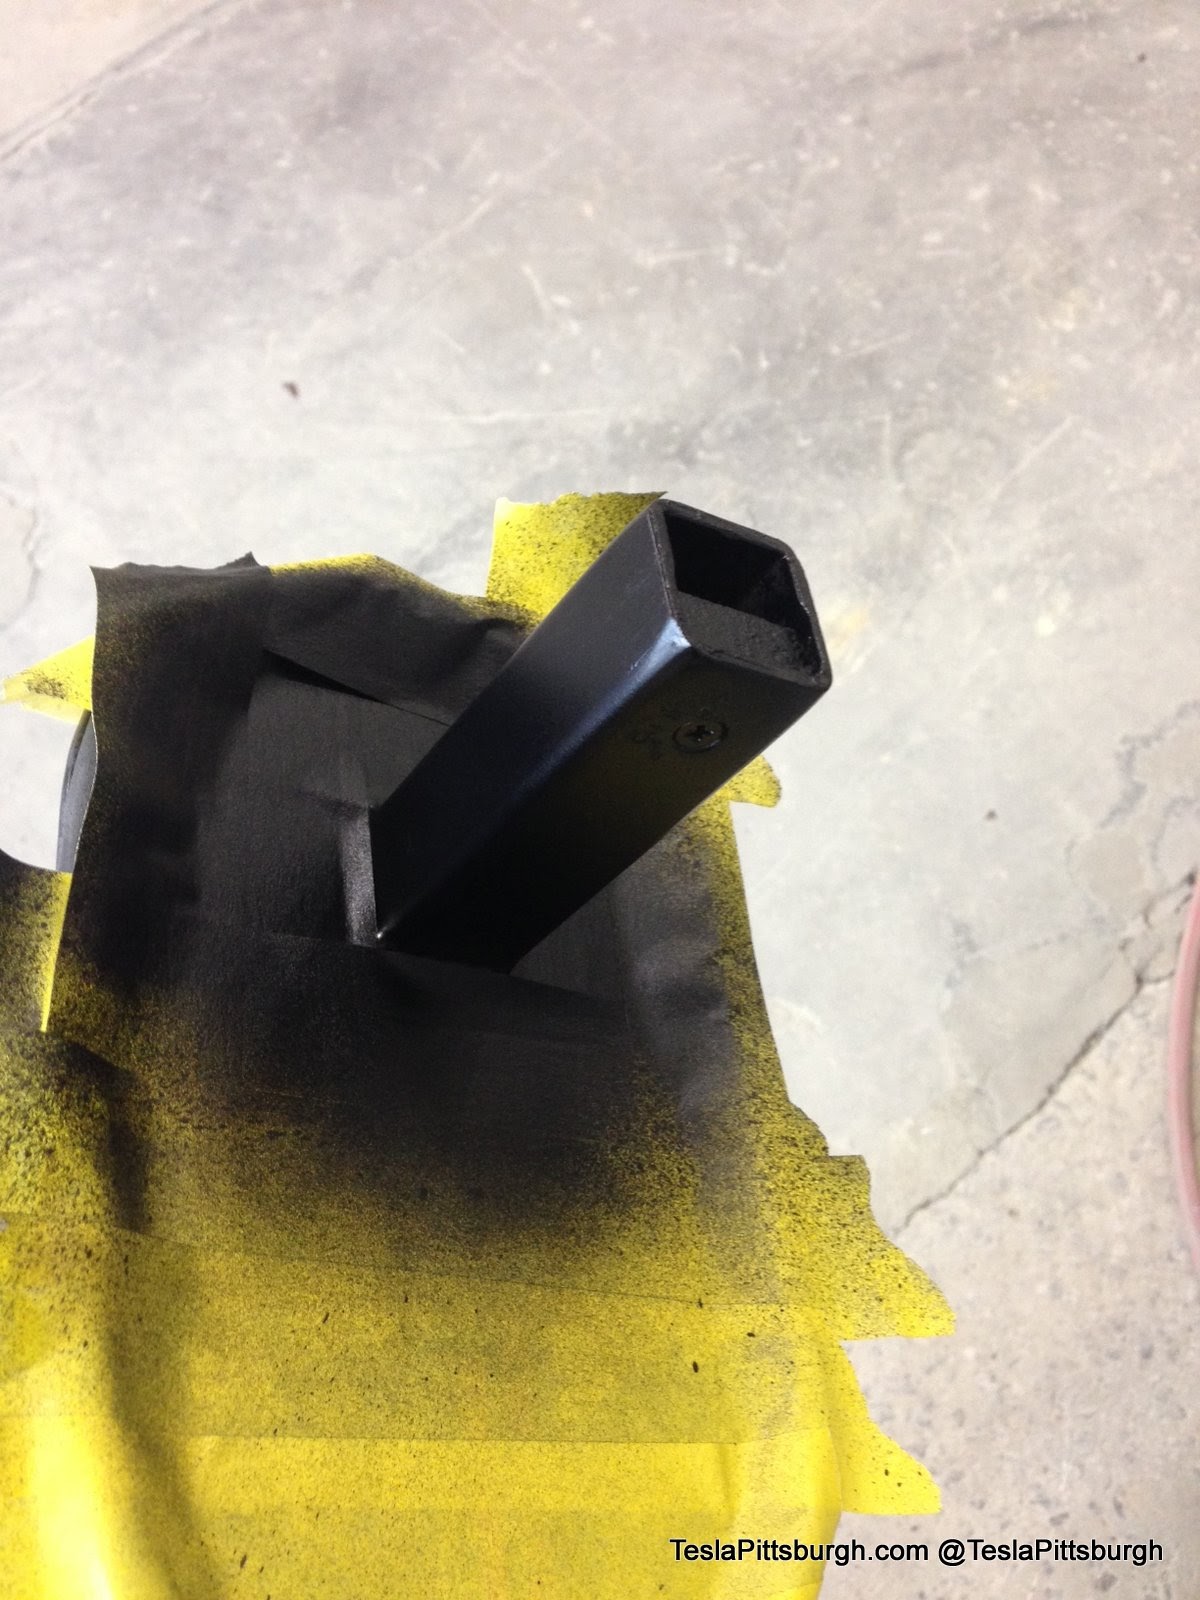
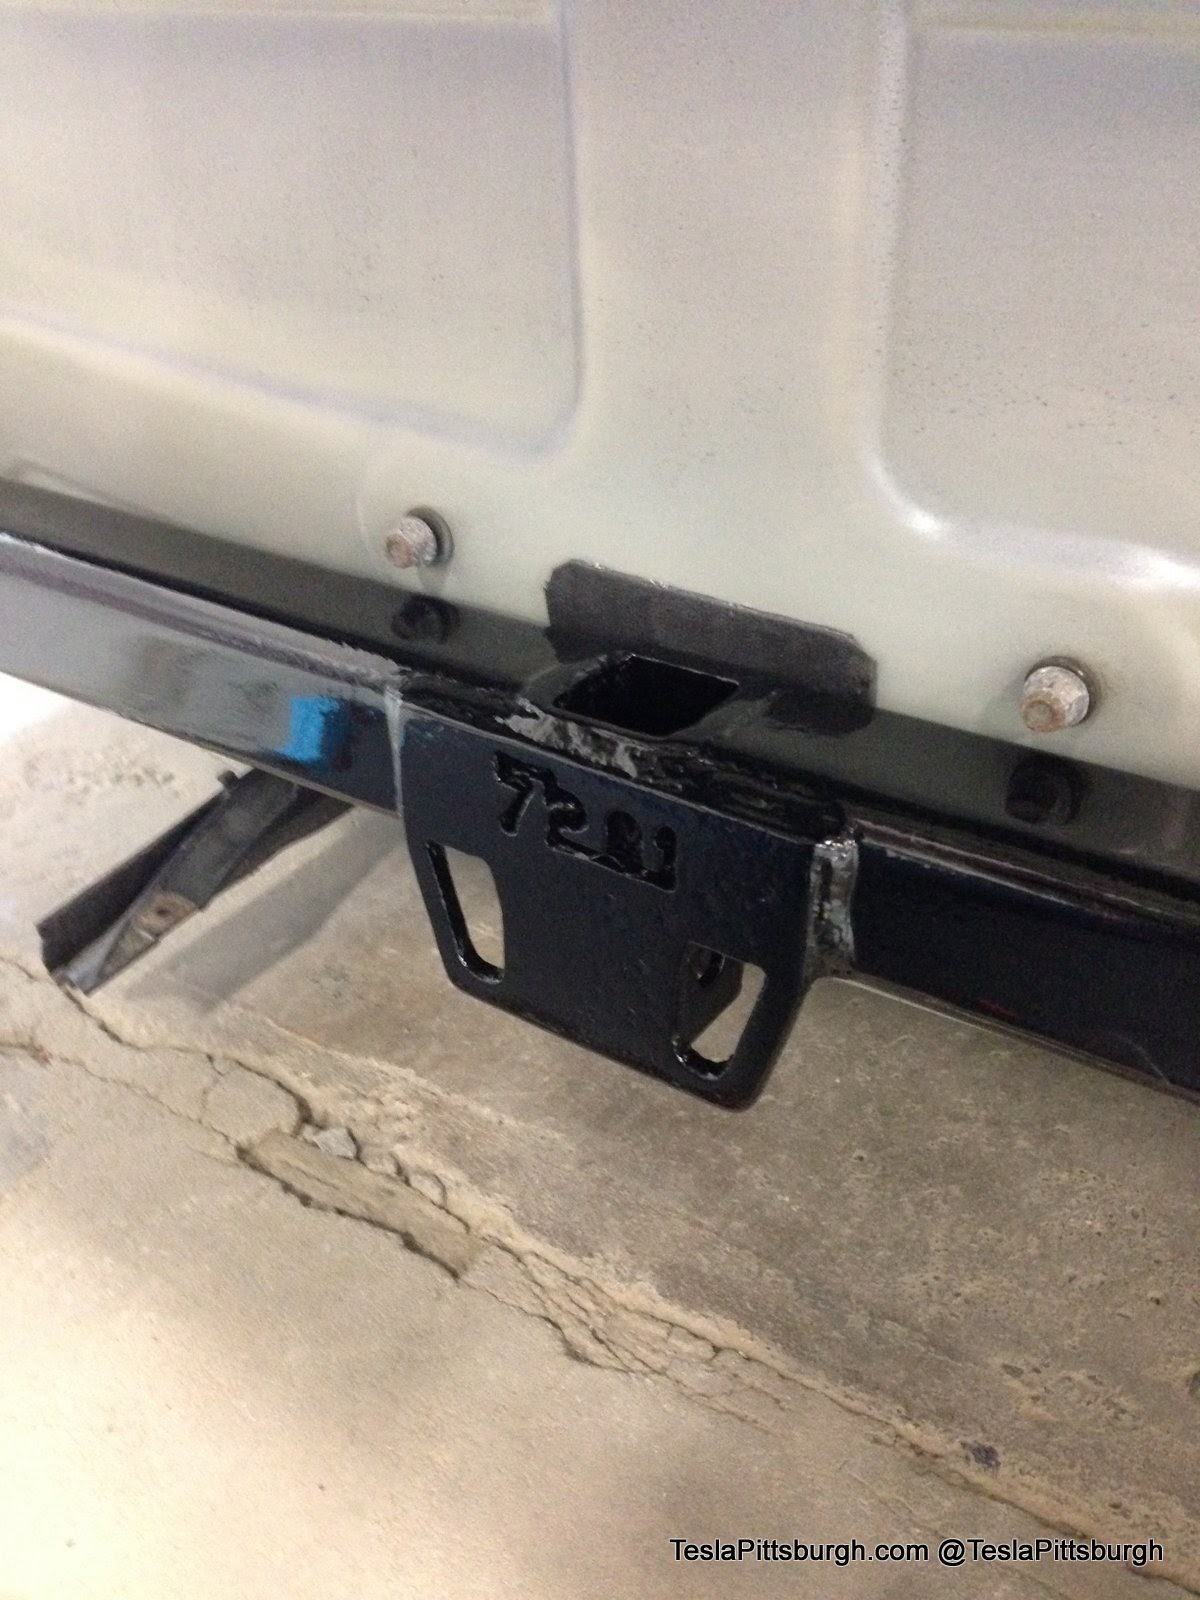
They scraped down and cleaned up the entirety of the hitch, including every single bolt. All the parts were given a new durable coat of underbody paint.
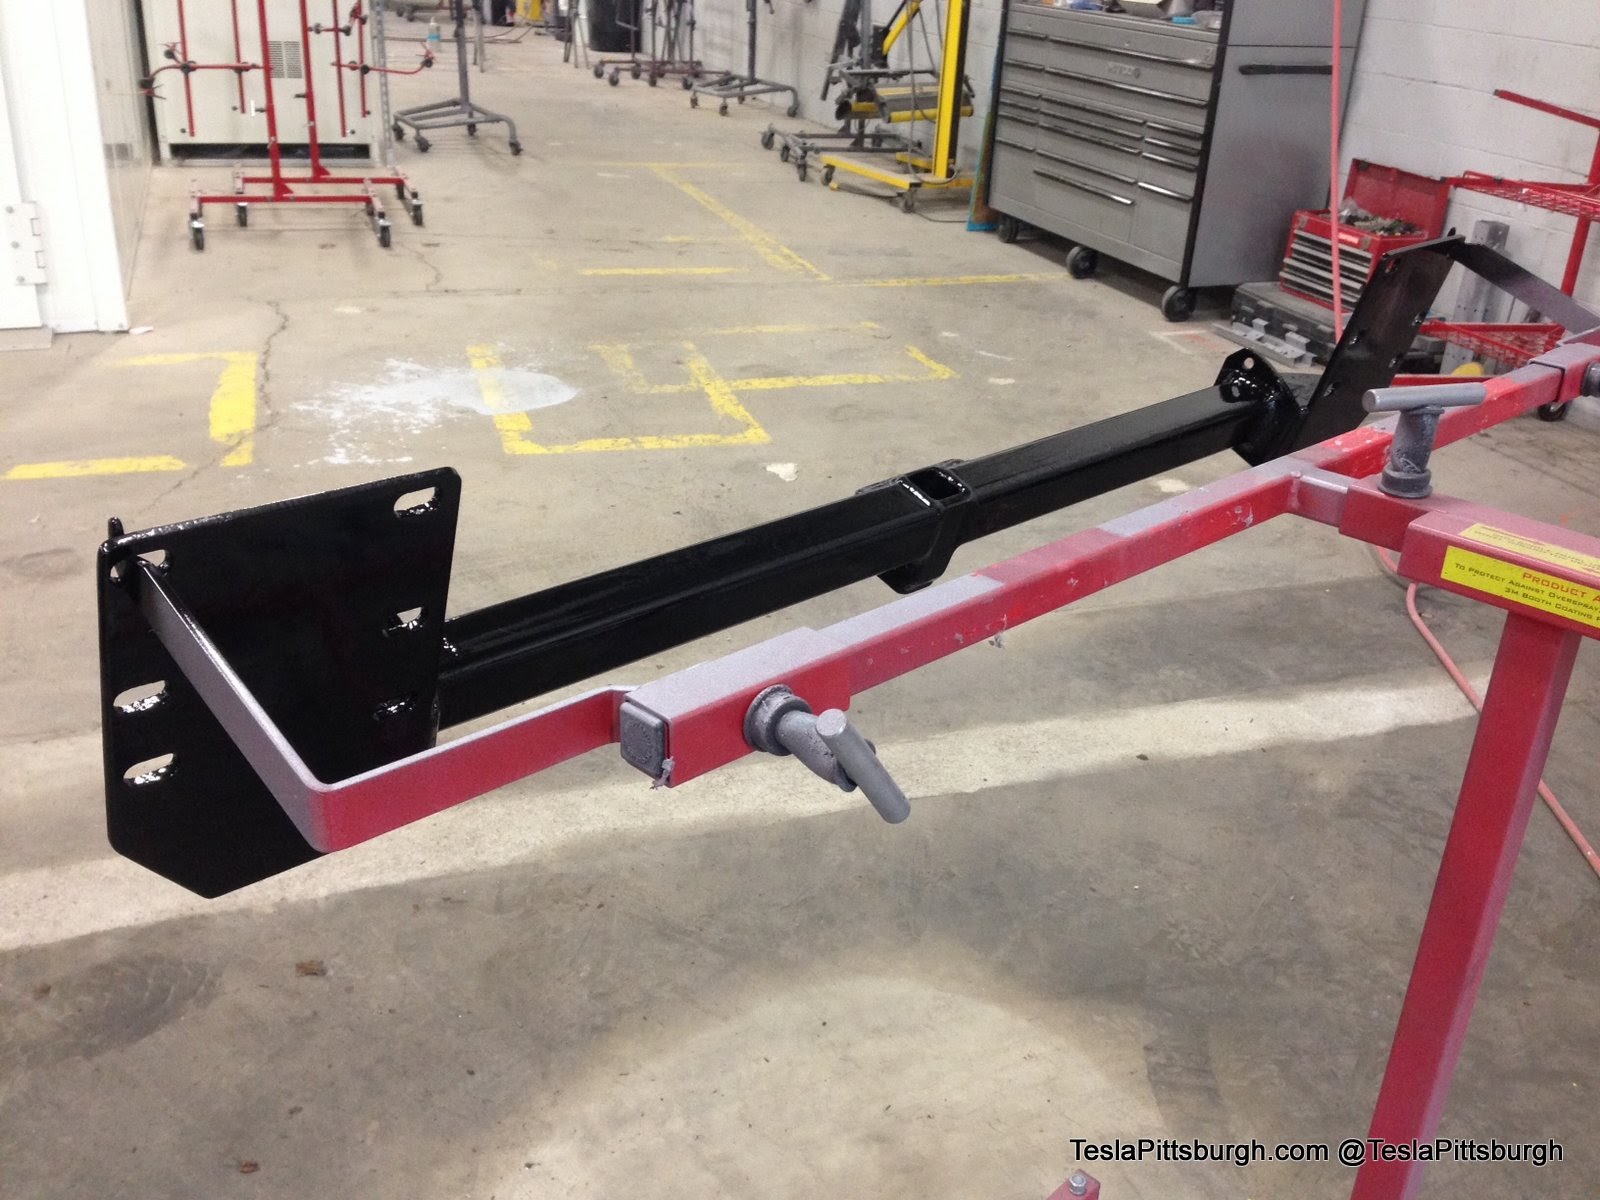
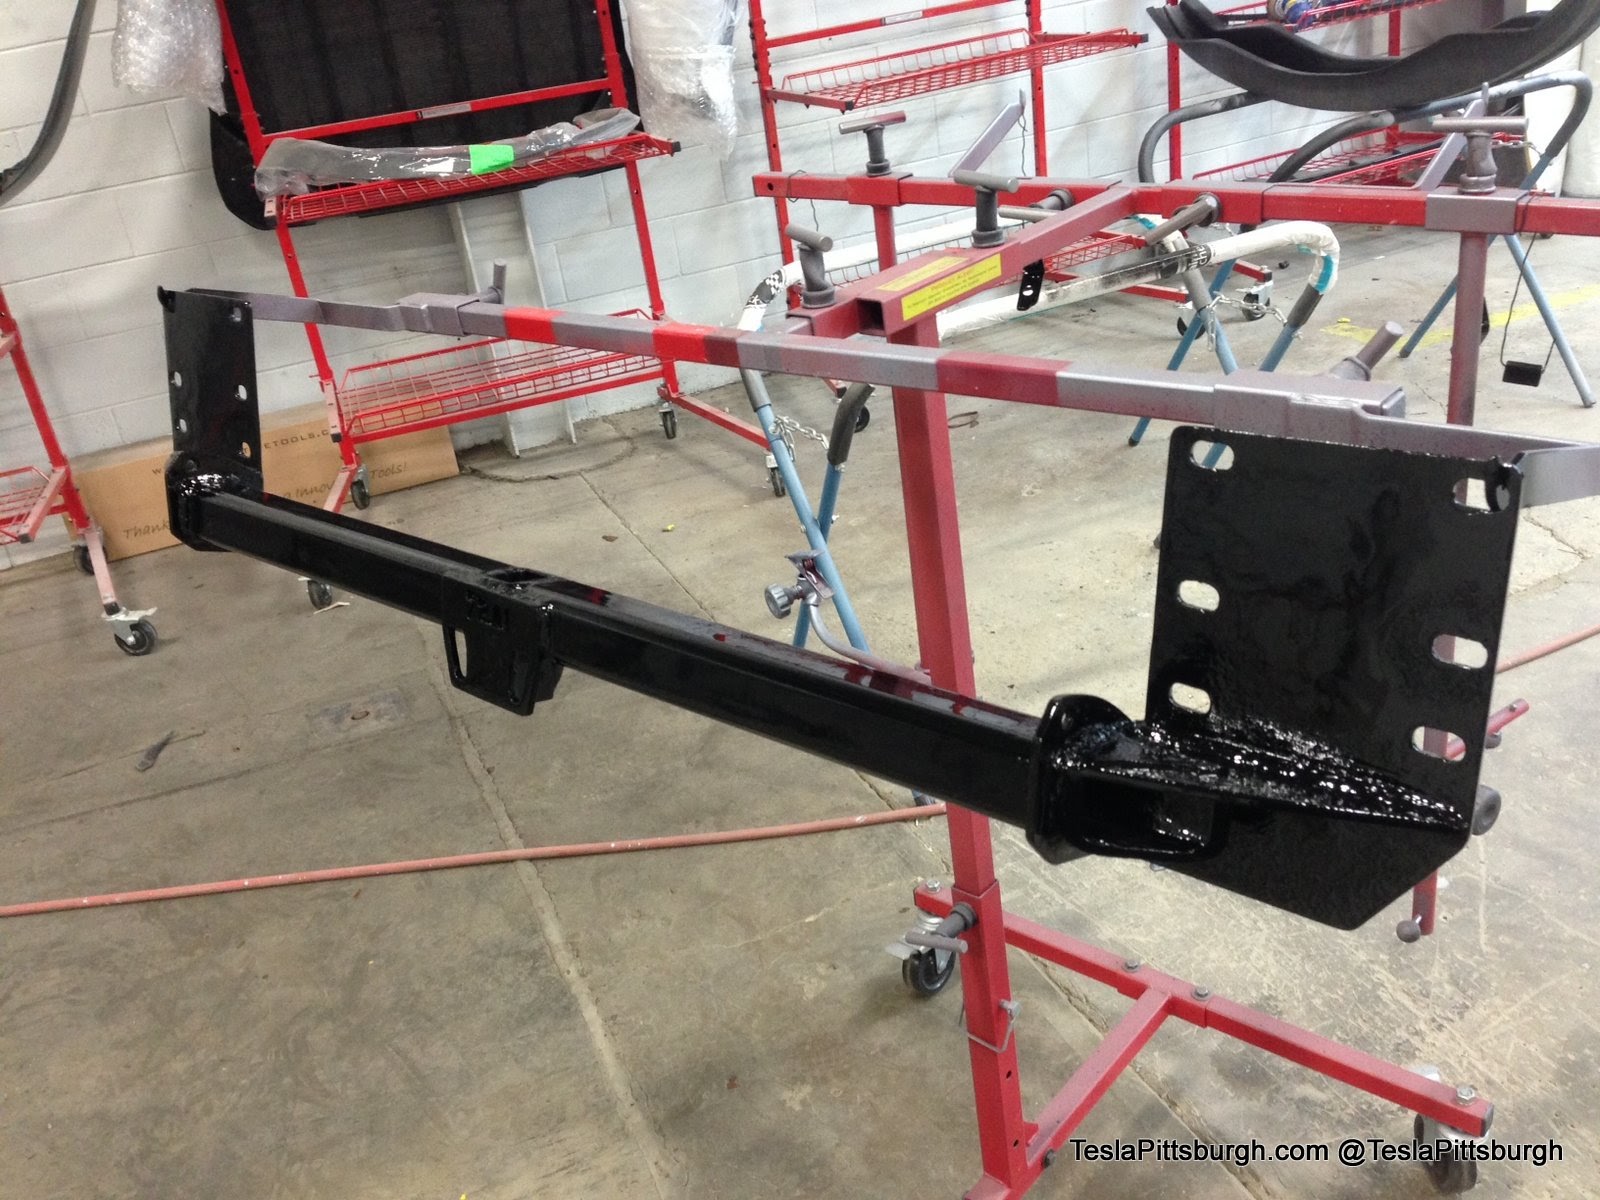
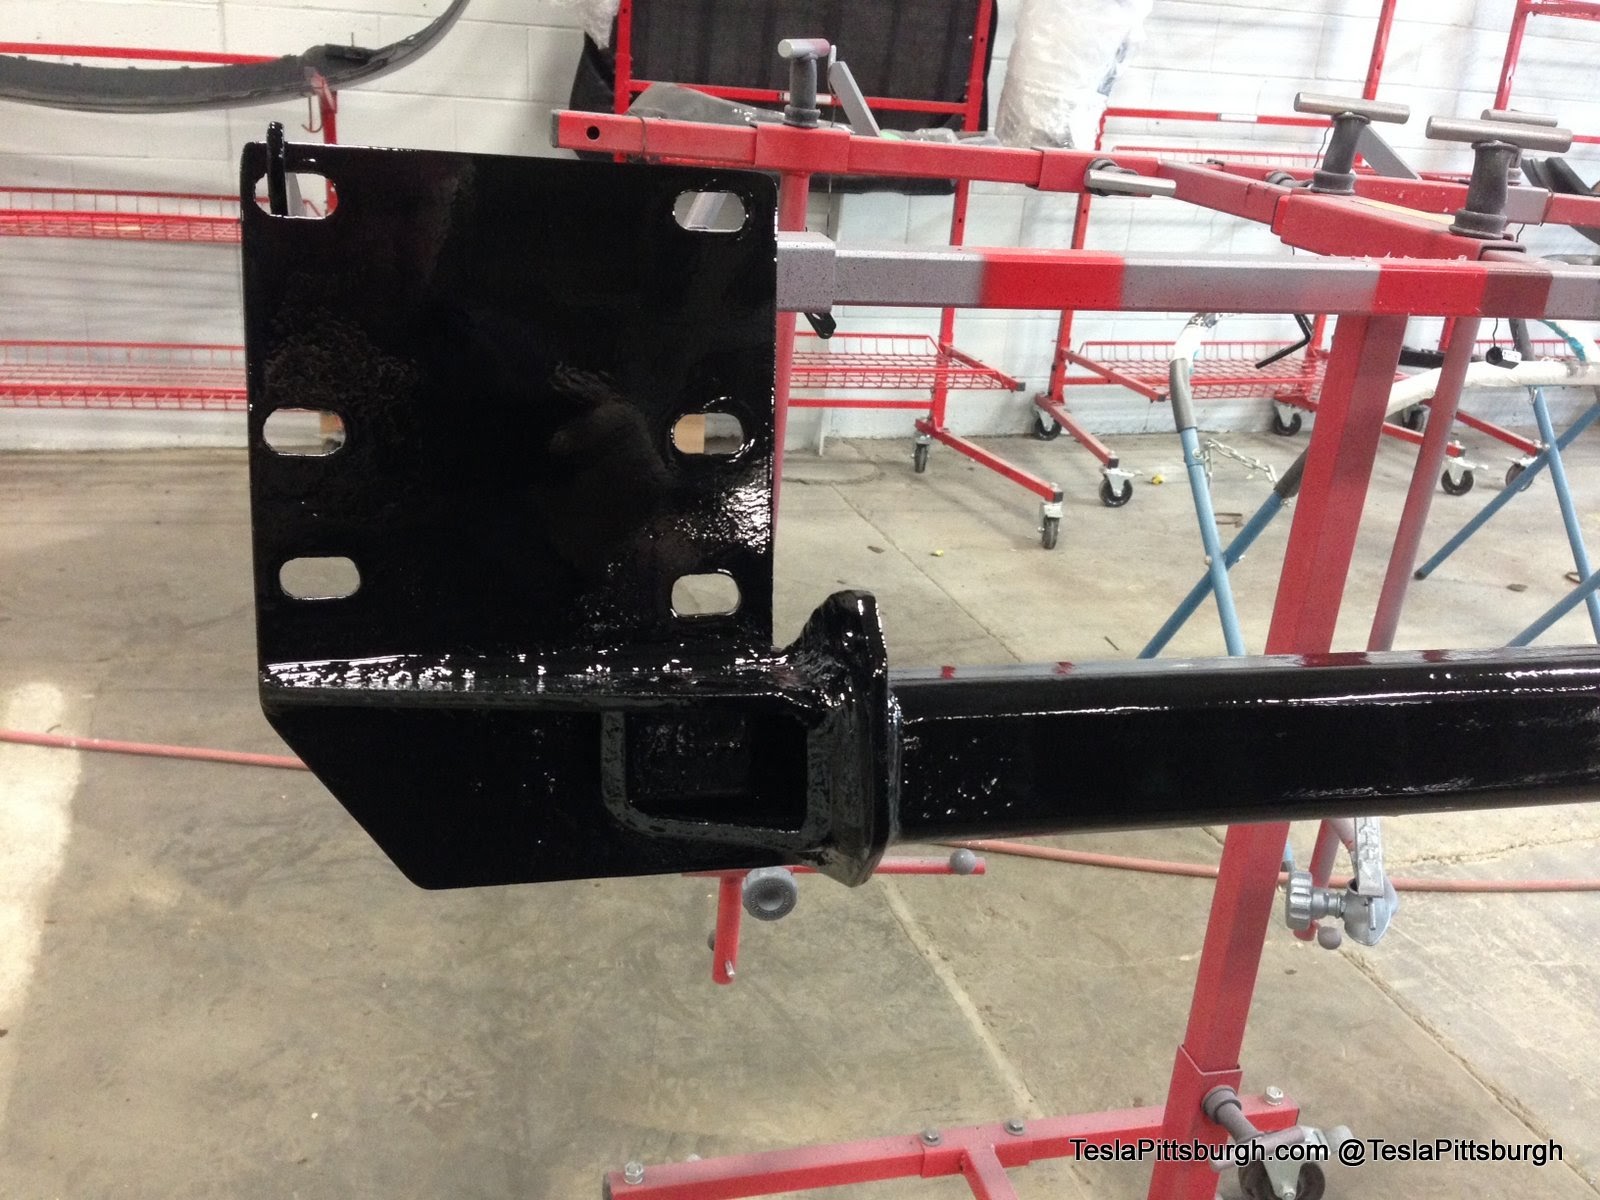
The inside of the hitch bar was open and, unsure of how deep paint would penetrate, Cochran even sprayed a generous coating of body-sealing wax to keep it from rusting inside too.
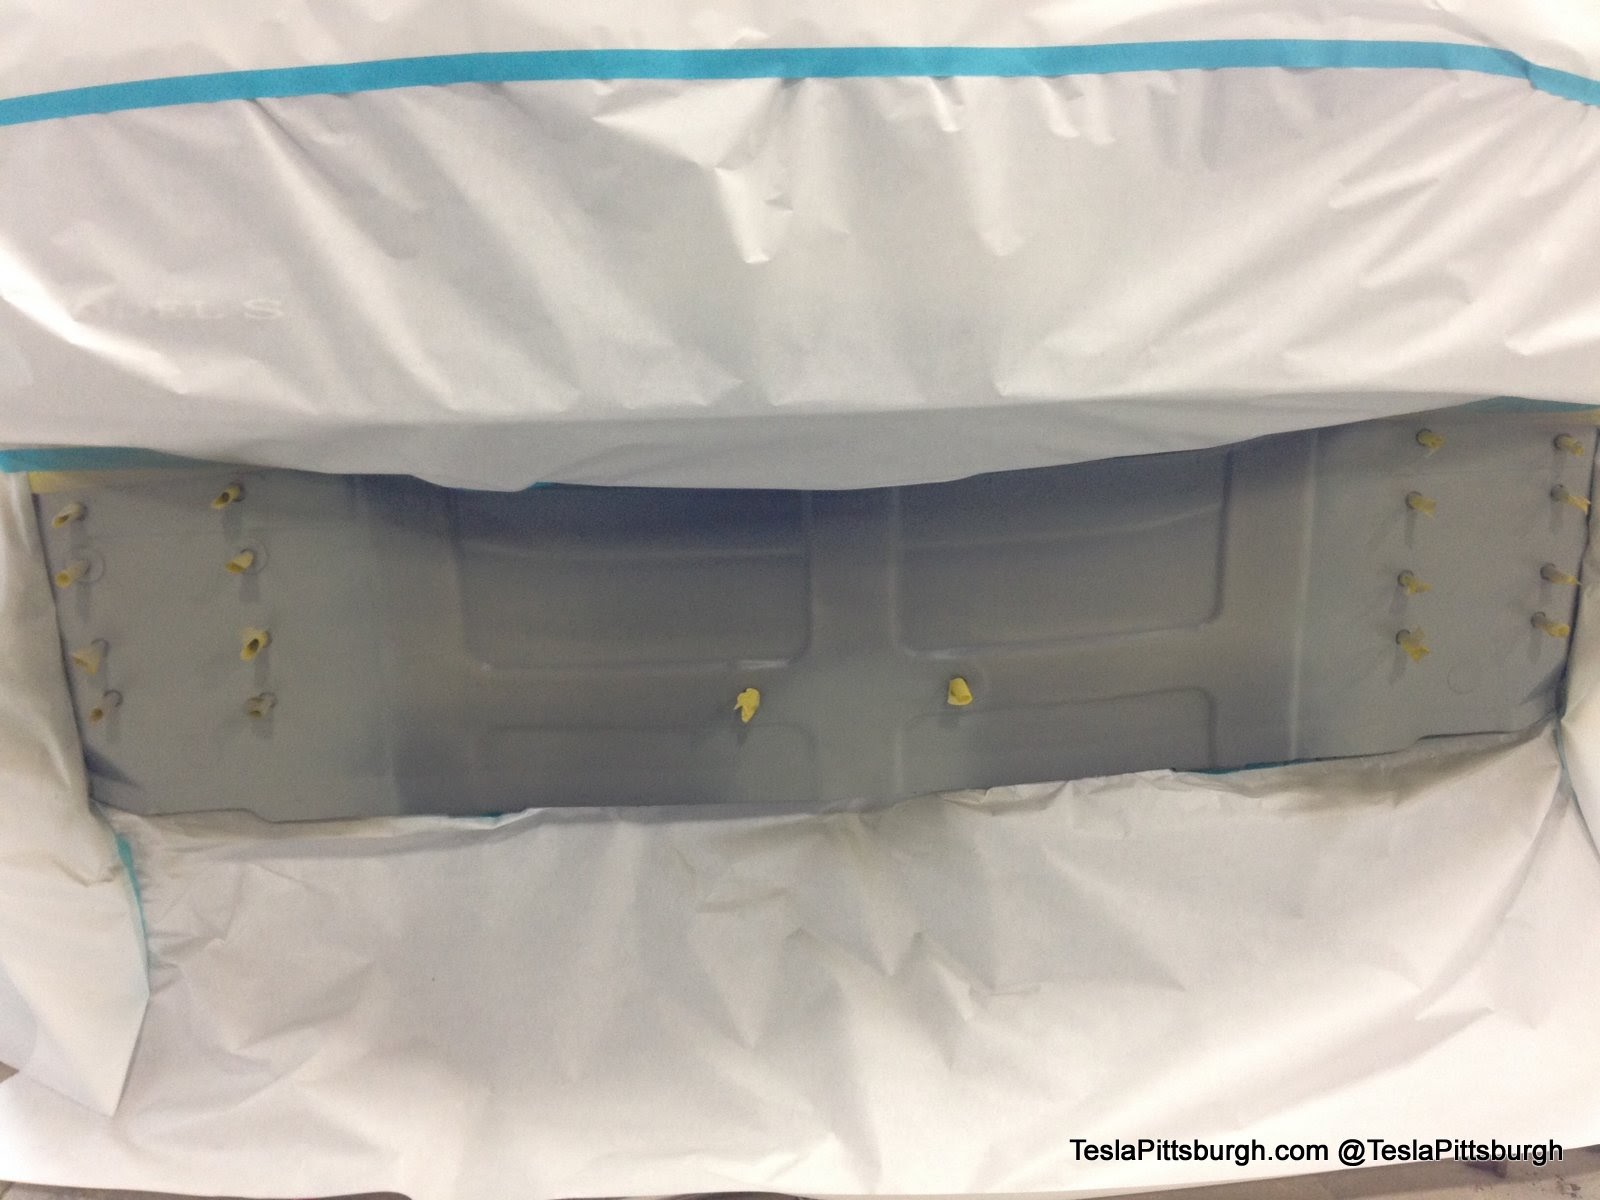
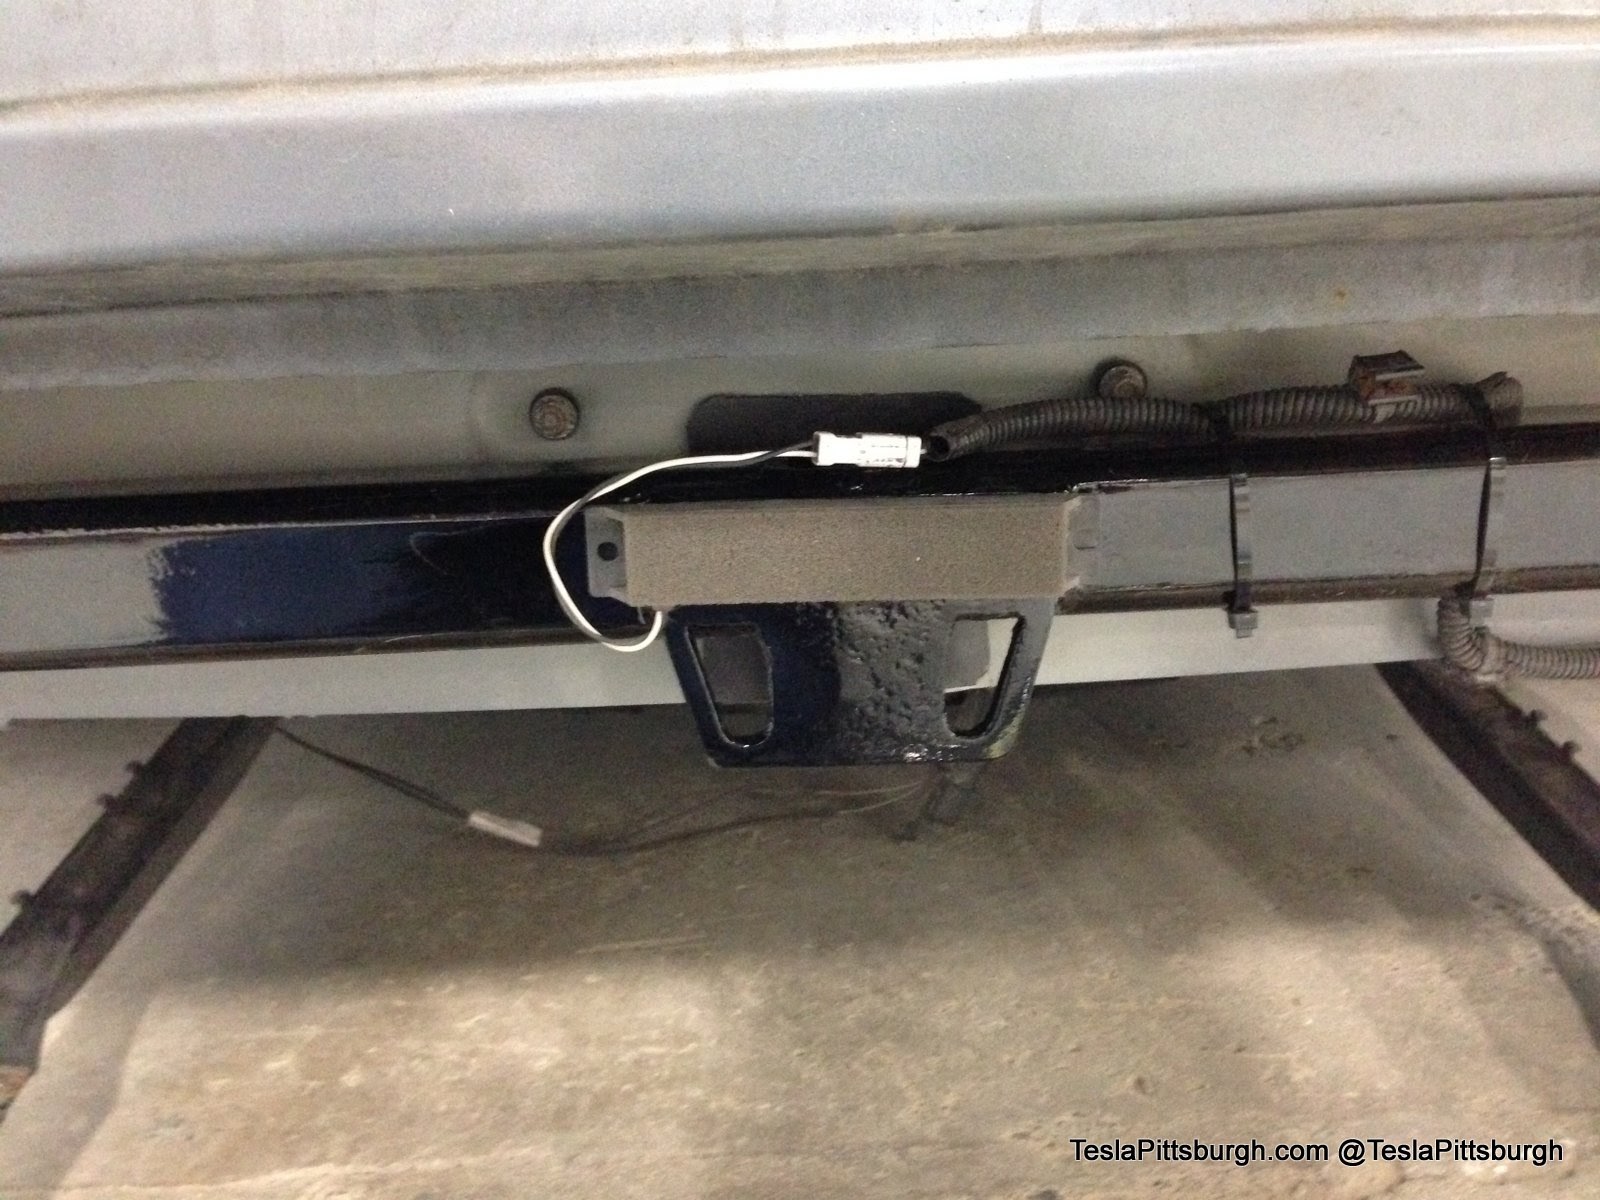
The rear of the Tesla was also cleaned up. The rear panel was restored and the entire back side of the frame was repainted as well.
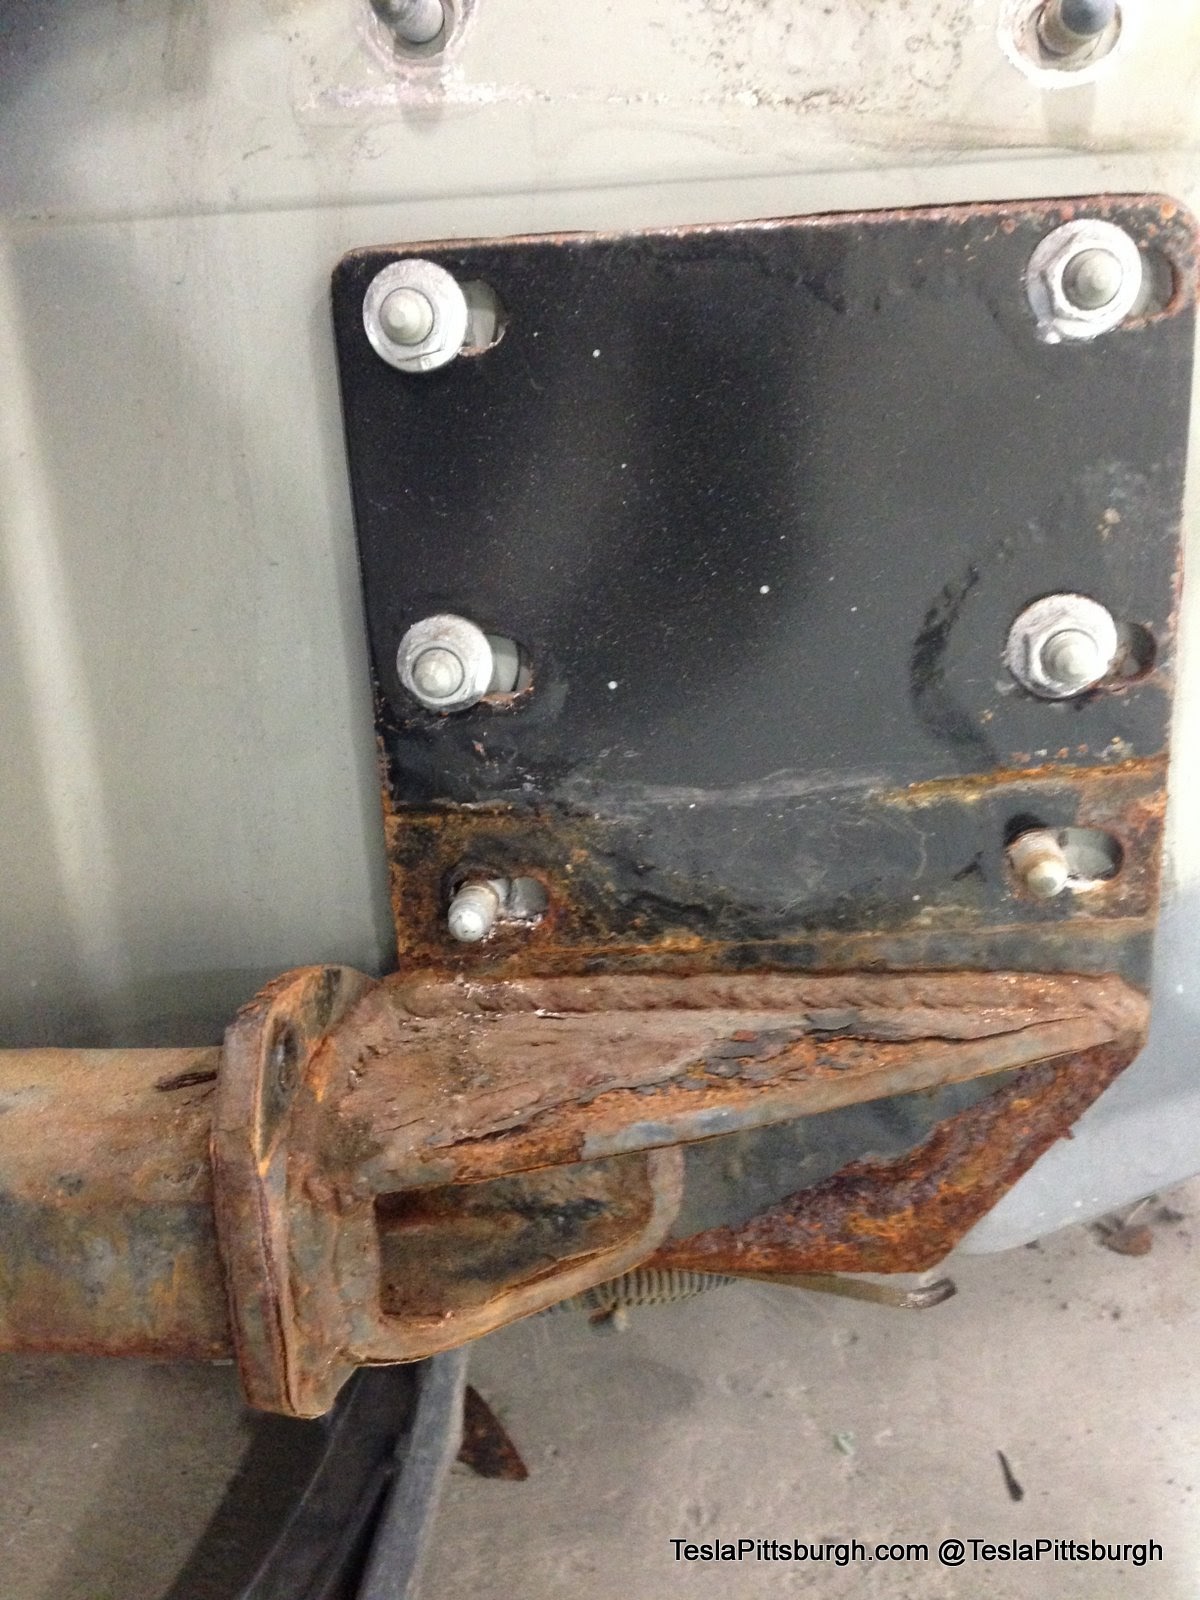
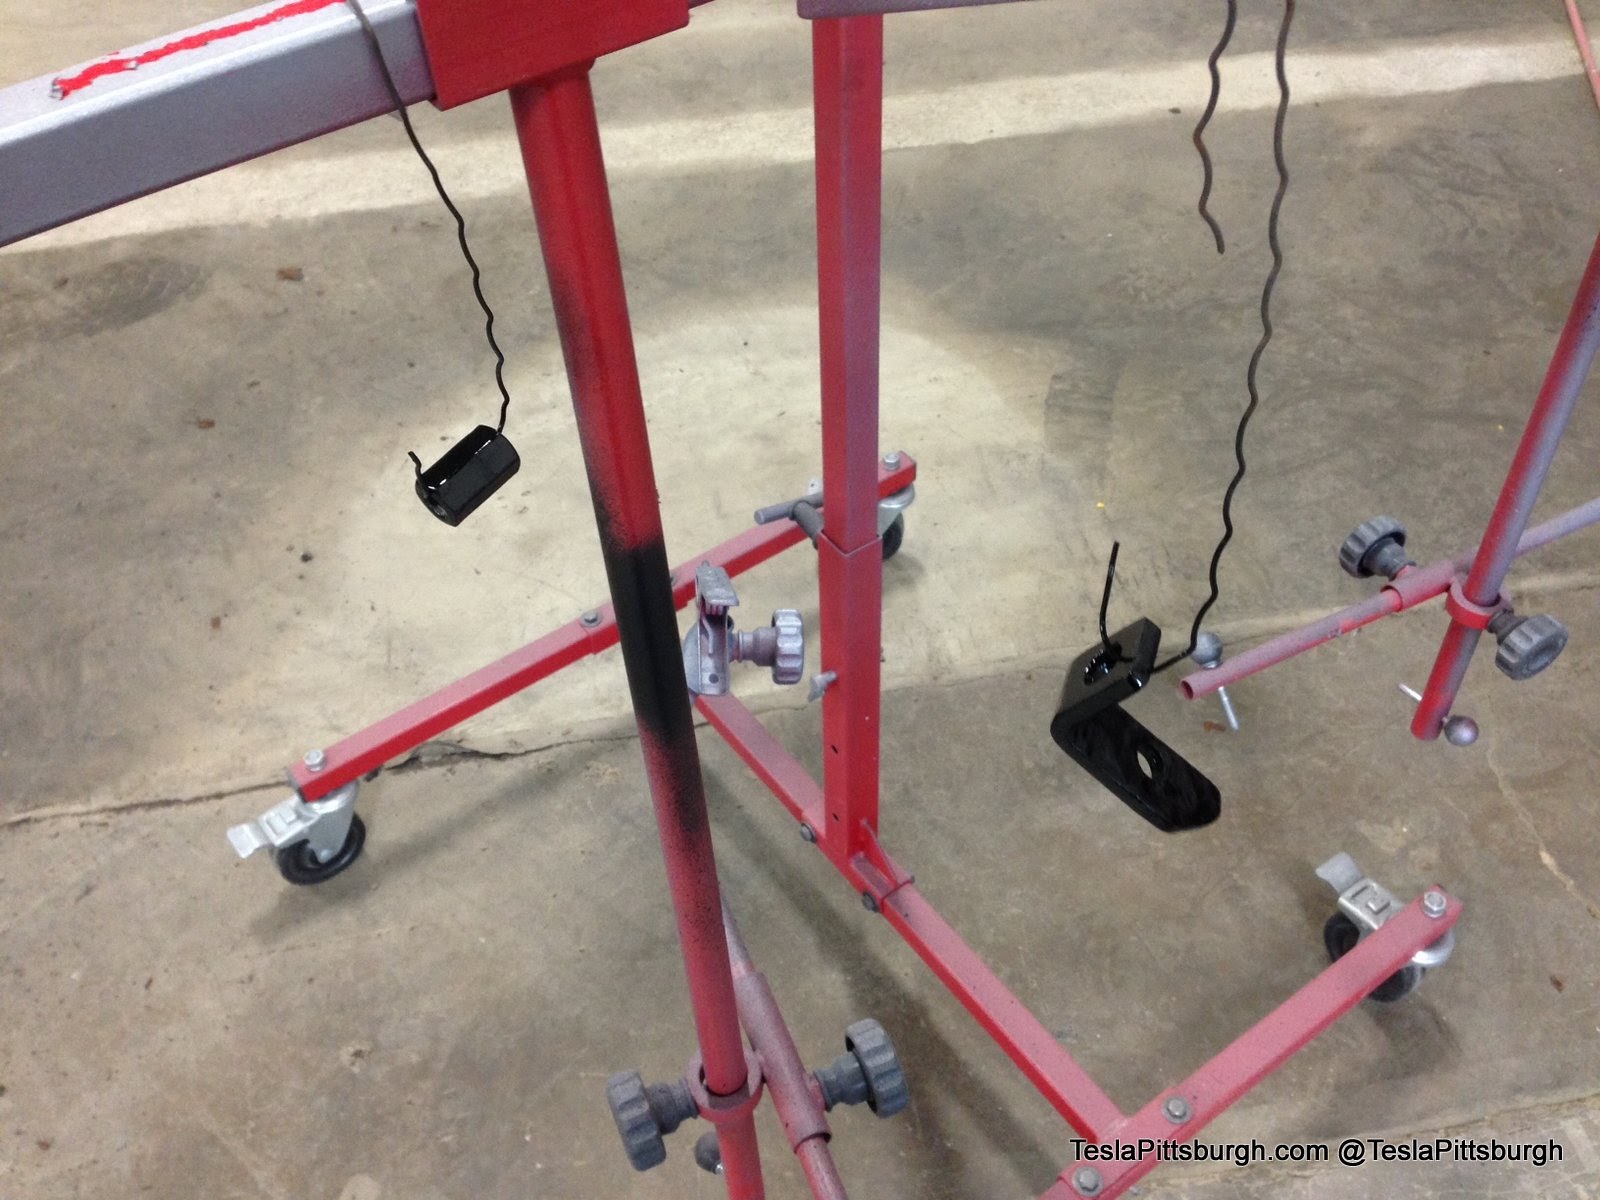
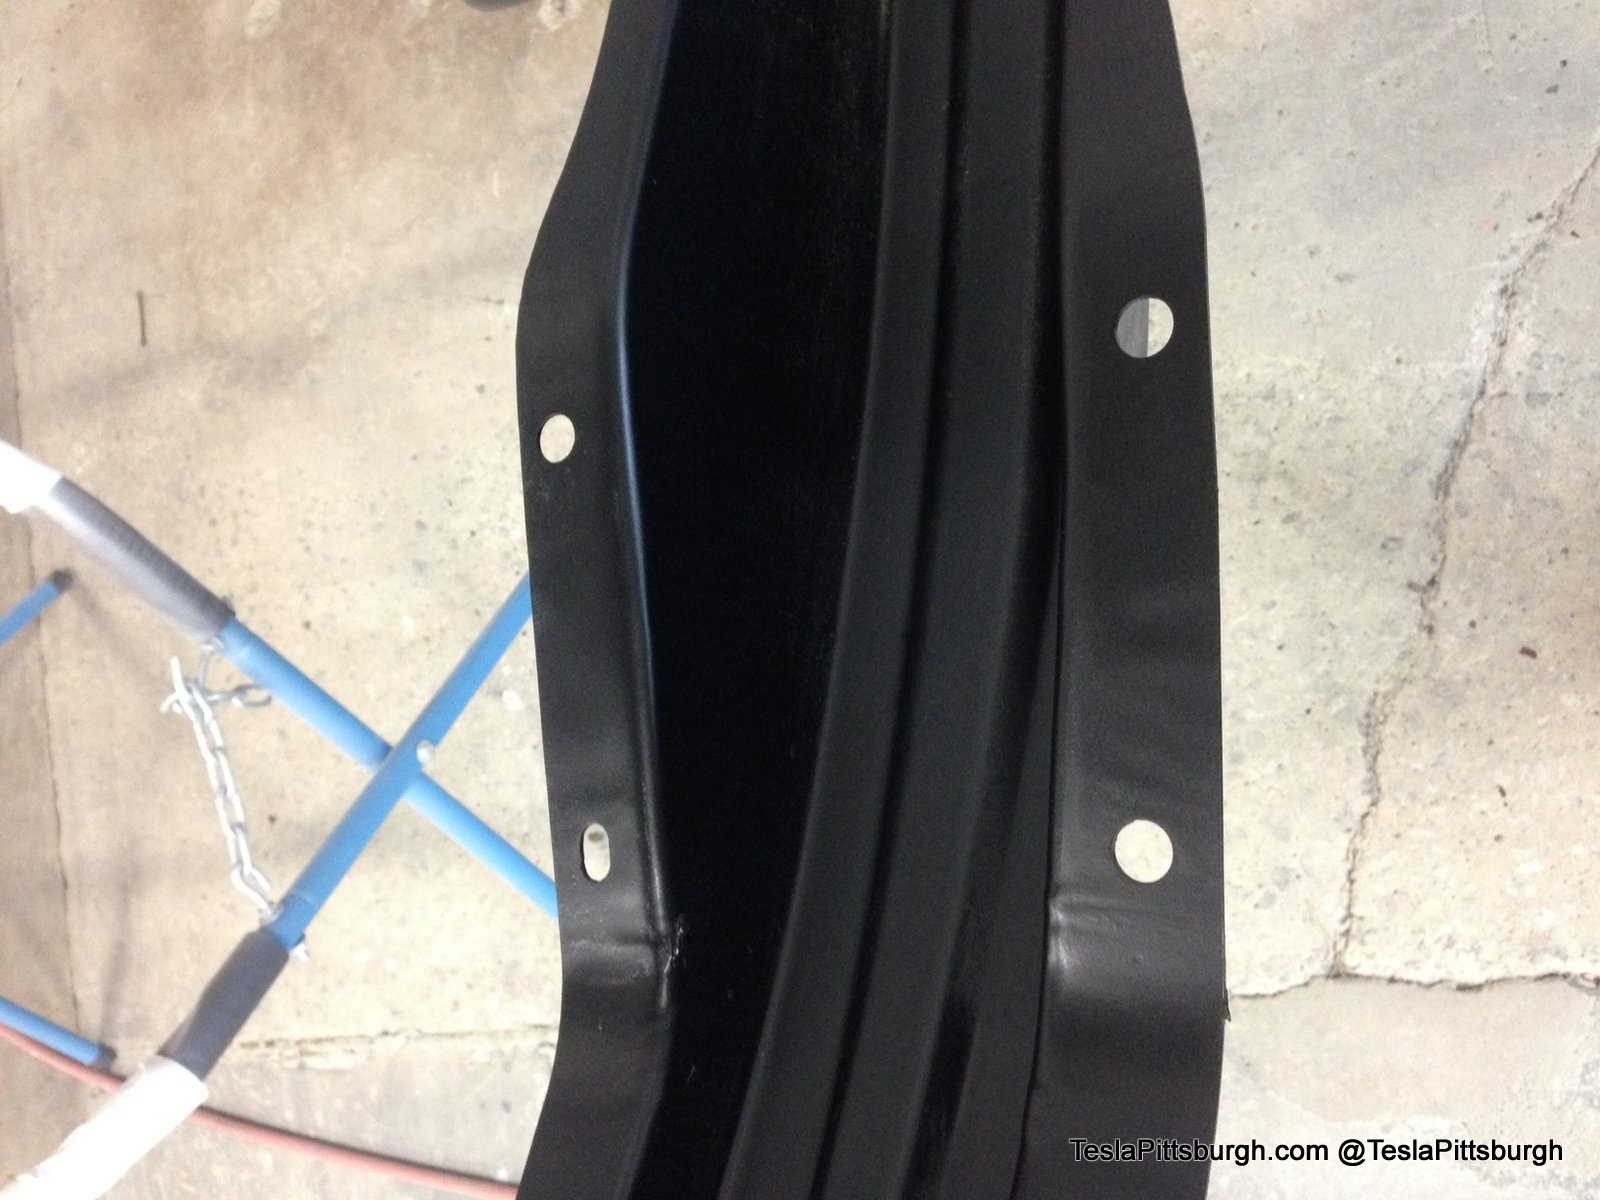
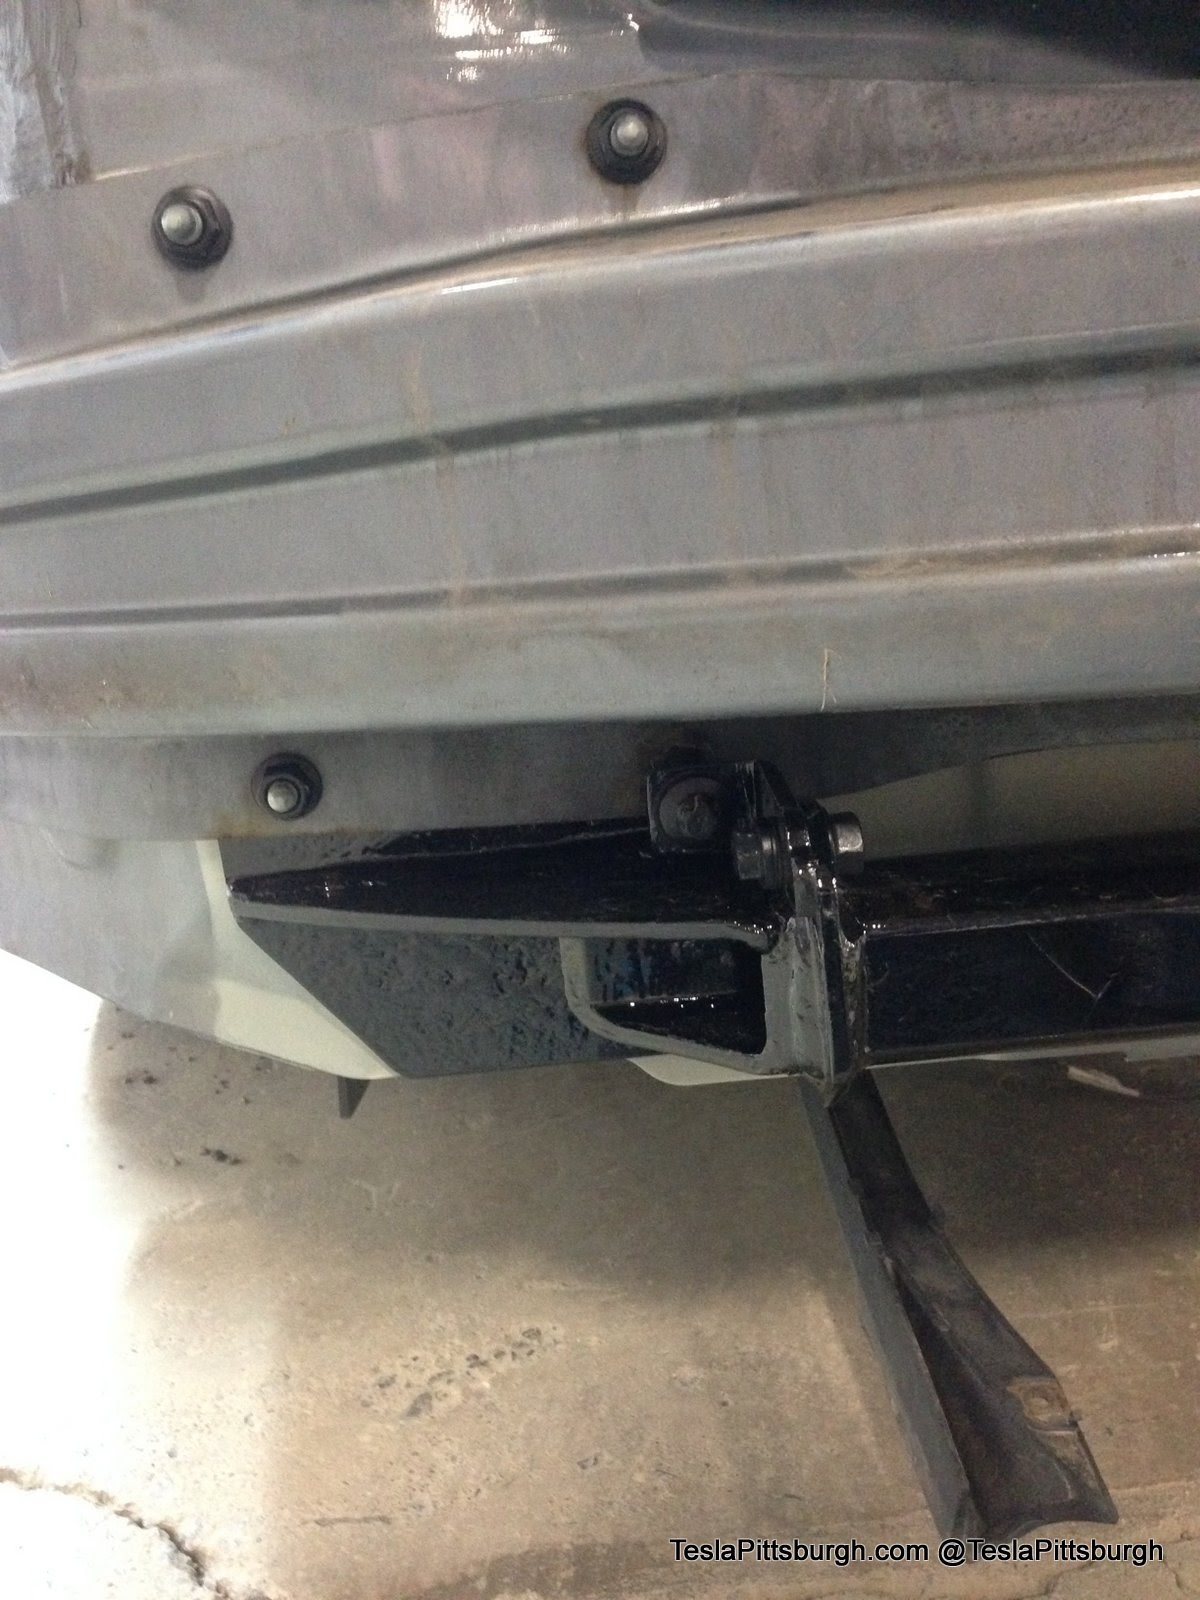
Hardware that was too far gone was replaced with new pieces and they created insulators to keep the hitch from ever touching the body again.
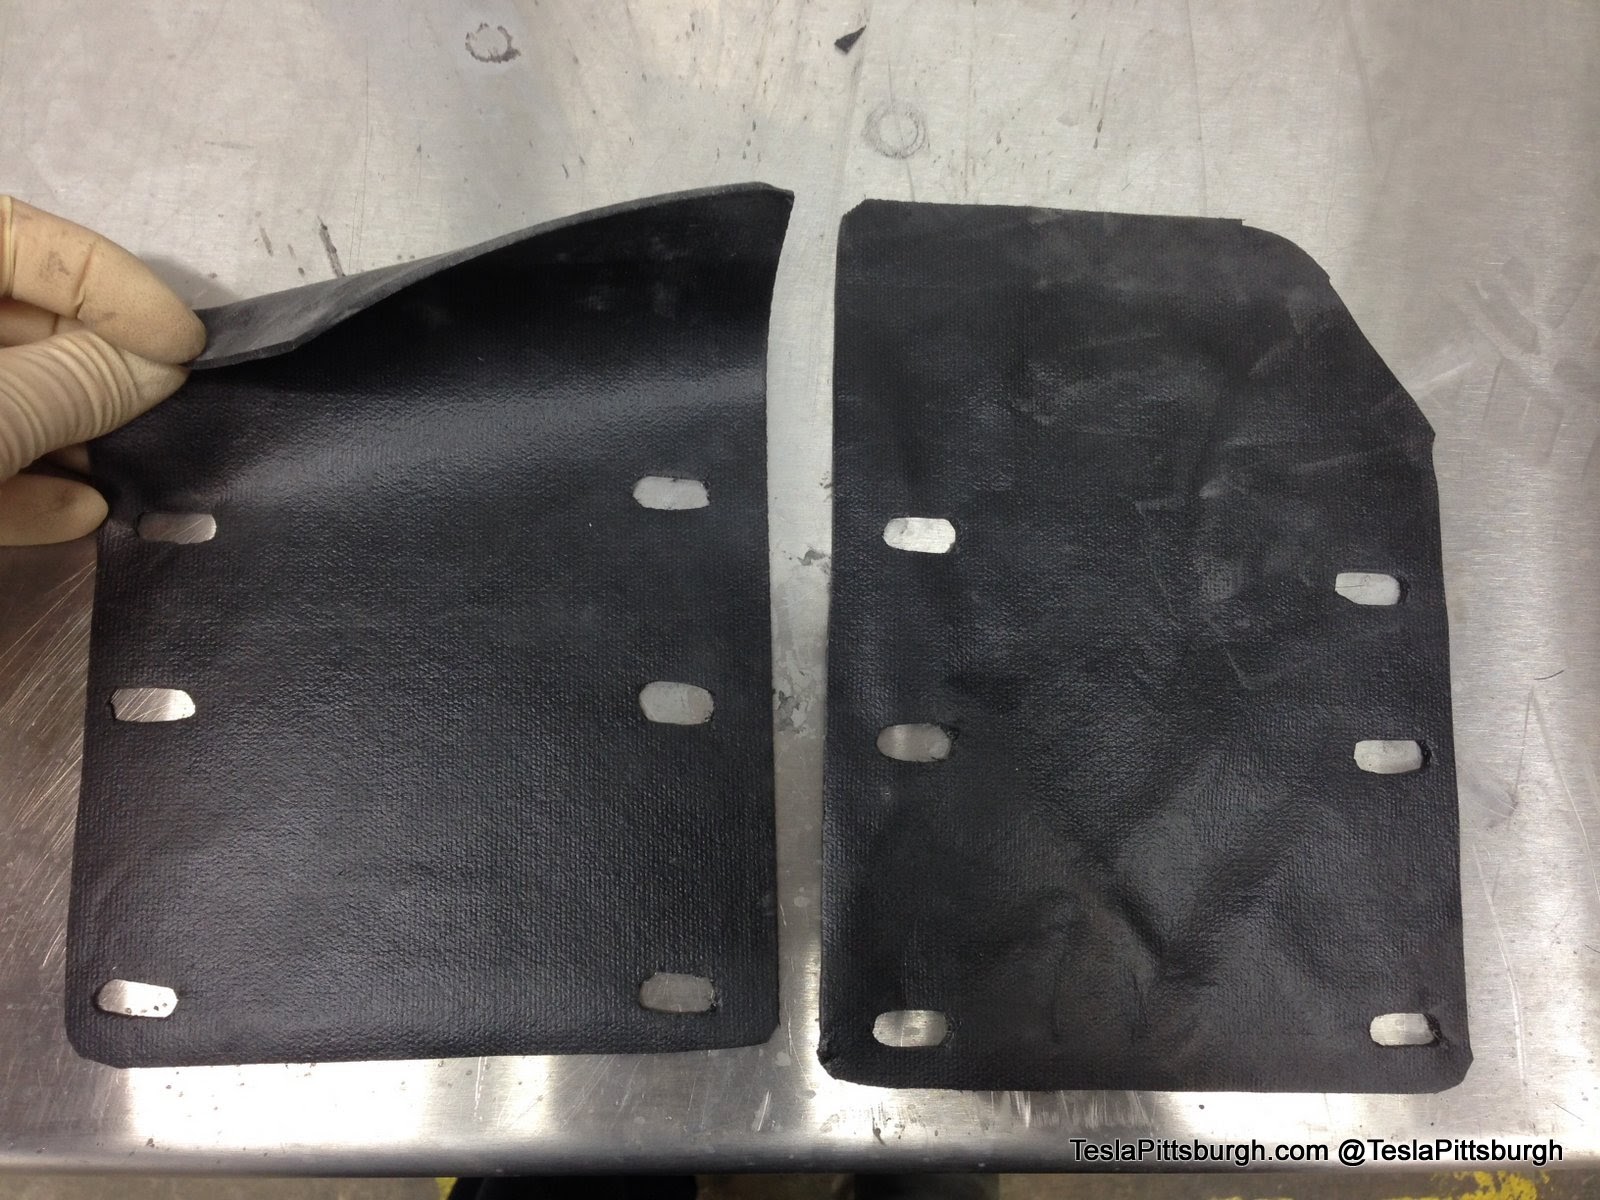
Insulating the bolts wasn’t enough, they also had to isolate the hitch mounting panels. They used a toolbox-lining type material to fabricate large pads to sandwich between the hitch and the rear of the Tesla. In the event the new paint ever wore off, there would still be a physical barrier between the two types of metal.
The good folks at Cochran even resprayed the backside of the steel Tesla bumper crash bar and the hitch’s cover, which had first tipped me off that something was going on in the dark insides of my bumper.

I did reach out to Torklift to see if there was any response or interest in this issue. Cochran had graciously waived most of the charges because my car was already apart for the collision repair, but it seemed reasonable to see if Torklift was willing to help out with what was left. They eventually responded it was their opinion that, essentially, “these things happen.” I was given a one-time offer to remove my hitch, ship it to Washington state (where Torklift is based) and they would repaint it and send it back for me to reinstall, with return shipping at my expense as well.
The initial response from Torklift was disappointing. The market rate to uninstall and reinstall the hitch would be about $300-400 each. The transit/repainting time would mean that, in addition to the $600-800 expense to mess with the hitch, I’d have to schedule two separate trips to a shop to have that work done. Add in the unknown costs to pack and ship a 40-pound chunk of steel across the country, TWICE. And for what? Based on the information I had, it seemed to be a promise of re-coating the hitch in the same finish that had failed and caused all this galvanic corrosion in the first place. Hardly a solution. They offered no alternative mounting instructions or showed any interest in further isolating their steel hitch from the aluminum structure of the Tesla, though it is possible that they did not understand the nature of the corrosion at that time.
So let this be a warning to any Tesla owner who has installed the Torklift Ecohitch. Your experience may vary, but there’s at least some chance that it is quietly eating your Tesla alive in the dark forgotten recesses of your car… completely out of your ability to casually inspect it.
If you’re contemplating a Torklift for your S, you’d be wise to work above and beyond the installation instructions and find a solution with your installer that will keep the hitch isolated from the structure of the car long-term. While it remains the best option for adding a hitch to a Model S (which is why I chose to rehab mine rather than be without it), make sure you understand the implications of “just following the instructions.” Buyer beware.
UPDATE: After this review was posted, Torklift investigated the problems described and is changing their product as a result. You can find their full response in the comments below.
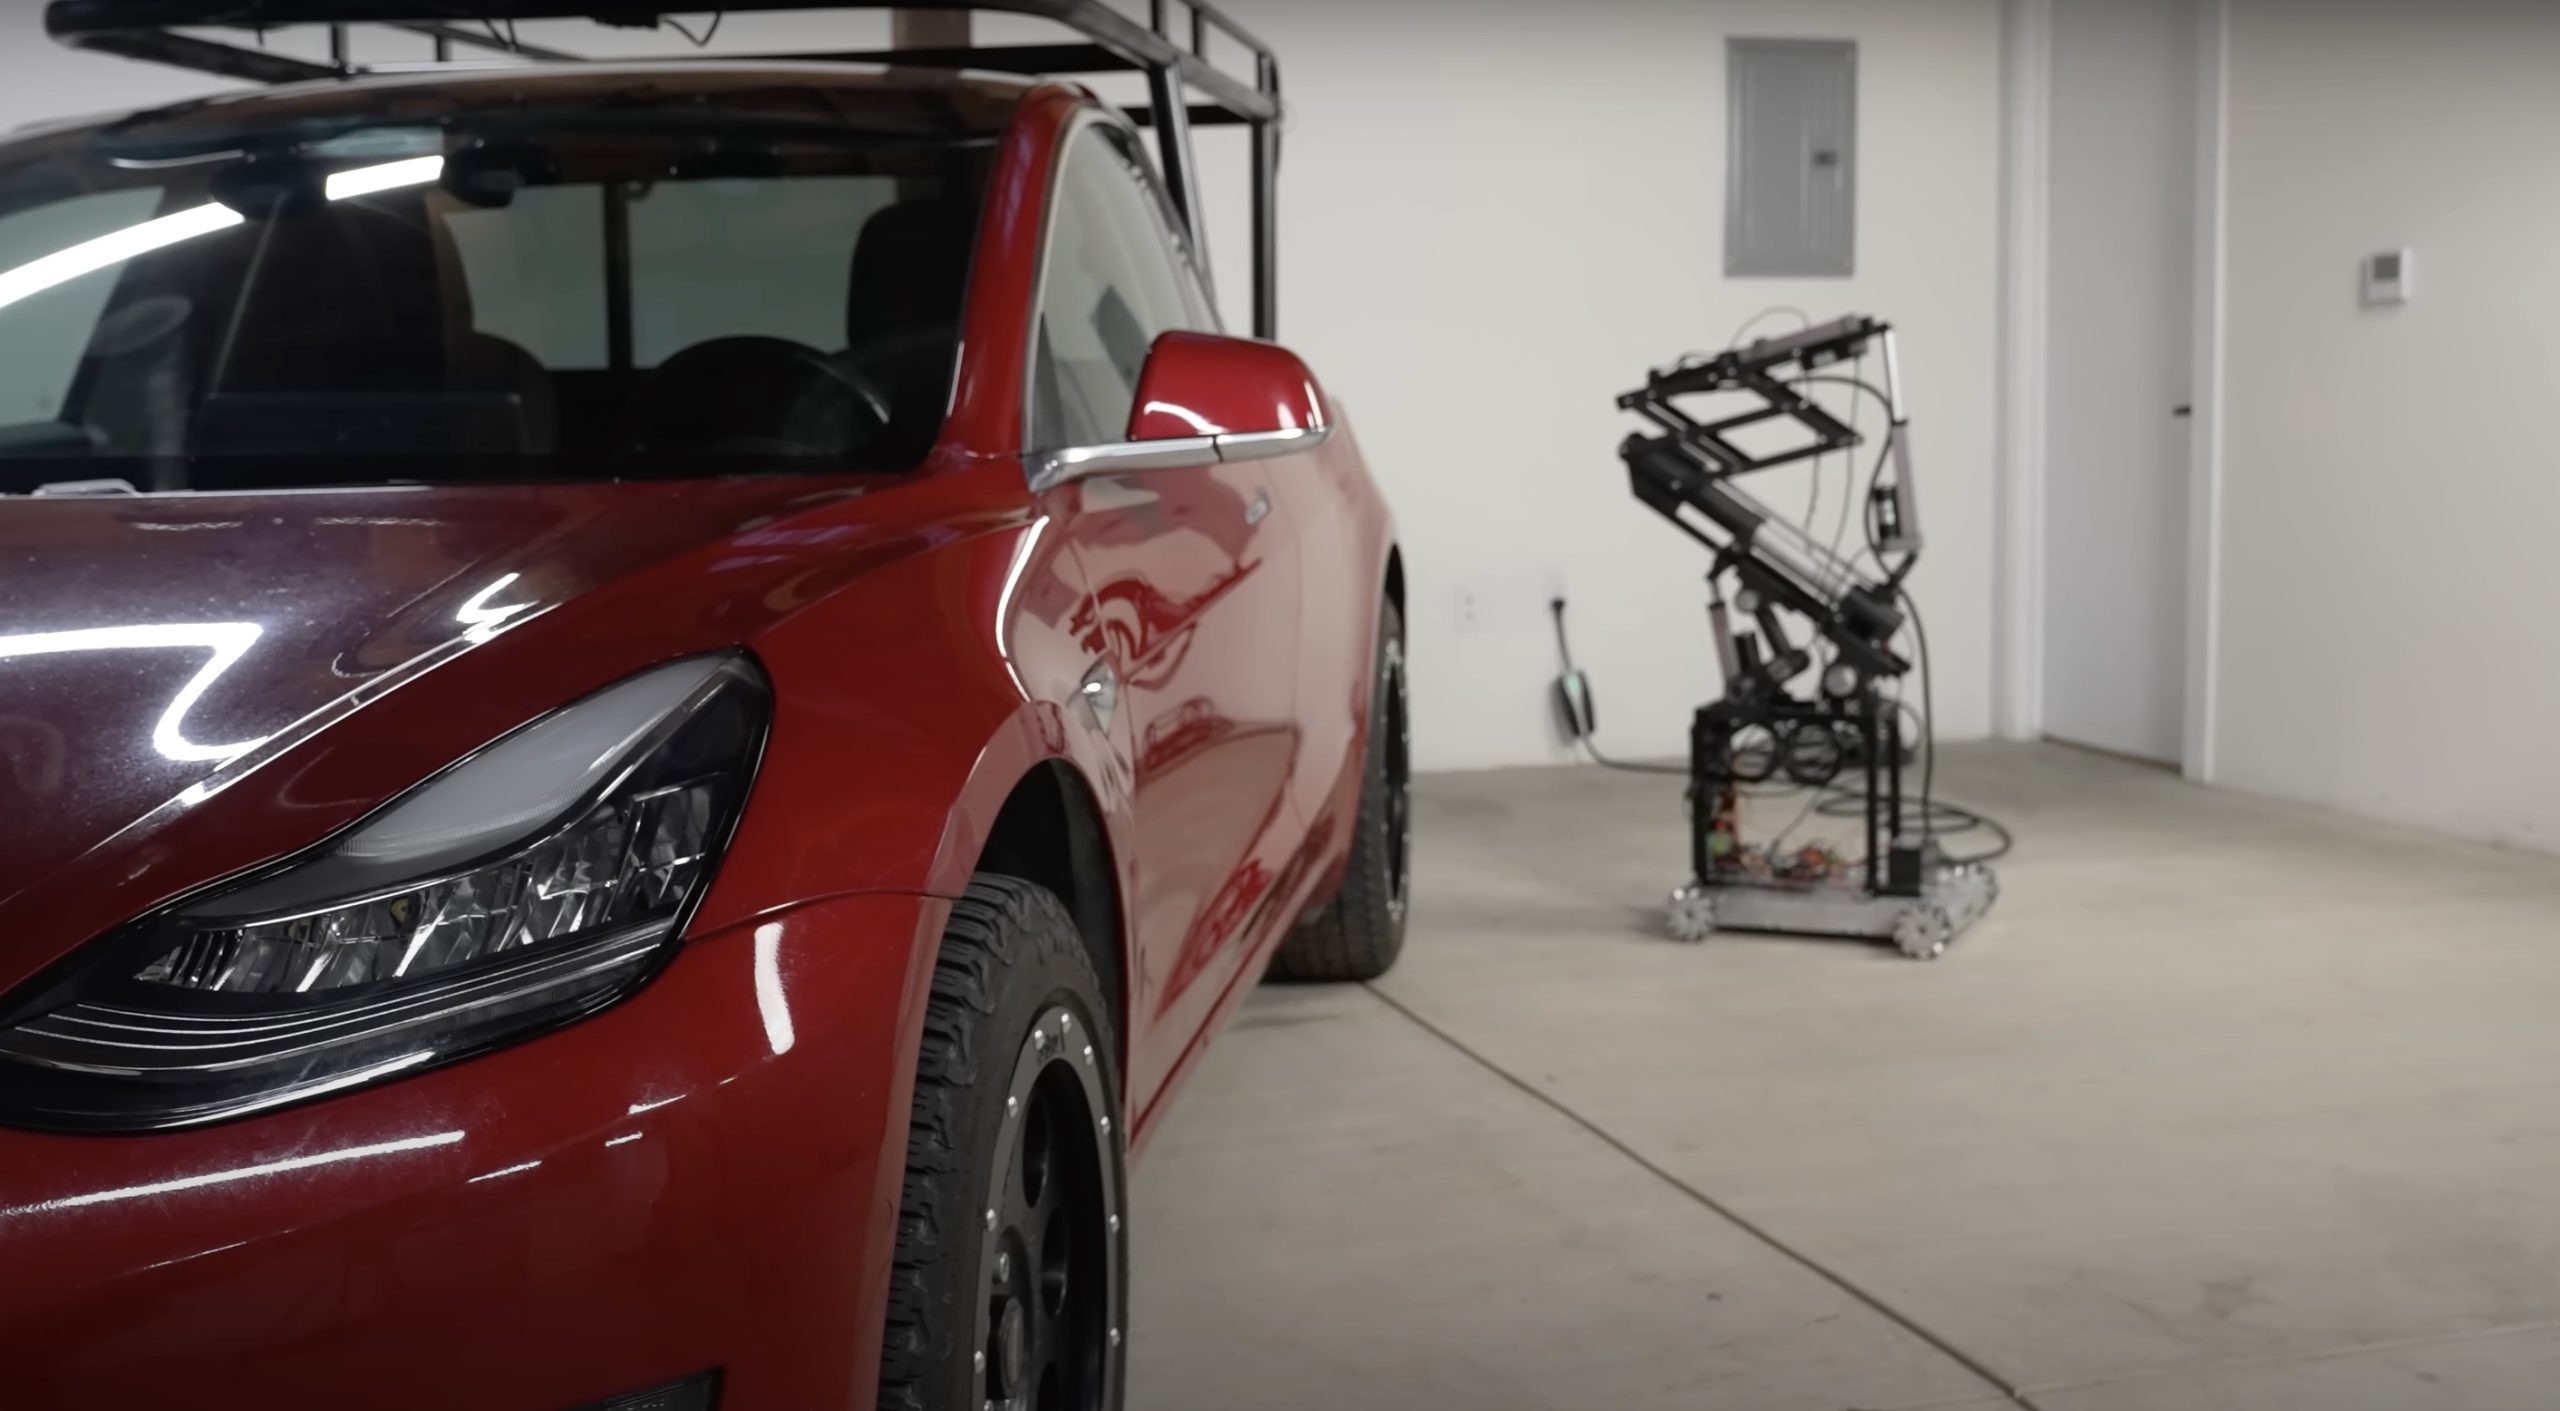
Back in 2019, YouTuber Simone Giertz, the self-proclaimed “Queen of Sh*tty Robots,” created a one-off Tesla Model 3 build that took the automotive world by storm. Fondly dubbed as “Truckla,” Giertz noted that the vehicle was actually her dream car — as crazy as that may sound.
Now almost four years later, the YouTuber posted an update on Truckla. And just like every other big project that one probably started, Giertz stated that she actually stopped working on Truckla when the vehicle was about 80% complete. The car is driving though, but a lot of stuff was not really working very well.
Thus, for her Truckla update, Giertz shared how most of her Model 3 pickup truck conversion was essentially completed. Truckla got a lot of detailing done, she got a slight lift, and she now has a functional tailgate. One has to admit, Truckla’s tailgate is pretty darn cool.
The “Queen of Sh*tty Robots” also opted to give Truckla a friend in the form of an automatic robot charger. Unlike Tesla’s rather interesting snake charger from years past, Truckla’s charger would come in the form of a rover, thanks to her friends at robotics platform Viam. Giertz aptly named Truckla’s robot charger friend “Chargela,” which is an appropriate name for such an invention.
Also true to form for Giertz, Chargela’s first encounter with Truckla was just a tiny bit awkward. One could say that Chargela may have just been a little bit nervous on his first try without human hands helping him. Most importantly, the system did work, so Giertz would likely keep using Chargela for her Model 3 pickup.
Teslas are very tech-heavy vehicles, so projects like Giertz’s Truckla are always remarkable. The fact that the Model 3 works perfectly fine despite having a good chunk of it cut off and turned into a pickup truck bed is mighty impressive any way one looks at it. Overall, Truckla will always be one of the coolest Tesla DIY projects to date, so any updates about the vehicle are always appreciated.
Truckla’s nearly four-year update can be viewed below.
Don’t hesitate to contact us with news tips. Just send a message to simon@teslarati.com to give us a heads up.
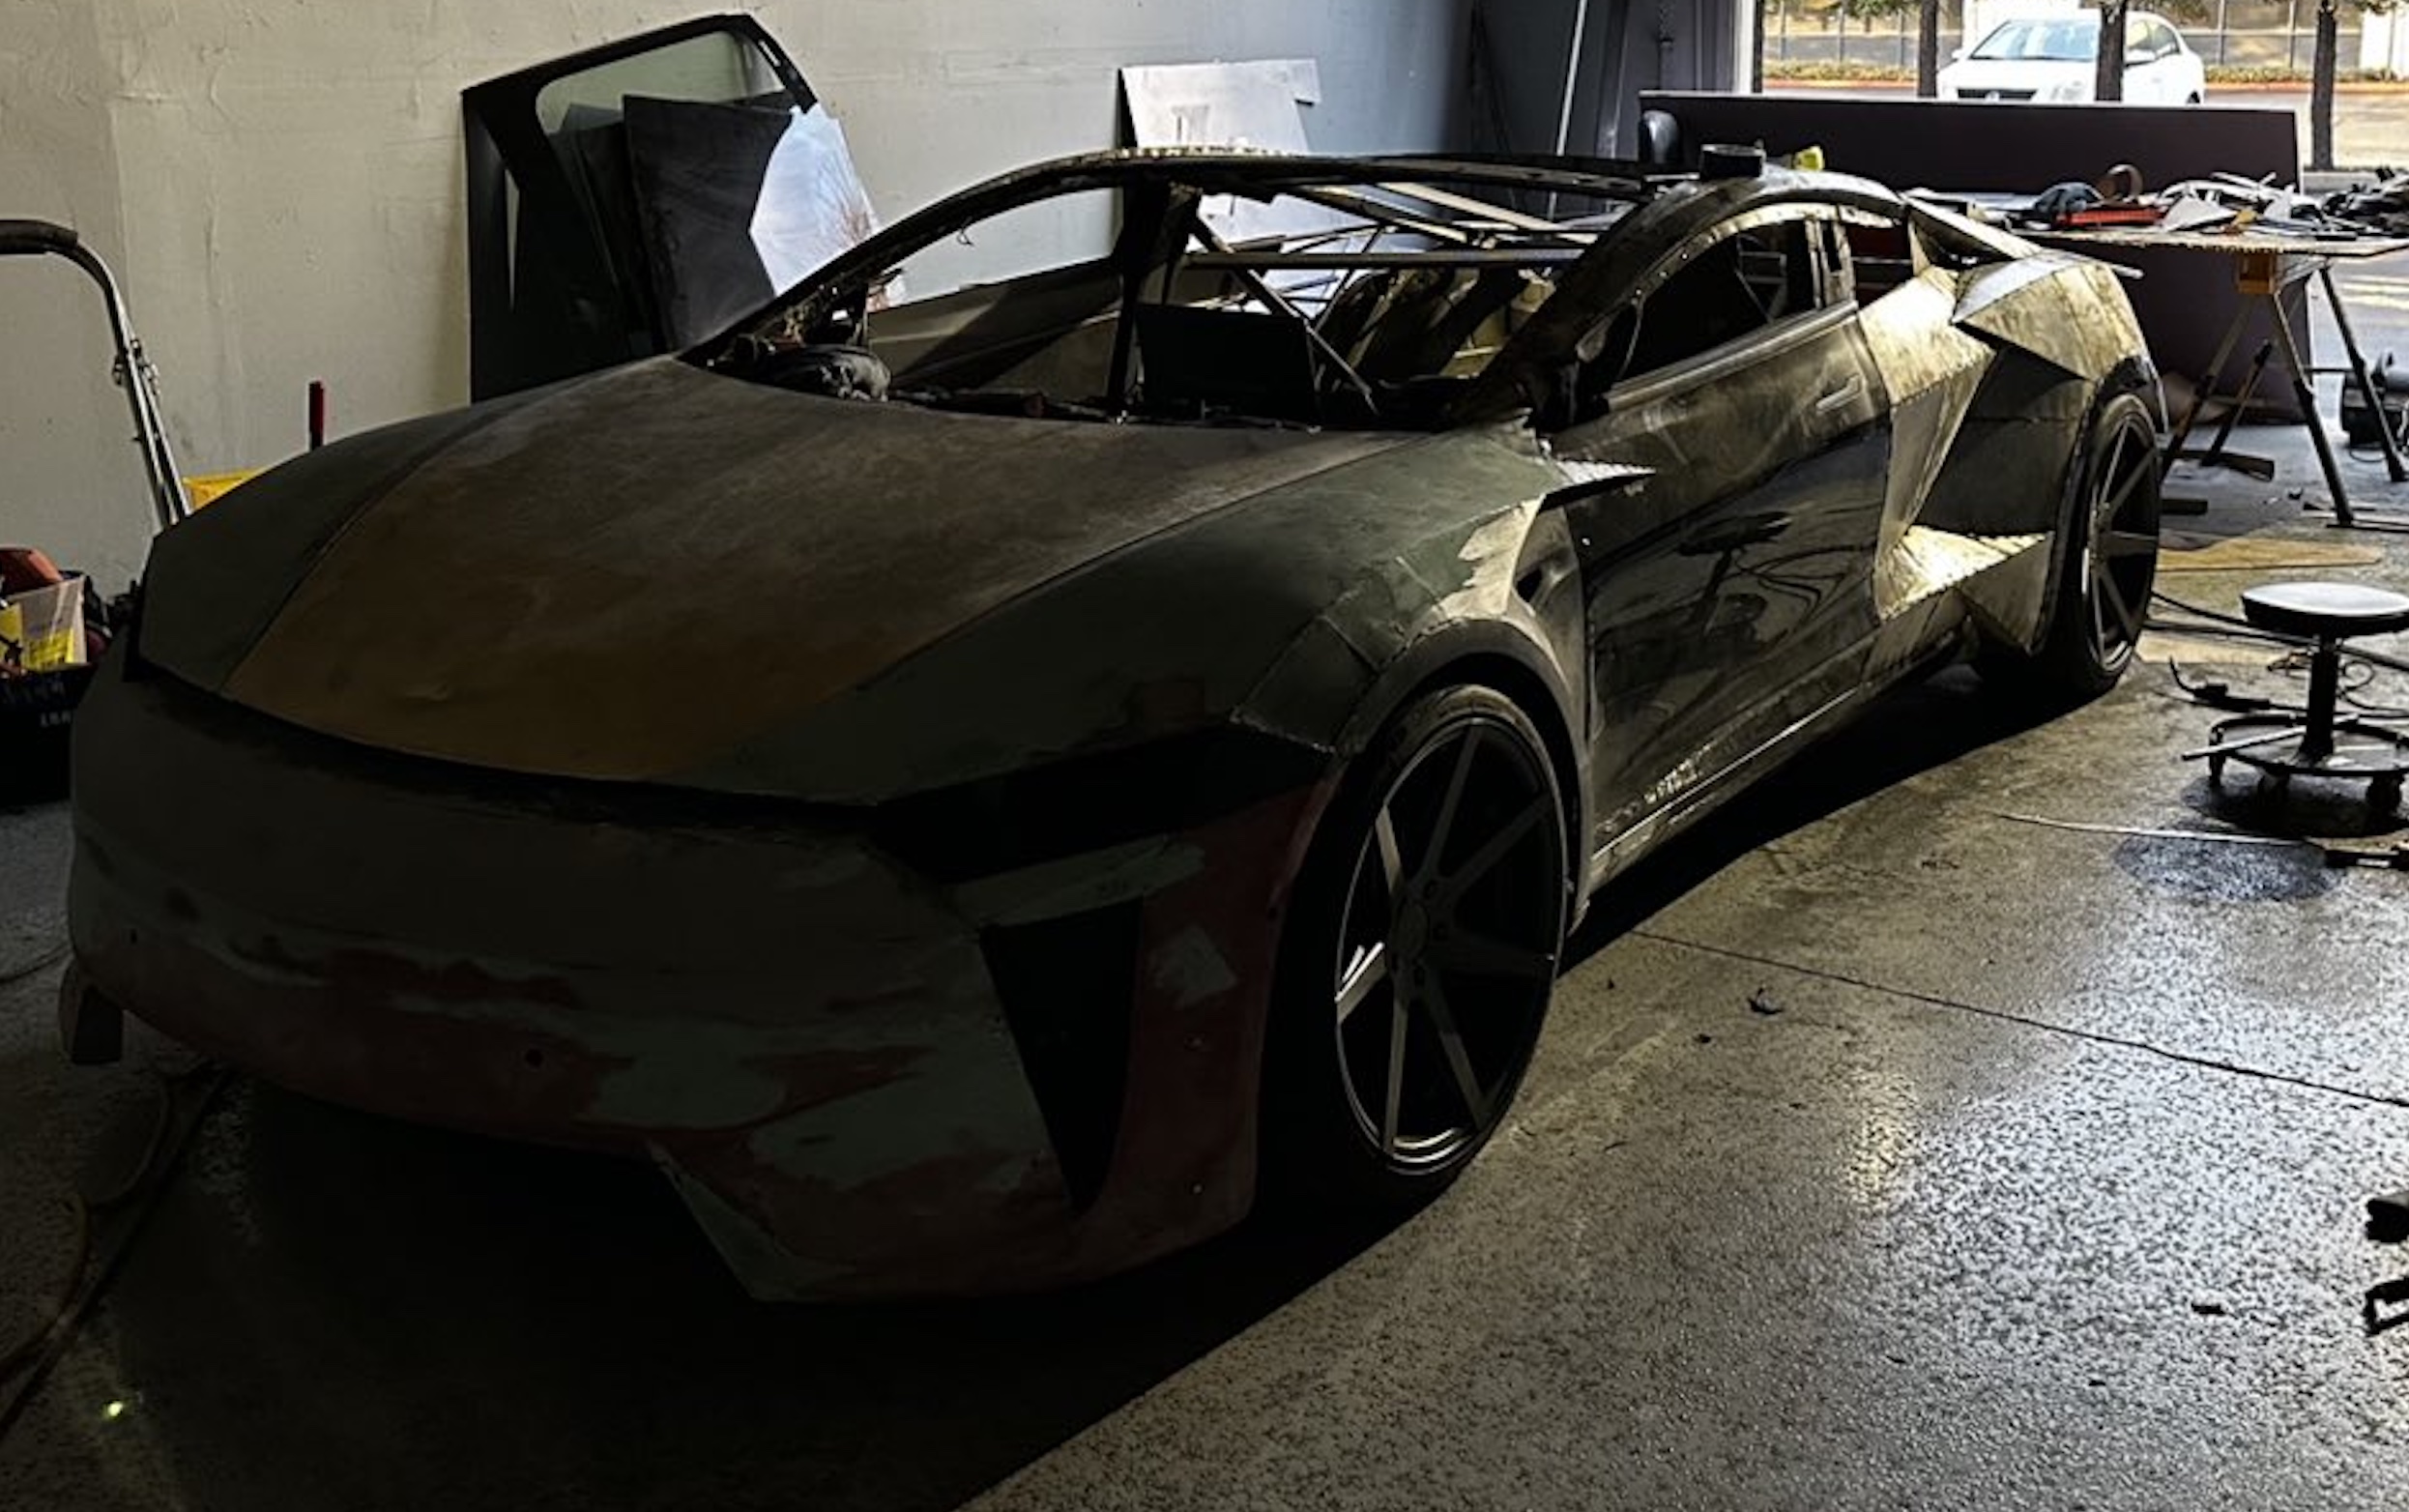
A Tesla owner is taking his hobby and love for electric vehicles to new levels by creating what could only be described as one of the coolest EV-related DIY projects to date. The idea for the project is simple: what happens when you cross a supercar with the Cybertruck? You end up with a two-seater CyberRoadster.
Tesla owner David Andreyev, who goes by the username @Cyber_Hooligan_ on Twitter, has spent the last few months creating a Cybertruck-inspired version of the next-generation Roadster made from a salvaged Model 3 Performance. Starting with a Model 3 Performance is an inspired choice, considering that it is Tesla’s first vehicle that has a dedicated Track Mode.
A look at Andreyev’s YouTube channel, which can be accessed here, shows the meticulous build that the Tesla owner has implemented on the project car. What’s particularly cool about the CyberRoadster is the fact that it’s being built with parts that are also from other Tesla vehicles, like its front bumper that came from a new Model S. Recent videos suggest that the project car’s rear bumper will be from a new Model S as well.
The journey is long for Andreyev, so the completion of the CyberRoadster will likely take some more time. Despite this, seeing the Tesla owner’s DIY journey on such an epic build is more than satisfying. And considering that the CyberRoadster is evidently a labor of love from the Tesla owner, the final results would likely be extremely worth it.
There’s a lot of crazy Tesla modifications that have been done as of late. But some, as it is with a lot of things on the internet these days, have become more silly gimmicks than serious automotive projects. Fortunately, car enthusiasts like Andreyev, who just happen to also love electric vehicles, are taking it upon themselves to create one-of-a-kind EVs that would surely capture the attention of anyone on the road.
Check out the latest video in the CyberRoadster’s creation below.
Don’t hesitate to contact us with news tips. Just send a message to simon@teslarati.com to give us a heads up.
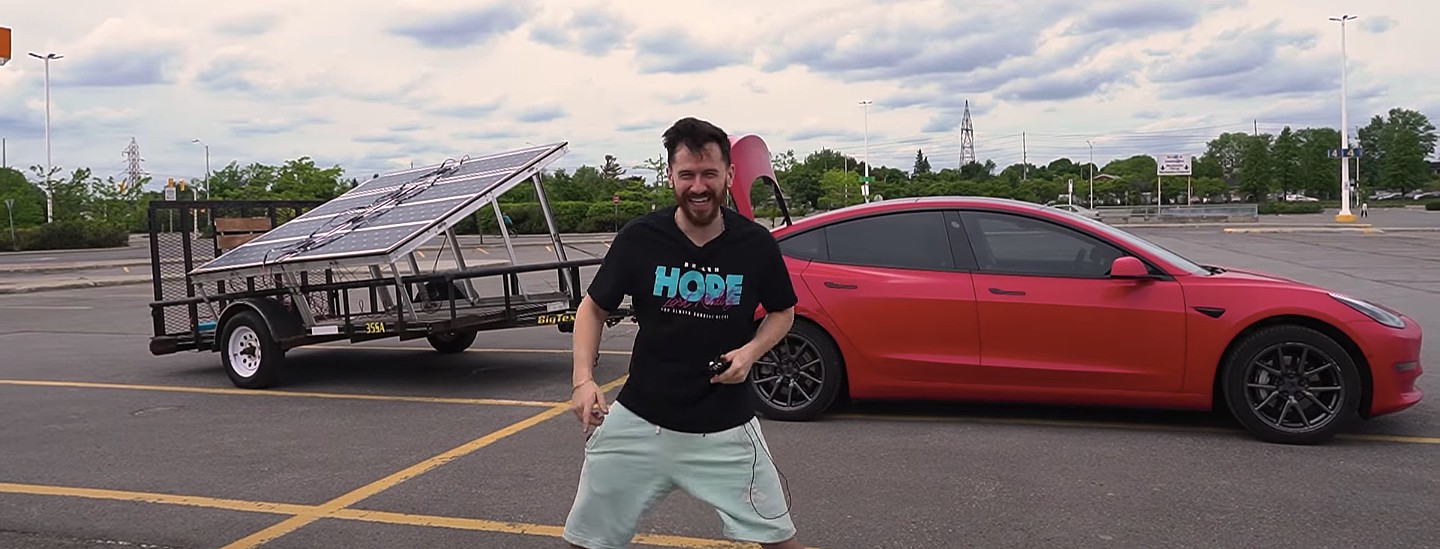
A Tesla owner has demonstrated a rather novel way to charge his Model 3. In a recent video, Sean Callaghan of the ItsYeBoi YouTube channel opted to use a series of off-the-shelf solar panel sheets onto a towable trailer to create a mobile charging unit for his all-electric sedan.
Callaghan planned to use only the sun and the solar sheets purchased from e-commerce platform Wish to charge his Model 3. The solar panel sheets would collect energy from the sun and transfer it to a control panel. The control panels were connected to batteries that would hold the energy—the batteries connected to an inverter, which would then charge the Tesla Model 3.
The entire assembly would provide the Model 3 with about 800 watts of energy on a completely sunny day. However, Callaghan shot the video when weather was overcast, so the entire solar panel trailer build only managed to provide around 300 watts throughout the YouTube host’s test.
To put this into perspective, a 100 volt home wall outlet provides 1.4 kilowatts of power, or 1,400 watts. Therefore, the 300-watt solar panel assembly built by Callaghan was producing less than 25% of the energy of a typical wall outlet. This is pretty marginal compared to Tesla’s 250-kilowatt V3 Superchargers, which provides 250,000 watts, or about 833 times as much power as the makeshift solar panel build.
However, Callaghan’s goal was not to charge the vehicle quickly. He explained the idea came from a previous video where he used a $5,000 Wish-purchased wind turbine to charge his Model 3. He wanted to test the effectiveness and efficiency of the system, which was questionable due to the time it would take to charge the battery fully.
The Model 3 battery pack is 78 kWh, and with Callaghan’s 300-watt system charging his electric vehicle, it would take 260 hours to supply the Tesla’s battery to full capacity.
In the past, electric vehicle enthusiasts have asked Tesla CEO Elon Musk why the company’s vehicles do not contain solar glass roofing, which would charge the car while the owner is driving. Musk has explained that the efficiency of this idea is challenging and likely would not provide an ample amount of range.
When asked about the idea of putting solar panels on the top of Tesla’s vehicles in 2017, Musk responded that the idea was “Not that helpful, because the actual surface of the car is not that much, and cars are often inside. The least efficient place to put solar is on the car.” It also would not be cost-effective for Tesla because “the cost of the panels and electronics, R&D and assembly would never pay for itself in the life of the vehicle, compared to charging from the wall in your garage,” Quartz noted.
That being said, Tesla plans to implement solar panels onto the motorized tonneau of the upcoming Cybertruck. The idea was discussed on Twitter when Musk stated that the optional feature would add “15 miles per day, possibly more” when parked in the sunlight. Also, fold-out solar wings could help capture enough solar energy for 30 to 40 miles a day.
Watch Sean Callaghan’s video of his makeshift solar panel trailer below.

Elon Musk drops a bomb regarding Tesla Model S, X inventory

Tesla Cybercab production ignites with 60 units spotted at Giga Texas


